
Bench Chisels into Dovetail Chisels
I am fortunate to own a few sets of quality chisels which I use for dovetailing, such as this set of Veritas chisels.
These have angled sides with minimal lands, and this enables the chisel blade to fit inside the dovetail socket without bruising the outside corners.

I have long been a fan of Japanese oire nomi (bench chisels), and in particular those made by Kiyohisa. These are no longer available, very expensive in a matched set, and so I have been collecting what I could find and afford over several years. These looked a little rag-tag, and eventually I replaced the handles to create a matched set.

Those familiar with oire nomi are aware that they are not suited to dovetailing as the sides are square and the lands are thick. Essentially, they are firmer-style chisels.

Dovetail angles are typically spoken of as ratios. The slimmest are 1:8, followed by 1:7, 1:6 and 1:5.
Draw a line 1” across and 6” vertical, and this creates an angle with a 1:6 ratio …

My preferred ratios are 1:7 for most hardwoods, and 1:6 for softer woods or where the angles are to be accentuated. If we have a chisel which can fit inside a 1:6 ratio angle, then the 1:7 will fit as well.
An easier way of creating this angle on a sliding bevel is to set it at 9.5 degrees (which is 1:6).

Now transfer this to a length of MDF or plywood (8” x ½” in this example) …

… and sandwich it between two leaves (here, 8” wide). This will create a jig with a 9.5 degree angle …

While one could use a bench grinder, my preference is a vertical belt sander with a 120-grit belt …

Ensure that the platform is at right angles to the face, and then attach the jig …

Belt sanders grind without much heat, unlike bench grinders. Keep your fingers on the blade and dunk it in cool water if it heats up.
Simply place the side of the chisel against the belt, and pull it across the face. Keeping it moving will reduce the chance of heat focussing on one spot.

The side of the blade will grind from the upper side down, and this makes it quite easy to keep track of where the grinding is taking place. The process is far easier than one might expect, and a side of the blade may be completed in just several light runs across the belt. It is possible to vary pressure if one end is grinding faster than the other end.
Eventually, you will reach this stage …

For Japanese chisels, which are blackened, it is possible to return the colour using black oxide. This is one I sourced in Australia ..

The result, after just a few minutes, looks like it was never modified. I like that – it looks original.
This is how I modified all the Kiyohisa oire nomi. However, it should not be viewed as a method for this type of chisel alone, but for all chisels with high sides and thick lands.
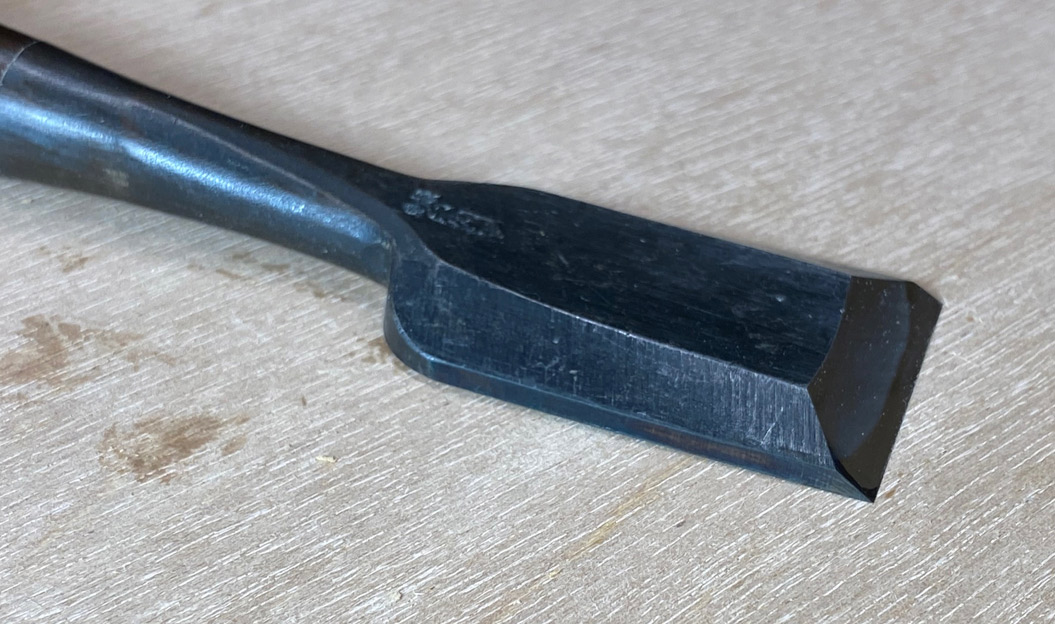
Below is a ubiquitous Stanley yellow handle chisel, to be found in every shed, and a vintage Witherby paring chisel …

The Witherby is worked on the belt sander …

The sides take a few minutes.

Here you can see the result of an added 1:6 ratio angle with minimal lands.

Chisels modified this way will not only fit inside dovetail sockets, but also work with greater precision against all sidewalls.
Derek Cohen
Perth, Australia
April 2021