
By Derek Cohen
When Gary Blum contacted me and asked if I would like to review his planes and publish the results, I thought that he was extremely brave... and obviously confident in his product. For not only has Gary designed and developed a set of handplanes that have some dramatic differences when contrasted with traditional designs, but he was willing to put all this on the line and risk criticism and financial loss.
The Blum planes are indeed different in looks, design and use when compared with many of the more familiar handplanes that are available. These aspects shall be examined in detail in this review of the Smoother and the Fore Plane. The first half of the review concentrates on sharpening issues. This is intwined with the design of the Blum planes and, thus, cannot be glossed over. Still, as best as possible, I shall attempt to capture the experience of using these planes for your own evaluation.
The time frame during which this review article was written was far longer than I originally expected it to be. The planes arrived in February 2008 and this article was completed five months later. In part this was due to my desire to extract the best from these planes, and it did take some time to get to know them well enough in this regard. As you will soon come to appreciate, they are different in many respects, and there were a number of habits I had to unlearn to recognise what to do to make them tick. I suspect that Gary is at a disadvantage in attempting to convey this information because he is too close to them. One of my aims was to shortcut the learning track of any prospective buyer.
Another reason for the length of evaluation was that I have been without my usual workshop facilities over this time. With renovations at home, the garage/workshop was closed and I relocated my workbench and some tools to various parts of my home, such as the rear veranda. Let me tell you that working under the vines might sound romantic, but fighting off mozzies and Perth summer heat is not! However, one consequence of the loss of the workshop was that I had to rationalize the handtools that I would use until all was back to normal. This provided additional opportunity to get to know the Blum planes quite intimately as most of my handplanes went into storage. Among those others retained were two HNT Gordon planes, the Smoother and the Trying Plane, since I considered that these would be a good point of comparison. They are similar in size, similar in concept, and similar in basic construction (that is, wood).


HNT Gordon Trying Plane and Blum Fore Plane ........ HNT Gordon Smoother and Blum Smoother
This is not altogether a fair comparison since their bed angles are different. The Blum planes are bedded at 50 degrees (York pitch), while the HNT Gordon is bedded at 60 degrees (Half pitch). This should be, and was, a significant factor in controlling tearout on the difficult Jarrah in the project that was used for the photo shoot. Still, this gave me a way of assessing the upper end of the range for these planes.
It occurs to me that, while most will understand that the purpose of a smoother is to .. well .. smooth a surface, there may be some confusion over the terms “trying plane” and “fore plane”, particularly when used interchangeably in this discussion.
A “Fore Plane” is the traditional plane to use “before” all other planes, and some will consider it the grandfather of the Jack plane. They are for rougher work, that is, removing wood fast through the use of a moderately heavily cambered blade.
That is not how it is defined here or, more specifically, by Gary in his website. He wrote, “A very handy plane to use as a short jointer or for panel work.” This is, in fact, my definition for a Trying Plane. This is how Terry Gordon envisaged his Trying Plane being used. Terry writes on his website, “(It is for) Smoothing of any long timber surface or for jointing.”
The smoothers were set up with a very fine camber, enough to remove track marks. The trying/fore planes were set up with both a flat blade (for match jointing) and a slightly cambered blade for flattening of board faces.
Most readers are aware that Australian timbers, especially the eucalypts, are notorious for their hardness and interlinked grain. Planes with high cutting angles suit best. My impression is that the US hardwoods are not as demanding, and a 50 degree cutting angle is well suited for the native timbers. The question is whether the Blum planes have something to offer over the more common Stanley bench planes, with their 45 degree (Common pitch) frog, and whether the their differences in blade adjustment are significant. To this end I have included a Stanley Bedrock #604, which is a similar size to the Blum Smoother. The #604 was set up with a Lie-Nielson “Stanley Replacement” A2 iron and cap iron.
Three features stand out when meeting one of the Blum planes for the first time – the all-wood construction, the blade adjustment system, and the blade itself.
The wooden construction is strikingly attractive and a reminder that Gary Blum is first and foremost a furniture maker. A number of wood combinations are offered. Here, the Fore Plane has a Mesquite body and East India Rosewood tote and knob, while the Smoother is has an East India Rosewood body and Cherry tote and knob. The workmanship is excellent and the planes really could just make nice objects d’art.

In this cut-away view and the image below, it can be seen that there are separate left- and right controls for adjusting the blade projection, and left- and right controls for positioning the frog to adjust the size of the mouth.


… with Purpleheart mouth plates.
It is when one gets to the blade and frog that the essence of these plane is seen. The blades are tiny, more like something that would be used in a safety razor than a handplane.
Here is a Blum smoother blade alongside the ¼” thick HNT Gordon blade.

The Blum blades are A2 steel, 3/64” (1.2mm) thick, and either 2” (smoother) or 2 ¼” (fore plane) wide.
To make this work, the frog is a massive steel construction that is 3/4" thick at the bottom and a back-up iron 5/32" thick.

The leading edge of the frog thus becomes
the chipbreaker and guides the shavings up and into the throat.
So how does this all function?
Essentially there are two controls: one set of knobs that adjust the lateral projection or depth of cut, and one set of knobs that adjust the mouth size.
Turn the two Depth Adjusting Screws, situated in the forward section, and the blade with raise or lower. Turn these counter clockwise to increase the blade projection and clockwise to reduce it. It does this by raising or lowering the frog.
The mouth is adjusted in a similar way when using the Mouth Adjusting Thumbscrews.
It is important to loosen (free up) or tighten (lock down) the frog before and after using these knobs with the Star Lock Knob.
Blade changing involves loosening the three screws in the Back-Up Iron and sliding the blade out. The blade is slotted, which makes it easy to refit in the same position as before.

My observations to date:
When I first used the smoother I experienced some chatter on a variety of wood types. This experience illuminated the need to head the recommendation to ensure that all is tight – specifically, tightening the mouth adjusting thumbscrews against the back of the frog after tightening the star lock knob. Gary emphasised this in his reply to my query: “The frog doesn't twist so it is possible that when you tighten the star lock knob it would only seat against one of the mouth thumbscrews”.
When I followed this routine all chatter disappeared. Note that in practice this setup is usually just an occasional housekeeping process since one does not often alter the size of the mouth. Usually one sets it once (for a while) and leaves it in that setting. In this it is little different to any other plane with an adjustable mouth.
The system has minimal backlash and adjustments are positive and immediate. A vast improvement over the Stanleys of this world.
However …
It took me a while to recognise that in a dual adjustment system, when making adjustments to one side, one will automatically make adjustments on the other side. For example, raise the blade on the left, and you will lower it on the right. This is obvious in a Stanley plane when you angle the blade adjustment lever because you have clear visual connection with all that is happening in the moment, but you do not see what adjustments are occurring with the Blum mechanism (and I, clearly a slowhead, awakened to this .. well .. slowly). For all adjustments I relied on using a finger tip each time to judge the amount and position of the projection.
Compared to a Stanley, during the early weeks of use I experienced the Blum system to be unnecessarily finicky. The small knobs felt stiff rather than firm, and too small to turn easily with my sausage fingers. Actually my hand is rather average in size, as are my fingers. It just felt this way. Looking back, it likely needed a couple of months to cease making this comparison and treat the Blum planes on their own merits. Over time these procedures became increasingly familiar and more natural. Now I no longer have to think about what to do and set up is actually faster than on a Stanley plane. Much faster. Removing and replacing a blade requires less than 1 minute.
A handplane is only as good as its blade. The Blum planes will stand or fall on the ability of their blades to be sharpened. This is a pivotal issue.
The small Blum blades do not, themselves, fit into a honing guide and, although I was able to freehand them, this is not a recommended method of honing (if you do want to try freehanding such narrow blades, then use a Side Sharpening technique).
Gary Blum has given much thought to getting them sharp, and I shall run through his method shortly. Over the months I also experimented with several methods, and finally settled on one.
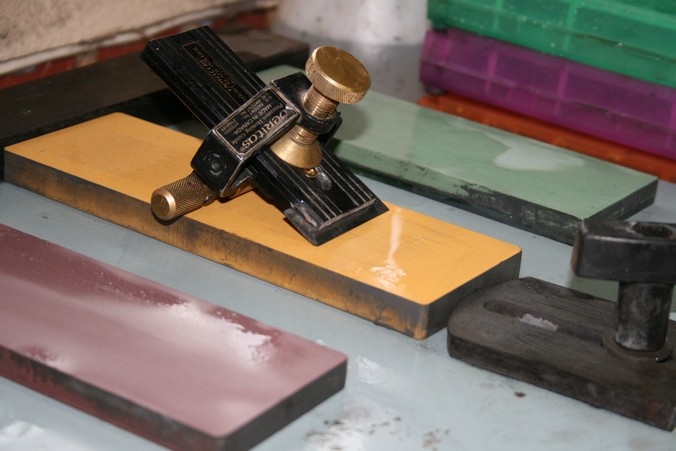
The recommended jig for the Blum blades is double-ended, with one side angled at 34° for coarse honing, and the other end at 35° for a polished microbevel.

The Fixed Angle Jig is 2 1/2" wide, 8" long and 1" thick. Built of UHMW plastic, it is solid and wear resistant. Here it is clamped into my face vise.

On this side the jig is set up to grind a 34° primary bevel. The blade is placed bevel up, and is held by the brass wedges. These slide up and down for greater or less projection over the top (the guide).

I experimented with a variety of hones. These included a selection of Eze-Lap diamond hones, such as the one in the picture, diamond pastes on hardwood, sandpaper grits on hardwood, and waterstones. Gary also recommends oil stones.
Since one is taking the honing media to the blade, rather than vice versa, it is possible (if not preferable) to use a small hone. A 4’ x 2” stone is more than large enough. Below is a 240 grit sandpaper paddle made with hardwood.

Creating a primary bevel is simple and quick with coarse sandpaper or diamond.
Once this stage is complete, the blade is moved to the 35° end. The aim now is to hone a microbevel. Set up the blade with enough projecting above the edge of the upper section so that honing will create a small microbevel.
 In
this picture are a selection of the hones used to create both the
primary bevel and the secondary microbevel. I found using waterstones
too cumbersome owing to their size (mine are the Professional
Shaptons), and settled on a largely “Scary Sharp” system,
ending with Veritas green rouge (0.5 microns) on a hardwood paddle.
In
this picture are a selection of the hones used to create both the
primary bevel and the secondary microbevel. I found using waterstones
too cumbersome owing to their size (mine are the Professional
Shaptons), and settled on a largely “Scary Sharp” system,
ending with Veritas green rouge (0.5 microns) on a hardwood paddle.
The blades were given a fine camber when grinding the primary bevel. This involved a little extra honing pressure at the ends of the blade.
Blades are also easily removed from the clamps to remove the wire edge.
Here is a link to a short video of the Fixed Angle Jig in action.
My initial reaction to this concept was very favourable. It made sense and it promised a way of honing thin blades with control of the angle. I was not clear on why Gary chose 35° as the final bevel angle as I might have chosen 30° for the greater penetration that angle offered. Gary replied that he had not found any significant difference in sharpness achieved by the two angles, and went with the larger angle as it offered a slightly better edge retention. Later I honed the blades at 30° and thought that the edge retention was just fine.
In practice I found this “upside down” method a little frustrating. Power grinding is never necessary with blades this thin. Shaping the primary bevel with sandpaper is quick, and the process with the jig is straight forward. The jig makes it easy to create a 34° primary bevel, and it does this with a built-in “stop”. That is, when this angle is reached all shaping halts – unless one deliberately tilts the hone below the horizontal upper surface of the jig.
My difficulty came in with the polishing side of the jig. The bottom line was that I was not confident that I was honing a microbevel with a repeatable angle. I could create edges sharp enough to plane, but then it was a case of starting a-new when the edge needed to be rehoned. Why was this?
Well, if you place the blade in the 35° end and raise it “enough” to hone the angle, and then hone the angle until the paddle was flush with the surface of the jig, you will have run out of metal to hone. Then you will have to raise it up again to hone the next grit. And if you did not hone all the way until the edge was flush, then the honing angle of the projected edge could not be at 35°.
As a result of this, I was sure that the edge was not as sharp as I could get it.
How did I determine this? One method was the quality of the shaving obtained (my later method produced improved shavings and ease of planing). Another was a simple comparison of shavings on pine end grain:

To cut a long story short, the method that I settled on a honing guide together with the Veritas Small-Blade Holder.

My preference was the original Veritas Honing Guide (pre-Mk II). I used the Mk II very successfully, but the Mk I was available to be dedicated to the Blum blades.
I cannot emphasise enough how easy this set up is to use. It is, in fact, easier to use than the Mk II on traditional blades. The Veritas SB Holder is designed around Rare Earth magnets to secure the blade. In practice this meant that the honing guide could be set up in such a way that blade could be inserted and removed in under about one second. It is even easier than my preferred method of freehand honing hollow ground blades on waterstones.
I compared the speed of the Fixed Angle Jig with freehand honing two freshly hollow ground blades (a HNT Gordon for the smoother and a LN “Stanley Replacement” for the #604), and a Blum blade in the Honing Guide plus SB Holder. This included adding a fine camber in each case.
Since I was not comfortable using my time on the Fixed Angle Jig, I looked at the time Gary took in his video. This was around 9 minutes to go from establishing a primary bevel to a finished edge. This seemed long so I checked with him. Gary stated that it usually took him about 4 minutes to complete this routine in his workshop.
That time is then same as I required to either freehand a blade or used the honing guide system. In other words, all systems are comparable for sharpening speed.
Developing a Set Up for a Honing Guide
The small-blade holder in the honing guide looks like this ..

Here is a picture of the guide being adjusted for a 30 degree primary bevel …

Once this angle is determined, the blade projection can be permanently recorded by making a stop block. This also automatically squares the blade in the guide each time the guide is set up from scratch, such as when changing honing angles.

The procedure involved grinding a 30 degree primary bevel on a DMT Extra Coarse diamond stone. This is a once-off preparation. Altering the bevel from 34 to 30 degrees took under 60 seconds.
Using the Veritas’ in-built facility for a 1° microbevel, one was created on a Shapton 1000 waterstone. This required but a few strokes. The microbevel angle was retained and further polishing took place on 5000 and 8000 Shapton waterstones.
For those who might prefer to use the Veritas Honing Guide Mk II …

… the setting for a 30° bevel is the 35° projection in the Yellow placement ..

Finally we get to the planing!
I captured the performance of the Fore Plane and Smoother during a then-current project. The wood used was hard, figured Jarrah, and the main secondary wood was Tasmanian Oak, also a Eucalypt. Both woods test a planes’ ability to control tearout. I added in a little Cherry and Radiata Pine for a look at the performance on less demanding, softer woods.
Of the two planes the Fore Plane was my favourite. This plane has a wonderful balance and is very comfortable to hold and push. The tote (on both planes) is a four-finger grip. This adds power, but some may experience this as unfamiliar since Stanley planes utilize a three-finger grip.
The plane I usually turn to for cross grain planing when flattening a board is a LV LA Jack with a 37-degree cutting angle. This low angle leaves a smooth finish.
 LV LA Jack on figured Jarrah
 HNT Gordon Trying Plane
 Blum Fore Plane
I was a little conservative in the shavings I took with the Blum as, using it third, the board was pretty flat, and so I opted for a smoothing cut.
All three planes performed well. Neither the HNT Gordon nor the Blum could match the ease of planing with the LV, but this was expected in view of their different cutting angles. The HNT Gordon and Blum were comparable.
Softwood is more of a test than hardwood in this area of planing. Here are thicker shavings on a Radiata Pine board …
 Fore Plane on Radiata Pine
With its adjustable mouth, the Blum Fore Plane is capable of being set up to take fine shavings like a smoother. It was used, however, with a camber to level the board with the grain. With a handful of blades courtesy of Gary Blum, it was easy to swap between blades with a moderate camber and finish with a fine camber.
 Fore Plane on Tasmanian Oak
The Fore Plane was used to match plane Tasmanian Oak boards.

As mentioned earlier, the Fore Plane has an excellent balance and planing edges was a comfortable task.
Here the Fore Plane is jointing hard, figured Jarrah…

A couple of observations.
There is an issue that warrants mention. With every other plane I have used, I have depended on visual feedback to assess whether the cut is centred. Simply put, is the shaving centred at the mouth? This is not as easy with the Blum. You cannot directly see the blade shaving the wood. You can do so by craning your head forward so as to look down the through of the mouth, but this is not really practical.
You also cannot adjust the cut as you plane, but then neither can you do so with BU planes and only with Stanley-based systems.
The upside to the twin-adjustments to blade projection is that you can make very fine alterations. The down side is that the process is more complex as it is not possible to retain a setting balance if all you want is a deeper or shallower cut, as would be the case with a single knob mechanism.
The Blum Smoother
While the Fore Plane was easy to like, I just did not feel the same way about the Smoother at the start. In the hand the plane feels incredibly light. I thought that it might be this since I have come to rely on heavier planes. The Blum smoother just did not feel as powerful as the HNT Gordon smoother. The latter felt heavier, and I put it down to this that factor – until I weighed the planes and discovered that the Blum smoother was the heavier of the two! 1kg verses 860gms (2.2 lbs verses 1.9 lbs).
With the thin blade in my thoughts, perhaps what I was now experiencing was a greater degree of feedback from a plane more sensitive to the wood surface?
The Blum smoother was, nevertheless, capable of excellent performance. A good measure of this was that I trusted to use it as the finish smoother on the figured Jarrah face grain. It left a track-free glassy surface …

The 50° cutting angle performed well on softer woods as well. Here are fine shavings in Pine …

… and in Cherry …

I could not duplicate the delicacy of these shavings with the Bedrock ..

The HNT Gordon smoother, however, performed equally well.

For a final test of the smoother I turned to one of the Jarrah boards I was using. This board, rich in figure, had earlier been nicknamed “The Board from Hell”.
The Bedrock just created moderately deep tearout …

The HNT Gordon produced some very fine shavings and left minimal tearout …

So, how did the Blum smoother do? It did well. Very well …

The final board still had tearout showing but it was not bad – easily good enough to now clean up with cabinet scrapers.

Rating the smoothers? The HNT Gordon is the better plane on this type of wood (keep in mind that it has a higher cutting angle). The Blum is not that far behind. Both are considerably better than the Bedrock. On less demanding woods, such as the Cherry and Radiata Pine, expect that these differences will be reduced significantly. The Blum, nevertheless, should potentially produce the better all-round performance than a Bedrock, if my experience is typical.
Gary Blum has produced a couple of interesting planes here. They are striking in looks, constructed like fine furniture, and rich in features.
The issue with blade sharpening was a significant delay in getting going with these planes. Then there were adjustment differences with which I needed to feel comfortable. Even now I feel that I am not quite there and that they have more to offer.
The Blum planes are light in feel and delicate in touch. They provide superb tactile feedback. Still, this is likely to polarize users as some may, as I did in the beginning, find them a bit finicky. The lack of visual feedback is not a deal breaker, but it may also be an issue for others. Consider that some of the visual feedback is replaced by greater tactile feedback.
As I said early on, the planes stand or fall on the how well the blades are honed. The jury is still out for me in regard to the Fixed Angle Jig. I shall be revisiting it when I review the Sharpening Box (which is the Fixed Angle Jig and much, much more). The FAJ works but I prefer using the honing guide set up. This produced reliable, easy to create sharp edges in a system more familiar to most, and I suspect more likely to be preferred.
The Blum blades are tiny. One advantage is that they are cheap and it is possible to own a number of these blades. Used in different configurations, or just as duplicates, it is possible to change these out very rapidly – far more so than with other planes of a traditional type with cap irons. Another advantage is that they are quick to grind. The A2 steel holds a good edge. The blade/frog combination appears solid. The planes were used in some really hard timber and were able to take moderately thick shavings without chatter.
Rating these planes based upon their performance here, keeping in mind the context created by the timber used, it is evident that cutting angle is a significant determinant of final outcomes. In this context, the Blum planes rank as excellent users for those working moderately complex grain.
Derek Cohen
Perth, Australia
July 2008