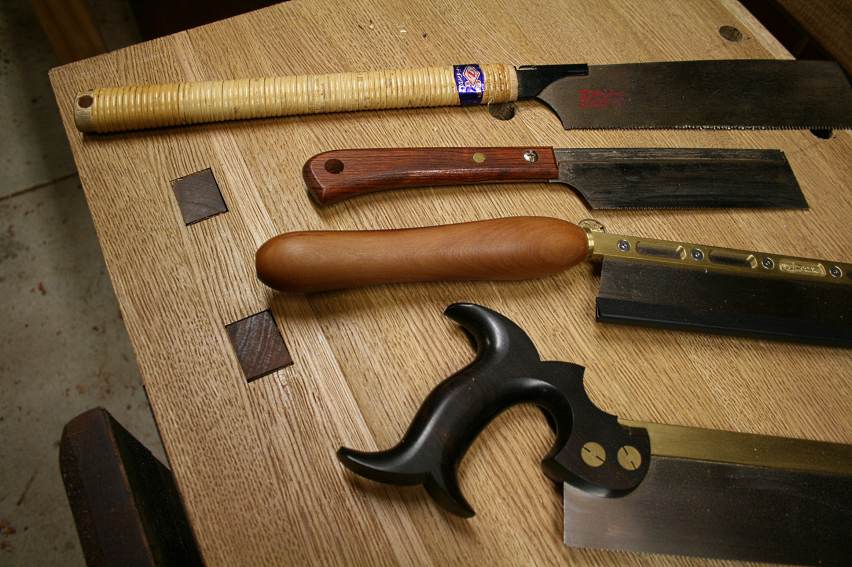
The Glen-Drake Joinery Saw
Kevin Drake is best known for the Tite-Mark marking gauge, a precision instrument that is considered one of the best of its kind. He has also designed and produced a number of other tools, from hammers to backsaws. These all have a certain style that is Kevin’s own, such as the two-handed “Wild West” dovetail saw.
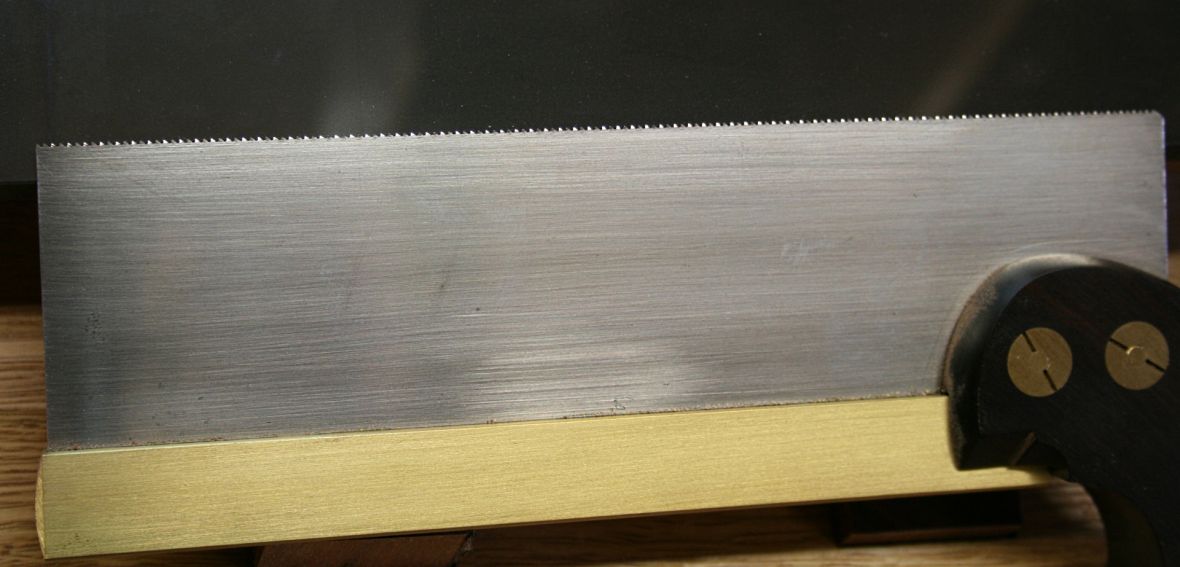
The Joinery Saw is no less interesting in its design. It features an 11” long blade, with teeth only after the first and last 2 ½”. In other words, the first and last 2 ½” does not have teeth. Furthermore, the teeth (in this saw, there are three different configurations) provide a progressive cut, going from 18 tpi (teeth per inch) to 14 tpi and then back to 18 tpi. The plate is a “thin” 0.015” thick and the rip-filed teeth are set with 0.005” for a total kerf of 0.020”.
The handle is designed along ergonomic lines. It is more akin to that of a Gent Saw. It is a push design, although if one wanted to, it is possible to turn the blade around and treat the saw as a pull saw.

The teeth ..

Compared with a Wenzloff & Sons thin plate saw with 20 tpi rip ..
The Joinery Saw was sent to me for review by Eric Brown. Eric’s enthusiasm for this saw was one reason I agreed to look at it. The other was that I was very curious.
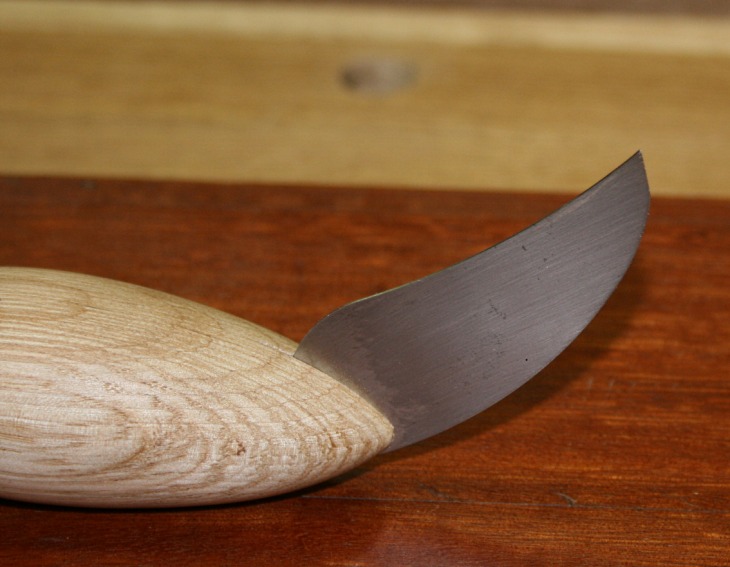
Eric also sent along a Kerf Starter. This is used as one would a marking knife. Instead of a beveled edge, however, it is shaped like a scraper, complete with tiny hook. The steel is the same thickness as the saw blade/set and the hook removes a shaving the width of the saw kerf in which the saw blade rides.
Saw Build
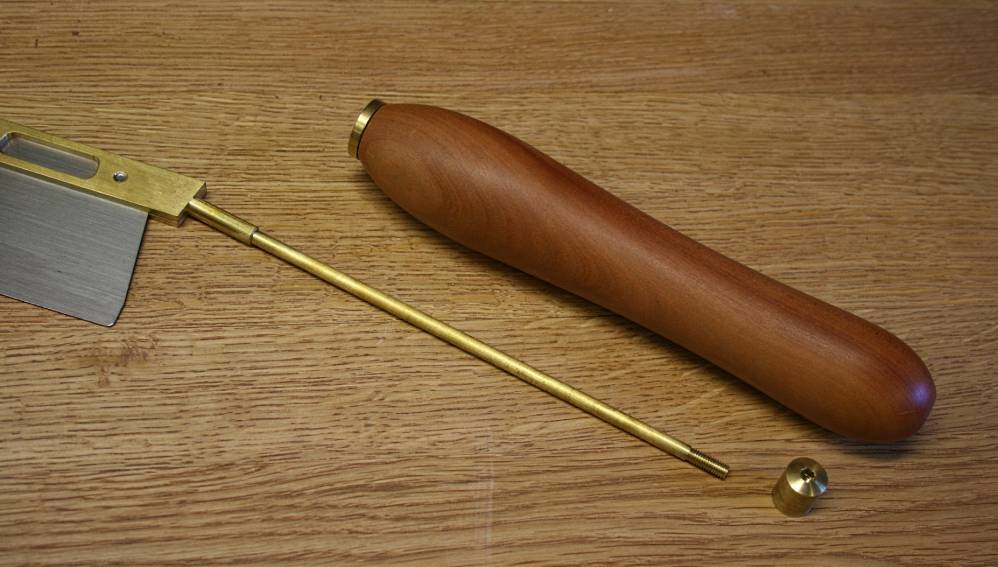
The joinery saw is beautifully made. The hotdog-shaped handle is attached with a rod and screw ala a handplane .
While the saw is fashioned along the lines of a Gent’s Saw, the handle differs in that it is angled. This is one of the ergonomic features for which Kevin’s tools are well known. In this case, the idea is to place the wrist at a more comfortable angle (where the Gent’s Saw handle lies coplanar to the saw back). In practice I thought that there was some substance to this aspect of the design.
Overall, however, I must admit that I did not get on with this handle. My hand is quite broad, yet I found the diameter too wide. The wood is beautifully finished, and then ends up being slippery. The round profile turned my hand and, instead of the saw being light in my hand, I was forced to grip it more tightly. I just could not find a comfortable position.

Below are a few saw handles for comparison. At the top is a Z-saw, and below that is the Veritas rip duzuki. Both are pull saws. The handles are significantly thinner.
Below the joinery saw is a Wenzloff & Sons. Even the handle of this traditional Western push saw feels less thick. This may be also due to its oval profile.
I think that the handle would benefit from having an oval profile. This would provide a reference for angle, as well as be a more natural and secure fit in the hand.
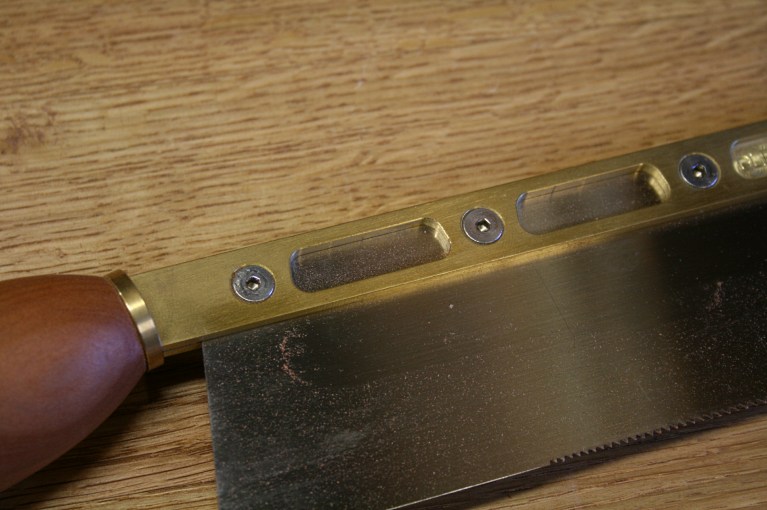
The saw plate is bolted within the brass saw back. This makes it easy to either replace the saw plate (e.g. for sharpening), or it may be reversed and used as a pull saw.
Teeth
There are three saw plates from which to choose.
The finer blade (18 to 14 to 18 TPI) works well in most hardwoods up to 3/4" thick and will cut over 1 3/8" deep. The medium blade (16-12-16) works best in 3/4" to 6/4" hardwoods, and will cut over 1 5/8" deep. The courser blade (14-10-14) works best in woods that are 6/4" and over and will cut over 2 3/8" deep.
The idea of a progressive tooth blade is to enable the saw to start easily (with the fine teeth), and then cut more aggressively (with the coarser teeth). 18 tpi represents the fine tooth.
For comparison I used the thin-plate (0.018”) Wenzloff dovetail saw. This is 20 tpi.
The G-D saw required 7 strokes to reach the ¾” depth in this ¾” wide Jarrah board, while the Wenzloff took 8 strokes.
Overall I do not see this as a significant difference in effort saved, especially as the Wenzloff was the smoother performer.
The Joinery Saw in use
The plan was to saw a set of through dovetails and record my experience of the joinery saw. Keep in mind that I have been using it for a few months.
The wood chosen was Jarrah on one side as Tasmanian Oak on the other. Both boards were ¾” thick, which is at the limit recommended for this saw. The Jarrah would test the saw’s ability to cope with hard wood, while the Tasmanian Oak is a medium hard wood.
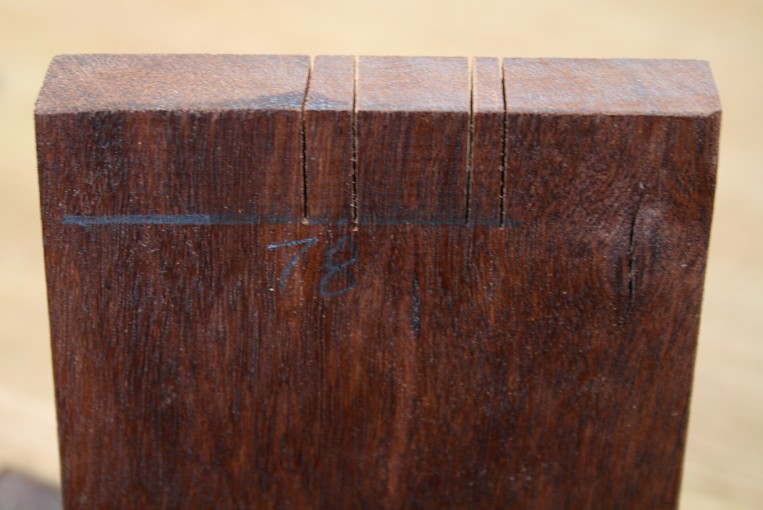
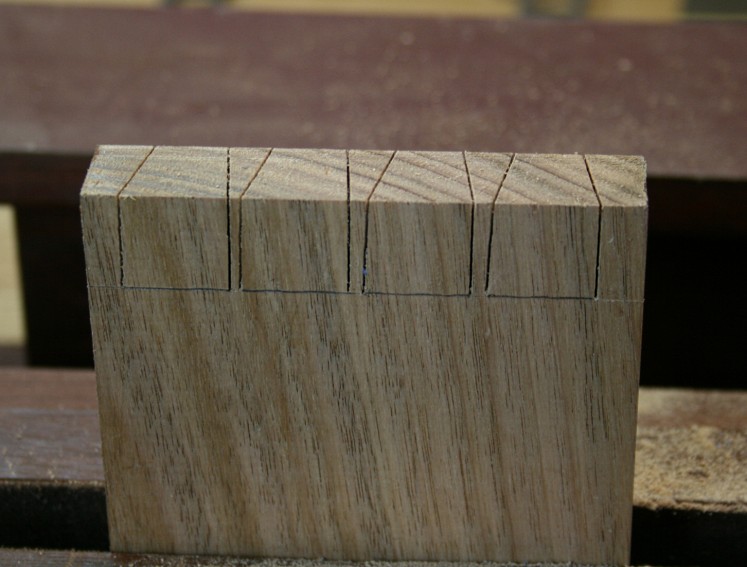
The Kerf Starter was used to mark out the dovetails.

I like the way this tool created a clean kerf for the saw. I can see it being particularly useful for beginners and advanced users alike.
Here is the marked edge, now ready for sawing.

I am not sure whether Kevin would advocate scoring the diagonal lines with the kerf starter or not. I chose to pencil them in, as is my usual method.

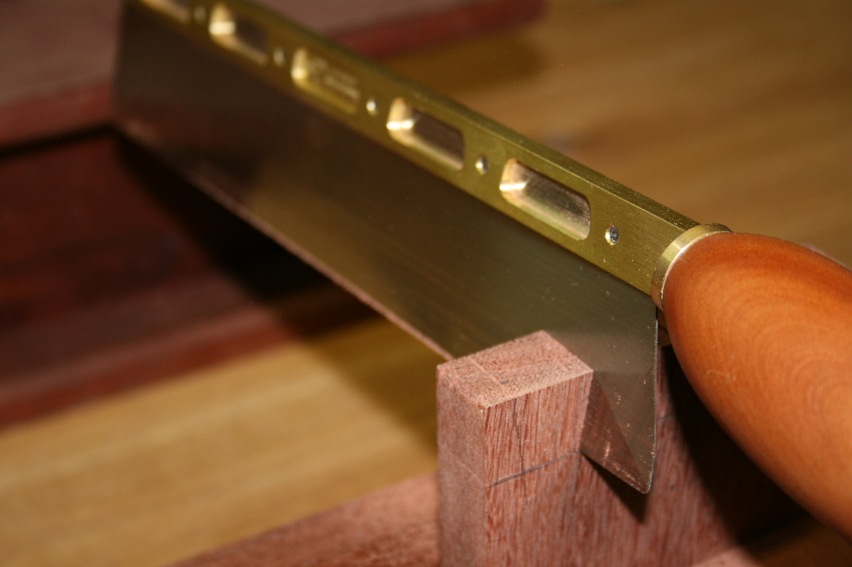
Using the joinery saw one must begin the cut with the smooth end of the plate. This allows the saw to gain momentum as it moves into the fine teeth, and then powers through the coarser teeth.

If one attempted to start the saw cut at this point, you may engage the coarse teeth, and the result will be the saw sticking.

The saw stroke continues through to the end of the plate, where it winds down through another set of fine teeth, and then comes to rest in the smooth area.
In practice I found the saw starts smoothly, accelerates into the finer teeth, and then hits the “gravel” with the coarse. Almost as soon as you reach this stage, the deceleration begins, and you wind down to the heel of the saw.
In this hard Jarrah, hitting the gravel created a rough ride. In the medium hard Tasmanian Oak, the ride was much smoother.
The thin blade and fine set left a clean kerf in its wake. Some may not get on with the feel of the saw, but no one will criticize the result it achieves.

Turning the board on its side to make the side cuts, I chose to saw the original gauge marks one one edge. This was not a success as I placed the toothless plate on the thin line … and it proceeded to skate along, and ended up sawing a tad over the line. This is going to leave a slight gap in the final result.

For the other side I used the kerf starter to create a kerf for the saw. The result was entirely different, and I was rewarded with a near-perfect corner off the saw.

Overall, the cross-cutting performance of this saw was quite impressive.
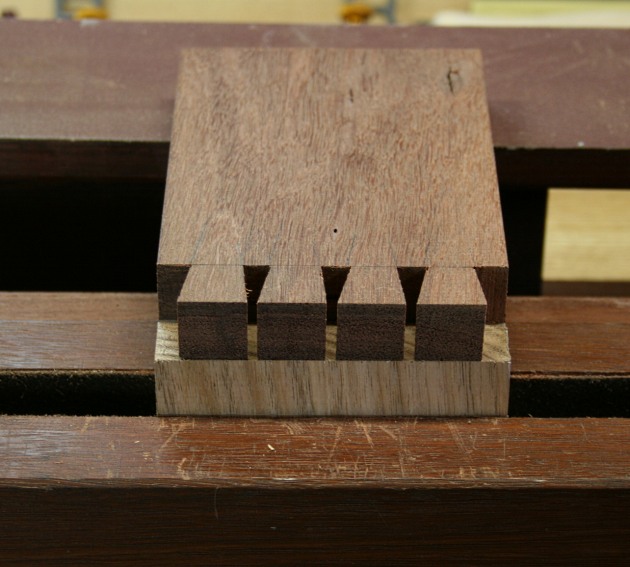
With the tail board sawn and waste cleared, it was time to mark out the pin board. This produced a slight dilemma …
Does one use the kerf starter to mark the tails?
Answer – no. If you use the kerf starter directly you will end up cutting into the pins (not the waste). A fine line from a knife will preserve the pins. (I am sure that Kevin would suggest using his offset gauge here, but this is just one more tool to use).
To demonstrate this I covered the endgrain in blue tape, and then transferred the lines with a fine knife.

The width of the knifed line is a tiny fraction of the kerf starter, and although it is in the pin area, it takes up about the same room as the glue.

Here is the sawn pin board. Compared with the hard Jarrah, there was less impact when sawing this Oak. It was, nevertheless, noticeable.
Again, the kerfs are clean, slim and sharp.
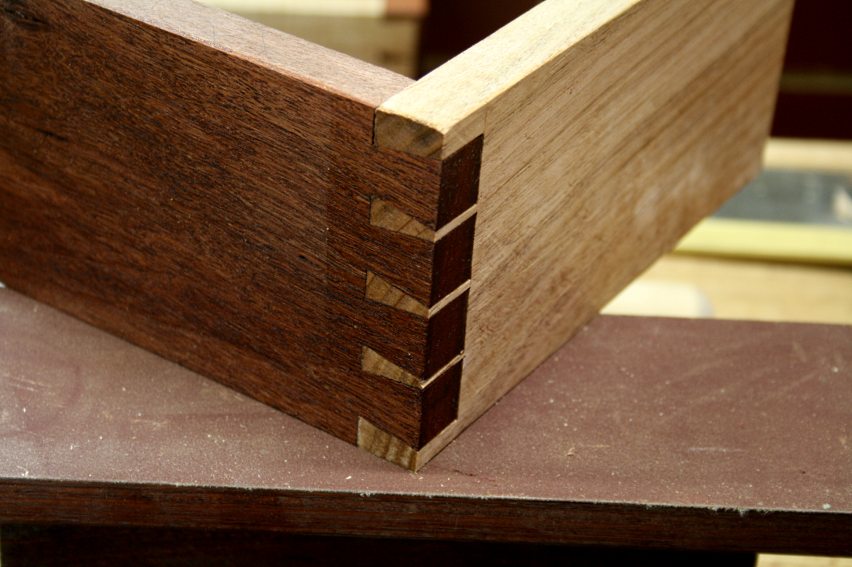
Here is the final result. With the exception of the over sawn shoulder, all went together tightly.
Summing Up
This is a dovetail saw that is designed to make the task of sawing easier and more accurate. It’s all about getting the saw to track straight and with the least resistance at the start of the cut, since a jerky start can throw the blade off line. The problem with dovetail saws is that they fit the kerf tightly and cannot be steered once underway. Kevin Drake’s solution is to focus on the start of the cut. It does this with a combination of strategies in the shape of the kerf starter and the toothless toe of the saw plate.
However control is often at the expense of speed. To make up for the slower fine teeth, the joinery saw includes coarse teeth in the middle of the blade. This does work .. but the transition from fine- to coarse teeth is noticeable, and for some this will be unacceptable. The only way to determine whether this is for you is to try it yourself.
Is the progressive tooth configuration an advance over the traditional singular variety? In my opinion, it is just as easily to replicate by altering the pitch of the teeth - the less upright the teeth, the easier they start a saw cut. Even this can be bettered by presenting the teeth to the wood at a higher angle, since this effectively reduces the pitch angle. In other words, with experience one learns to saw at the right angle for the start and in the middle of the cut.
The saw is beautifully made. However I consider that it is let down by the handle which lacks control in spite of an ergonomic advantage over the traditional gent saw handle.
It may be argued that there are too many gimmicks here, that the saw is intended for a novice rather than the experienced handsaw user. Certainly, I do expect that more experienced users will not seek out the saw. One may, on the other hand, use the kerf starter. I do believe that it offers something useful to all in the most important area in sawing dovetails – the square kerf at the start of the tail.
So, overall this is an interesting, innovative design, which seeks to look afresh at the requirements of sawing dovetails. For that alone Kevin deserves our admiration.
Regards from Perth
Derek
March 2012