
The Veritas (Lee Valley) Bevel Up Jointer
|
The
Joynter is made fomewhat longer than the Fore-plane, and hath its
Sole perfectly ftraight from end to end. Its Office is to follow
the Fore-plane, and to fhoot an edge perfectly ftraight, and not
only an edge, but alfo a Board of any thicknefs; efpecially when
a Joynt is to be fhot. |
I won’t disguise the fact that I was excited to receive the Bevel Up Jointer (BUJ) from LV for feedback. Each of the LV bevel up planes I have had the opportunity to use has proved to be an advance on the handplanes I had been using up to that point.
My user jointer is a Type 11 Stanley #7, which dates to 1910 -1918. It has been tweaked and tuned, and performs about as well as it ever could. This #7 uses a Japanese laminated Smoothcut blade and this is supported by a thick Clifton two-piece cap iron. I am particularly taken with the blade, which holds an edge for a long time. This #7 is a good plane, however its cutting angle is 45 degrees, which is not ideal for hardwoods, particularly those with interlinked grain. Working with challenging hardwoods, a constant issue is the avoidance of tearout. When tearout occurs, it is not just the frustration of repairing the damage, but it is especially the need to re-plane a section, and the resultant alteration to the dimensions of the piece.
One of the promises of the BUJ is that it is possible to quickly alter the cutting angle, changing from low angle (37°) to standard angle (45°) or York angle (50°) and, ultimately, a high angle (62°). The only other similar length plane I have used with a high angle bed is the 60° HINT Gordon Trying Plane. This is a terrific plane and one that is certainly capable of taming Australian hardwoods. The downside is, at 18” it is about the same length as a #6. The BUJ is 22” long, the same length as my #7. The BUJ could compete against both the #7 and the #8 since the sole includes an extra 1” between the toe and the mouth.
Hand-in-hand with the ability to alter the cutting angle is the BUJs’ adjustable mouth. In line with the rest of the LV BU range this plane can, with the twist of a knob, rapidly alter from a thick, rank cut to a fine, smoothing cut. This feature, along with the high cutting angle, should translate into tearout-free planing.
A third area of interest lies with the planing action of the BUJ. It is a case of the low bed of the BUJ verses the high frog of the more traditional Stanley. Can one experience the different centres of gravity and, if so, how is it significant?
But wait – there’s more! Two reviews for the price of one!
LV is offering a companion Jointer Fence for the BUJ. This is designed to make it easier to maintain square edges when jointing. It functions in a similar manner to the Stanley #386 Gauge. I thought it would be interesting to compare these two guides, as well as offering a few related ideas that might prove useful in the workshop.
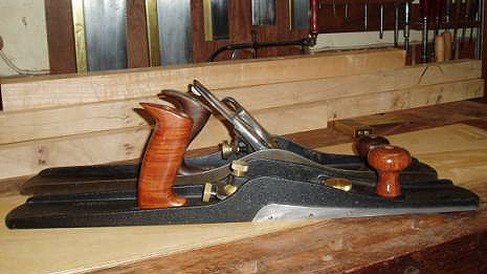
The LV Bevel Up Jointer Plane
The production of the LV BU Jointer plane completes a three-plane family that comprises the BU Smoother, LA Jack and the BU Jointer. These planes share the same blade size as well as a family resemblance of features, such as an adjustable mouth and bed angle.

Front to back: Bevel Up Jointer, Low Angle Jack, and Bevel Up Smoother.
Let us take a look at the specific features offered by the BUJ:

The BUJ …
Is constructed from “fully stress-relieved ductile iron”. Ductile iron differs from the cast iron used by Stanley. It is durable and stable. Unlike cast iron, if dropped onto a concrete floor it will not crack or break.
Is designed with a low centre of gravity. This is a consequence of the bevel up design and the low bed angle of 12° (compared to the 45° bed/frog of a bevel down plane).
Has a wide range of effective cutting angles. Since the cutting angle is obtained from the bevel angle of the blade’s cutting edge together with the bed angle, altering the bevel angle will alter the cutting angle. Common cutting angles used on planes include a low angle (total 37°), standard angle (total 45°), York angle (total 50°), and high angle (total 62°).
Uses a thick blade (3/16”) to aid stability and reduce the possibility of chatter. This is made of A2 tool steel hardened to Rc60-62.
With its adjustable mouth it has the capability to be set up for the finest of shavings or a rank, coarse cut.
Blade stability is further increased through
alignment by set screws on each side of the blade, and
a long and wide bed that supports the blade down to the mouth.

Set screws on each side hold the blade securely in place
Provision is made to attach a jointer fence (the two outer screw holes).
A substantial front knob and rear tote. The rear tote has double bolts for additional rigidity (compared to traditional bench planes such as the Stanley, which use only one bolt).
Precise blade adjustment (through a Norris-style adjuster). Blade adjustment is in two planes – blade projection and lateral adjustment.
A set back mouth. While it shares the same overall length as the Stanley #7, the BUJ has its mouth set further back and at the same distance from the toe as that of a Stanley #8. This offers the equivalent registration area as a #8 jointer plane. The rear of the sole (mouth to heel) is the same as a #7.

Mouth position and sole length of BUJ (top) and Stanley #7 (bottom) compared
The adjustable mouth also features a screw stop that permits returnable settings. The mouth can be opened to clear it of debris, then reset to its previous position. The mouth of the BUJ differs from that of its siblings owing to the longer length of the sole.

Where twisting the front knob controls the BUS and LAJ, the BUJ uses the brass Toe Locking Knob.
In the background ….
I spent about a month becoming familiar with the BUJ before beginning this review. As part of the current investigations I set out to use it in a real world setting, that is, while building a piece of furniture, a sofa table. I thought that it would be an interesting experiment to limit bench planes to just the BUJ since this might provide the opportunity to assess its versatility with regard to cutting angles. In reality this meant no smoother, no block plane, and no jack plane. Since the design I had in mind would involve a few curves, I included a spokeshave (my trusty Stanley #53 in the main, but occasionally also the LV LA Spokeshave – still getting to know this one). In the end I also wound up using a card scraper to smooth some tear out. Illustrations of these in use are included for the sake of continuity.
Now, before anyone begins to anticipate a complete Neanderthal construction, think again. The timber I use is almost always recycled salvage. Typically, it could be ex-roof trusses, beams or floor boards. This sofa table was to be constructed from three old Jarrah floorboards (for the tabletop) and a couple of Blackbutt roof pillars (for the legs and frame). These timbers have hardness ratings of 8.5 kN and 9.5 kN respectively (for comparison, American Douglas Fir has a rating of 3.2 kN).
Jarrah is prized amongst cabinetmakers for its red tones and fine figure, while Blackbutt, a straw coloured timber, is tougher than old boots and better known for use as flooring and telephone poles.
The Blackbutt was resawn on my bandsaw, then ripped into lengths on the tablesaw.

Resawing Blackbutt

Ready to go!
Investigating the promise
To evaluate the BUJ, it was used alongside my Stanley #7. Consideration was given to including a #8 as well, but the overall size of the BUJ places it in direct competition with the #7. The BUJ was assessed in two cutting angle configurations.
Firstly, it was set up and used with a cutting angle of 45° since this is the standard configuration of the Stanley #7. This was done to determine whether there were differences between the two planes, both in performance and in action, so equalizing the blade cutting angle was necessary. Mouth size was also adjusted to the smallest possible to make fine shavings (since amount of tearout was to be primary area of evaluation).
Secondly, the BUJ was set up with a cutting angle of 62°, the high angle mode that I use with smoothers. The purpose of this was to explore the advantage the BUJ had over the Stanley (that is, could it significantly reduce tearout).
All blades were honed to 8000 (1.2 microns) on King waterstones using a LV Honing Guide Mk II for reliability of bevel angle.

LV Bevel Up Jointer on the left and Stanley #7 on the right

Stanley
#7
A breakdown of their features is as follows:
|
|
LV Bevel Up Jointer |
Stanley #7 Jointer |
Stanley #8 Jointer |
|
Length |
22”/559mm |
22”/559mm |
23 7/8”/ 606mm |
|
Width of blade |
2 ¼ ” |
2 3/8” |
|
|
Toe to Mouth |
7 7/8”/200mm |
7 5/16”/185mm |
7 7/8”/200mm |
|
Weight |
7 ½ lbs |
8 1/8 lbs |
|
|
Bedding Angle |
12 degrees |
45 degrees |
|
Setting up the Jointers
|
Its
iron muft be set very fine, fo fine, that when you wink with one
Eye, and fet that end the ftraight fide of the Iron is next to
the other Eye, there appears a little above an hairs breadth of
the edge above the Superficies of the sole of the Plane, and the
length of the edge muft lie perfectly ftraight with the flat
breadth of the sole of the Plane: For the iron being then well
wedg'd up, and you working with the Plane thus set, have
the greater affurance that the Iron cannot run too deep into the
Stuff, and confequently you have the lefs danger that the Joynt
is wrought out of ftraight. |
There appear to be two schools of thought when it comes to honing jointer plane blades. The first advocates a slight camber across the bevel, while the other argues for the bevel being straight across its face. I follow the latter approach, believing that the jointer belongs to a group of planes whose primary function is to create a fit. Others in this group include the plough, rabbet (or rebate), dado and fillester.
One other reason for honing a straight bevel on the BUJ is that a cambered bevel would prevent the use of the Jointer Fence. More on this later.
Experiencing the BUJ and the Stanley #7
The first factor that strikes one is that the mouth of the BUJ is considerably easier to adjust than that of the Stanley. Loosen the Toe Locking Knob and, together with the Mouth Adjustment Screw Stop, position the mouth at the desired width. It is a simple matter, taking no more than seconds, to open the mouth of the BUJ for a rank cut, then return it to the fine setting. It is relatively easy to maintain the blade positioning through the use of the side set screws. By contrast, the Stanley requires the complete removal of the blade to access the Adjustment Screws before the frog can be adjusted. This also results in a considerable amount of time being utilized in re-establishing settings (such as the bevel being square) each time an adjustment is made to the mouth.
Once set up, both planes had little difficulty achieving very fine shavings. As mentioned earlier, the Stanley is my user and I had spent much time tuning it until it could achieve this degree of performance. The BUJ received minimal tuning and, outside of sharpening and positioning the blade, produced a very superior performance right out of the box.
Here are examples of some fine shavings:

BUJ set up for a fine shaving (<.0005”)

Stanley set up for a fine shaving (.0005)
Hefting the planes, it is evident that there is a difference in weight but more noticeably a difference in balance. The BUJ is lighter but lifting the planes by their totes is more comfortable with the Stanley since its tote has greater forward tilt. However, pushing the planes is easier with the BUJ since its weight is sufficient to hold it down without the need for addition downforce. The upright tote is even easier on higher workbenches. With the BUJ there is a sensation of working low down. I am not sure if this is just psychological, but the low bed guides the eye and the vertical tote is then automatically grasped low down. One pushes parallel to the benchtop. The Stanley can only be held high and the push is angled downward. The sensation is of working from a higher position, and this does not “feel” as controlled a movement as with the BUJ.
The picture below shows the angle of the totes.
The Process and Experience of Edge Jointing
The aim was to achieve a fine spring joint, that is, creating a fine sliver of light at the centre when two boards are placed against one another. How fine is big enough? When the boards can be pulled together by moderate clamp pressure alone. A spring joint ensures that the two connecting edges remain tight throughout their lengths.
The first step is to attain a flat edge, then remove a shaving from the central portion (beginning and ending at the inside edges of the board). The main difficulty in obtaining a flat edge is when there is a “hump” (i.e. it is convex) at the centre. Even a long plane will ride along and fail to remove this, particularly when the gradient is gentle. In such cases, the first objective is to remove the hump before planing the whole edge. It is helpful to check the length with a straight edge.

Checking flatness with a straight edge
Attempting to join boards by squaring their individual edges is a fool’s errand since it is extremely difficult to attain a perfectly square edge along the entire length of a board. Butt joining two boards is best done by match planing. Clamp the two boards together in a vise and line up their edges. Planing them together creates complementary angles which, when joined together, will produce a perfectly matched surface.
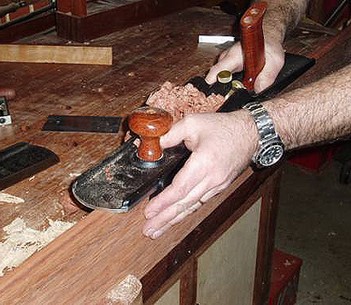
The pictures below illustrate edge planing single boards. The front hand acts as a fence to guide the plane along its centre and to hold it square to the board. As reported earlier, the BUJ provided the better feedback or feel in this regard.

Edge jointing with the BUJ

Edge jointing with the Stanley
Remember to enter the board with downward pressure on the front hand, and exit the board with downward pressure on the rear hand.
Flattening boards
Flattening the Jarrah tabletop without tearout was possible with the BUJ but not with the Stanley. Again, it was the case of the BUJ being capable of planing at a higher effective cutting angle (62°) than the Stanley (45°).
The adjustable mouth of the BUJ made it very simple to clear accumulated shavings: loosen the Toe Locking Knob … slight the mouth forward … blow out shavings … slide the mouth back into its original position (as set by the Mouth Adjustment Stop Screw). Easy-peasy.
My only niggle was with the front knob. The mushroom shape is the same as those on the BU Smoother and LA Jack and, on these planes, it is very comfortable. On the BUS and LAJ the knob is held by a screw from the underside (since they do double duty and also serve to tighten the adjustable mouths). The knob on the BUJ is inserted from the top as with the Stanley. I found the bolt was sunk a tad too deeply and, as a result, it was possible to feel the sharp edges of the recess. By contrast, the screw in the Stanley’s knob was flush with the top and more comfortable.

BUJ on Jarrah

Squaring the sides on Blackbutt
Opening the mouth changed the settings on the BUJ from fine to rank and, together with a second blade (45° cutting angle), enabled it to rapidly hog out the waste to create the tapers for the legs. Some tearout was produced this way, but with the 62° blade set up, and returning the mouth to a finer size, the tearout was largely removed. The Stanley could not match the BUJ here – it was not practical to open and close the mouth, nor was the cutting angle suited to Blackbutt.

Creating and smoothing the tapered legs
Some results of planing Blackbutt
This Blackbutt really tested the capability of these planes. Not only was the timber very dense, but also the grain was extremely interlinked, changing direction every few inches. Here is a cross section:

The pencil marks attempt to highlight the grain direction. This section of timber was planed by the Stanley and BUJ (below). The areas marked in red represent obvious tearout, while the blue areas represent mild tearout.

It is evident that the BUJ (62° cutting angle) produced the superior performance. This must, nevertheless, be viewed against the knowledge that the timber was very challenging. Consequently, I judged the Stanley’s performance as good as possible under these conditions.
Equalizing the cutting angles is a better way of comparing apples with apples. Below are examples of the Stanley and BUJ at 45°, followed by the BUJ at 62° - all taken while planing the leg tapers.

Shaping and smoothing (just for interest)
The boat-shaped tabletop was created with the use of a spokeshave (below), and the edges then bevelled with the BUJ (see later).

Spokeshaving the tabletop ends
The aprons were smoothed by the BUJ at an acute angle.

Remaining tearout was removed with a card scraper.

A Comment on the LV Blades
Three LV blades were used in all, each with a different bevel angle. The low angle blade was briefly used to plane the table top end grain. A standard angle blade was also briefly used, this time for the direct comparison with the Stanley’s cutting angle. The greater part of the review was done with the high angle blade, so the durability of its edge is worth noting. In this regard, this blade was honed twice in all for the entire project.
The Veritas Bevel-Up Jointer Fence
Holding a jointer plane square to the narrow edge of a board is a skilful task even for the experienced. Maintaining the angle, pressure and position along a long length is an even greater challenge. Stanley produced the #386 Jointer Gauge as an add-on for their #5 - #8 planes. This enabled a plane to be guided along the edge at a set angle. The #386 fence is adjustable over a wide, variable range of bevel angles, including perpendicular. The Stanley #386 went out of production in 1947.

Here is the Stanley #386 Jointer Gauge on the Stanley #7 plane together with the Veritas Bevel-Up Jointer Fence (BUJ Fence) on the LV BUJ. For purposes of this review, both the #386 and the BUJ Fence were used only on the LV BUJ plane.

The Veritas Bevel-Up Jointer Fence was designed specifically for the BUJ. It consists of an anodized aluminum, non-adjustable fence that is clamped with screws to the side of the plane.
|
|
Stanley #386 Jointer Gauge |
Veritas Bevel-Up Jointer Fence |
|
Length |
11”/280mm |
11”/280mm |
|
Depth |
2 ½”/64mm |
2”/50mm |
|
Construction |
cast iron |
aluminum |
|
Range |
variable angled |
fixed angle |
|
Attachment |
Hold down clamps |
screws |
Installing the BUJ Fence simply involves aligning and inserting two clamping knobs. A set screw fine tunes the sureness of the fence to the sole of the plane. See below:

Once square it is tempting to use Loctite to retain a permanent set up. I never managed to obtain a perfectly repeatable setting, and so needed to use the set screw to fine tune the fence each time. Logic argues that this may have been caused by the screw moving position slightly each time, but I did not test out the theory by using the Loctite to glue the threads.
The BUJ Fence was easier to set up than the Stanley #386. Although the BUJ Fence required a minor degree of tuning each time it was used, the clamping knobs were quick and easy to attach. By contrast, the clamps used on the #386 are finicky and, frankly, frustrating to adjust correctly.

#386 clamps, as set up on LA Jack
Both the #386 Jointer Gauge and the BUJ Fence can be attached to either side of the plane.
In use, I found the BUJ Fence my preferred choice when jointing a board. It was not really easier to use than the #386, but its slightly narrower depth gave it a wider range of board widths and it better suited my style of jointing, that is, to run the front hand under the plane’s sole. In this case this was done while pressing the fence against the board. See the picture below:
The BUJ Fence
The #386 has a front knob that is grasped to support the fence against the board. This is outboard of the fence and, consequently, there is a loss of “feel”.

The Stanley #386 Jointer Gauge
Both fences produced perfectly square edges.

Overall, I preferred the lack of fussiness of the BUJ Fence to the fiddliness of the #386. To Lee Valley I would recommend that they produce the fence in a narrower depth, either as a replacement or as an alternative. The 2” depth is still a limiting factor – once you clamp a floorboard in a vise, there is not much leeway to maneuver. I suspect that a 1 ½” (perhaps even a 1”) deep fence would still provide enough stability through a cut. To illustrate this point, when squaring up shallow board, I sometimes use a Record #778. See below:

Planing Bevels
The more obvious advantage that the #386 has over the BUJ Fence lies in its ability to cut a variable range of bevel angles. Veritas suggest that a “bevelled piece of wood” be screwed on to the BUJ Fence (through the in-built countersunk holes) when a bevelled angle needs to be planed. This is not so simple.
It seems to me that a jointer fence really needs to cater for two angles for 90% of the work it will do, these being 90° and 45 °. Making a 45 ° beveled wedge for the BUJ Fence is not possible. If the wedge is large enough to be attached to the fence, it will also end up reducing the planing area to an essentially impractical size. See below:

So, the solution is to make up a beveled fence based on the BUJ Fence. Using off-cuts of Blackbutt and Jarrah, a 45 ° beveled fence was patterned on the plan of the BUJ Fence. It was attached to the plane with the clamping knobs.

45° Bevel Fence
The Bevel Fence was attached to the right side of the BUJ. The BUJ is run on the left side of the edge, which was my preferred set up since I could more easily observe the results of my efforts.

The result was an even and accurately planed 45 ° bevel.

Using the BUJ Fence to create a Planing Bed
It is possible to secure the BUJ plus Fence in a vise in an upside down position. Adjust the blade and mouth for a very fine cut. Now it is capable of being used as a bed planer. Just watch the fingers!

In Conclusion
There is no doubt in my mind that the LV Bevel Up Jointer Plane far outclasses the Stanley #7, a plane that has been the benchmark for many. The BUJ feels balanced in use, is capable of the widest range of planing settings and the highest level of performance, and generally is a well thought out and quality piece of equipment.
The above is illustrated by the final results achieved building the sofa table. Here is a sample of the jointed Jarrah tabletop:

Top
from three jointed boards
The Jointer Fence is useful to use in its 90 ° guise. It feels quite natural and does not dominate the planing process. However I would like to see a 1” deep version produced. In truth, the planing of bevels is not high on my agenda. I prefer to do these with a block plane or spokeshave. Consequently, a bevel add-on for the Fence would be nice to have when planing long lengths, but not essential.
And in the end …

Derek Cohen
Perth,
Australia
November 2005