
Router planes are great tools for smoothing the bottoms of hinge mortices, dados and grooves.
Veritas have recently released their second router plane, the “Small”. This joins the “Large” router plane in the line up.
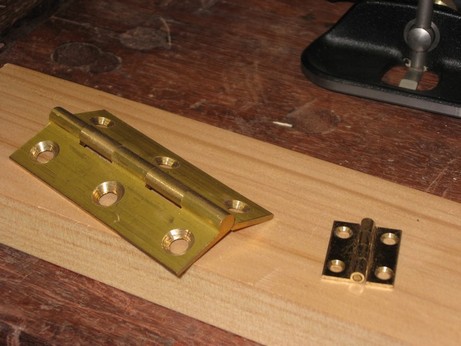
It is just 3-1/4" wide and 2-1/4" deep. For scale, here is the Small router plane (left) alongside the Large router plane (right):
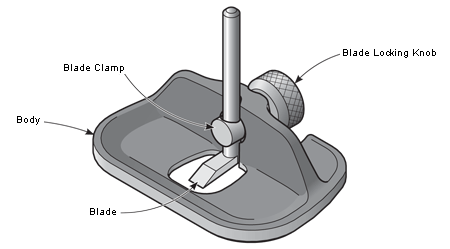
Image from Lee Valley
In comparison with its larger sibling, it is evident that there is the absence of provision for a fence, and the absence of fine depth adjustment. This is a small and basic tool, and the question is whether this limits its usefulness in the workshop?
The Small is derived from the Stanley #271, but differs from it in a number of important ways. Here are these two planes alongside one another:

The Veritas has a slightly larger footprint. More obviously, it has a different blade holding design.
The Stanley clamps the blade with a screw. It relies on sufficient down force for rigidity. Without this, the blade will drop out of the clamp. This is pretty much an either-or situation.
The Veritas clamps the blade with the aid of a spring-loaded “wavy” washer.

This enables the blade clamp to exert a variable degree of pressure on the blade. The blade locking knob can be loosened, and the clamp will continue to apply sufficient pressure on the blade shaft to hold it in position. Press the blade locking knob inward – towards the blade – and this will release the blade completely.
The Veritas design has one negative point in my opinion, this being the absence of provision for the blade to be locked in position. The Stanley, by comparison, has a groove running the length of the blade shaft into which the screw fits. This holds the position of the blade position. While it is a relatively simple matter to correctly orientate the Veritas, it does require moderate locking tension to prevent movement. Once this is done I did not experience any such problems.
Adjusting the blade
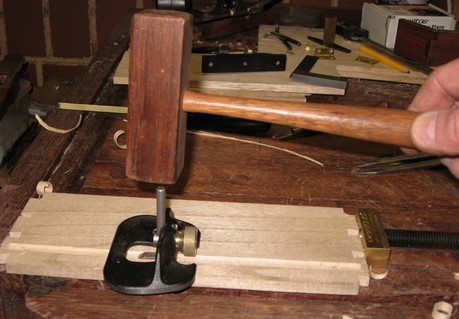
Unlike the Large router plane, the Small lacks a depth adjuster. Adjustment is a manual affair.
There are two ways that I might recommend. The first is to loosen the blade locking knob and raise- or lower the blade with fingers.
The other method is the one I prefer. This involves maintaining moderate-high blade tension via the clamp, and then use a mallet to tap the blade into position. The moderate-to-high tension is necessary to assure that the blade head does not alter position.
The Blade
The Small comes with a single ¼” wide blade high-carbon steel blade. I wondered why this might be so since I anticipate that the Small will be identified by some users as a tool for inlay work. The addition of smaller sizes, such as 1/8” and 3/16”, might be recommended.
One idea is to buy one or more blades from Veritas and simply grind the sides until you get the width you need.
Of course it is a relatively easy matter to make custom blades. Conversion of Allen keys has been a long-standing favourite occupation of many…
….. Grind the base flat on a disk sander ….
…... Rough out the bevel on a coarse file, then refine it with a finer file ….
….. or, hollow grind on a belt sander …
….. finish on a diamond stone and green rouge on a MDF lap.
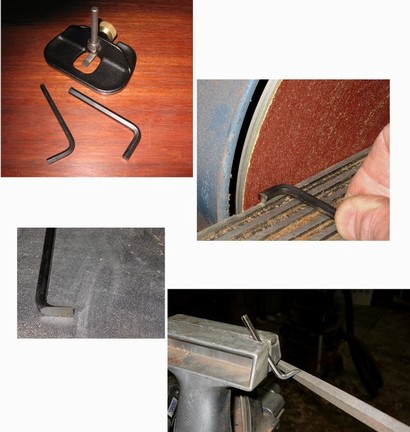
The result here is two blades, a 1/8” and a 3/16”.

The blade has a non-removable, fixed head with a 25° bevel. Veritas recommend that that the blade is honed and lapped on a waterstone.
I would suggest that a diamond stone or an oil stone are safer mediums. The narrow blades are tricky to freehand and are likely to cause damage to the soft surface of a waterstone if the user lacks experience.
One of the more common uses I have for a router plane is in creating the mortice for a hinge. Generally, unless the hinge is small, I use the Large router plane for this task. So I was curious to discover how the Small would fare in this regard.
Here is the target 3” hinge.
Step 1. Clamp the hinge firmly into position.
Step 2. Mark its outline with a sharp knife.
Step 3. Mark the depth of cut with a cutting gauge.
Step 4. Increase the depth of the cut line with a sharp chisel.

Step 5. Chop cuts into the mortice to facilitate waste removal. Aim to go just short of the desired depth.
Step 6. Chamfer the inside edges of the mortice. This will prevent damage to the sides.
Step 7. Finally, route out the waste.
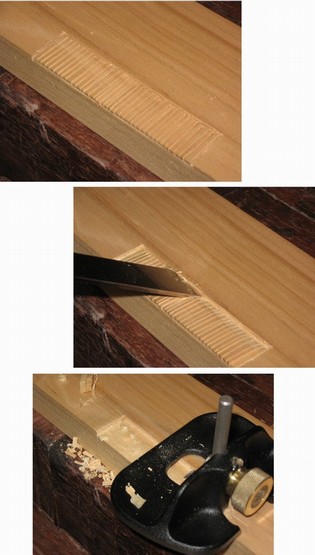
The Small was easy to use in this task. Although lacking the heft and momentum of its larger sibling, it had more than sufficient registration for stable planing, and waste was removed without effort.
Here is the result:

About two years ago we cut down a Paulownia tree in our garden. I harvested the trunk and promised my wife that I would build her something in memory of the tree. To my surprise, the timber turned out to be as light as Balsa wood and with similar properties – far from the hardwood I imagined it to be. Nevertheless, I aimed to keep my promise.
The aim here was to build a basic box, and later dress it up with a base and lid in contrasting timbers.
The Paulownia wood proved to be a challenge to work with as, while soft and easy to cut, the fibres do not sever cleanly and have a tendency to tear.
We begin here with sides already dimensioned and dovetailed.
Step 1 is the mark one side of the groove with a sharp cutting gauge.

Step 2 is to mark the width of the (1/4”) router blade with a marking knife.
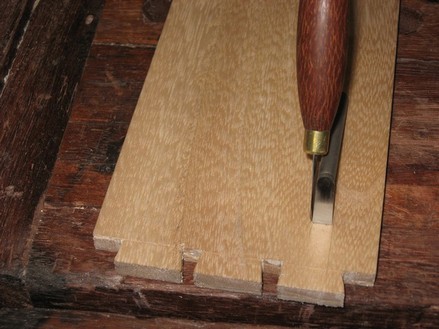
Step 3 is to complete the second line with the cutting gauge, and then knife these to the desired depth of the groove.

Step 4 is to chisel out the end of the stopped groove. Reverse the chisel and cut bevel down.
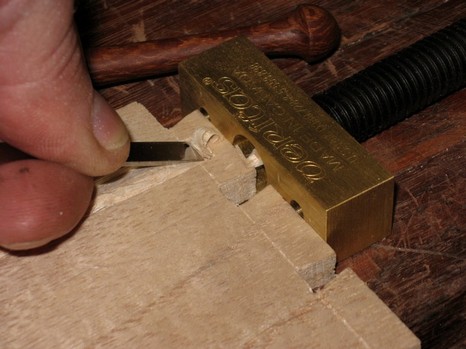
Step 5 is to chisel out the waste from the sides of the groove.
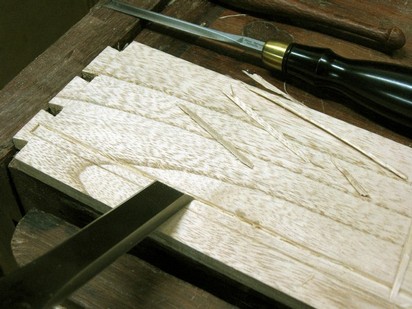
Step 6 now involves planing out the bulk of the waste with the router plane. Begin at the end of the groove and work backwards. Then finish with a few runs the full length of the groove.

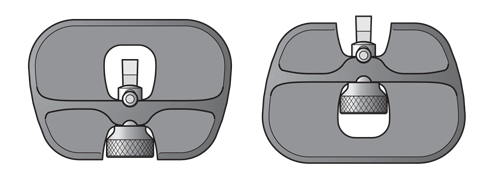
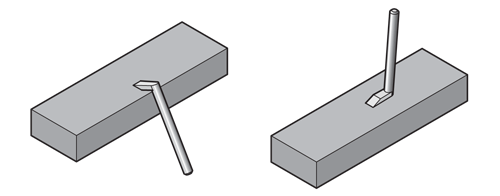
|
Closed throat or inboard orientation. |
|
Bullnose or outboard orientation |
While the closed throat orientation is likely to be used on most occasions, the bullnose set up is very useful. For example, When I needed to plane near the edge of the board, in the area of the end clamp, this was only possible with the removal of the plane’s nose.

The short, end boards did not require a stopped groove, and this could therefore be made with a plough plane, a #043.
To do this, use one of the cut grooves to position the blade/fence of the plough.

Now plane the short sides. Of course, I don’t have a picture of this. Nor do I have a picture of the one end for which I forgot to orientate the grain. Ploughing into the grain is not recommended. Dilemma – I do not want to reset the fence on the other side of the plough. Or the fence is too short to do so. Answer – use the router plane.
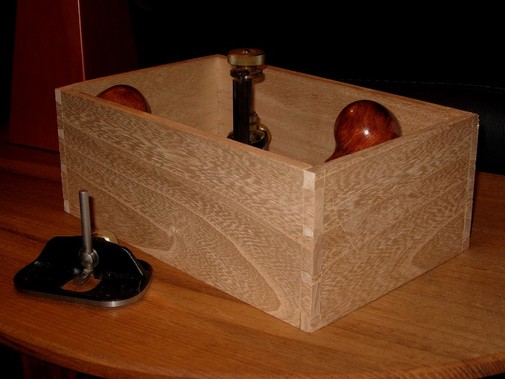
Well it is not finished. It is just a basic box at this stage. But already my wife has claimed it for herself and all thoughts of it being used to store tools are dashed!
The Veritas Small Router Plane is a welcome addition to a workshop. It is better made and easier to use than its Stanley predecessor.
This is an elegantly simple plane. I think that there is some room for improvement, such as a flat on the front of the blade shaft and blade clamp to aid in locking its postion, but this is a small niggle. Overall this is a comfortable plane to hold, and its finely finished sole makes it easy to push or pull. It will not replace the Large router plane, which has refinements such as a depth adjuster and a fence, but the Small is quick to set up and use, and its size is preferred for more intricate work.
October 2007