Back
to Tool Reviews
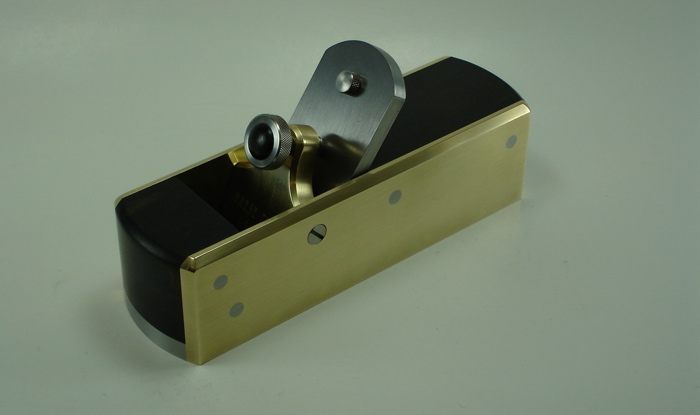
The
Brese Small Smoother Kit
Offered
here is a work in progress of the building of a smoother kit. Thisis
a relatively easy kit to build, partly because all that is required
is the infill, and partly because Ron did such a fantastic job with
the machining of the steel shell – there were no surprises.
Still, as work progressed, decisions were required regarding the
design, testing was undertaken and modifications made. Nothing
unusual in any of this, just the type of sessions that anyone else
might be expected to make. Join me as I build this little smoother…
Beginnings
About
a year ago Ron
Brese
offered a couple of his small smoothers in kit
form.
I jumped at the opportunity since I had long admired the model for
this plane, Karl Holtey’s 11-S.
The
Holtey 11-S …

Ron’s
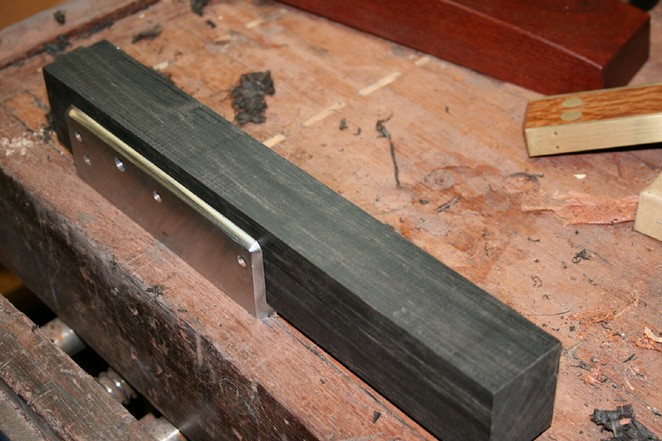
version offered pre-assembled metal work, and essentially all one had
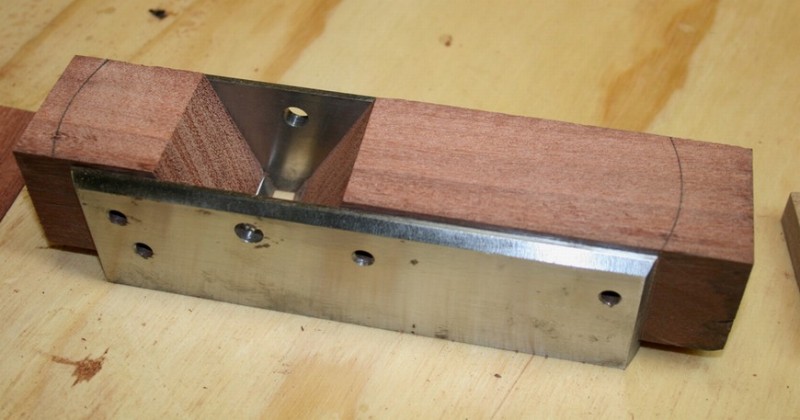
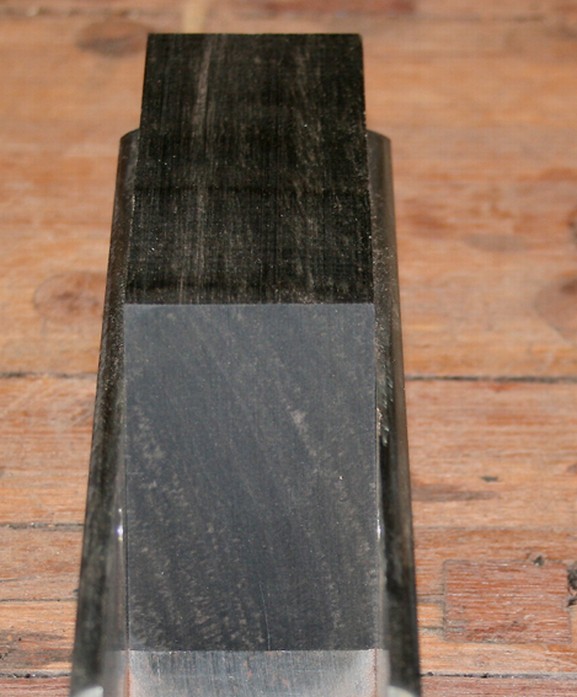
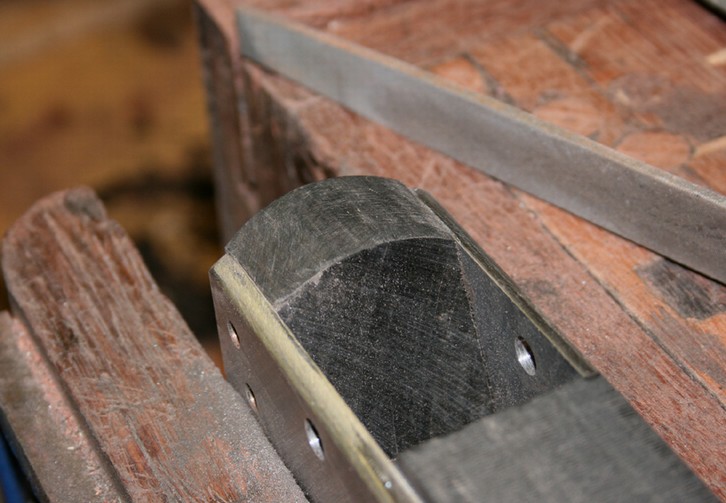
to do was fit the infill. This little smoother is 6 ½”
long with a 1 ½” wide 7/32” thick blade.
Construction is metal-to-metal with screws. At the time of the offer,
the basic model was all brass, and later this became brass sides on a
steel sole.
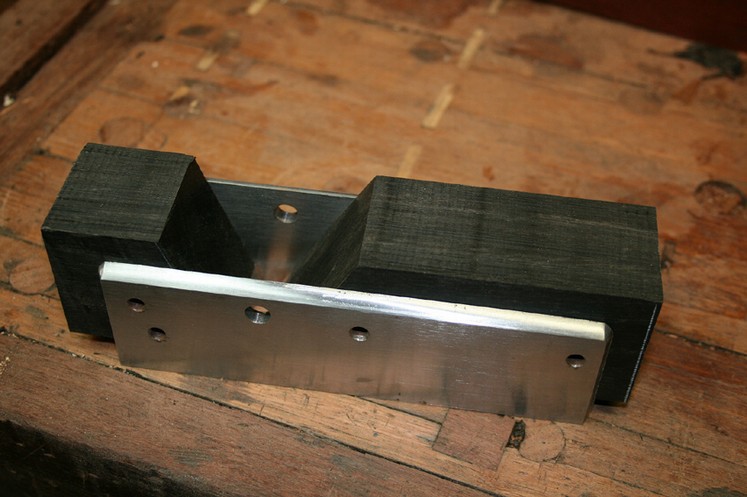
Ron
and I discussed possibilities and we reached agreement on a rather
unique combination. He would prepare for me an all-steel construction
with a 60° bed. I planned to use Ebony for infill.
Now
time has gone by and I have used every excuse in the book why I have
not got my act together and built the kit. I mean how hard is it to
fit infill! I have done this a couple of times before, so it is not
exactly an unknown phenomenon. I think there were three kits on
offer. Jameel
Abraham
got his done pretty damn quick, and oh my, what a beautiful job he
did (this is Ron’s version of Jameel’s design) ..
Well
I won’t repeat the excuses. I have finally got around to the
kit … well, partially. I only have the one piece of Ebony that
is the correct size, and I don’t want to screw it up. So I
decided to infill the smoother with a practice piece of Jarrah to
work out the kinks. I thought that I would even stain it as close to
Ebony as possible to get an idea of how it will look.
So this
I did today. And there are a multitude of pictures to amuse or bore
you with. A veritable picture show of infilling a plane using a mix
of power and hand tools. So for you Ron …
First I must
say that Ron has done an amazing job in machining this kit. Every
angle was spot-on.
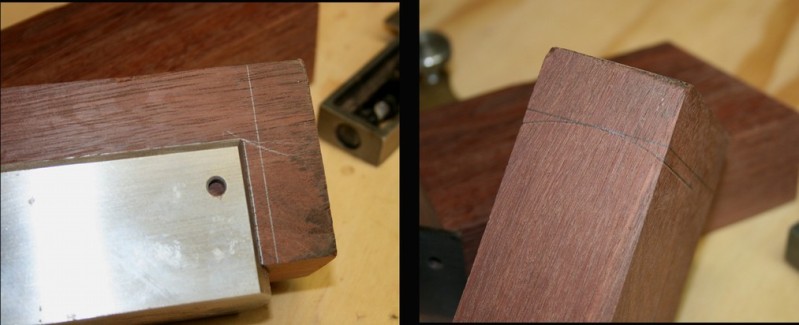
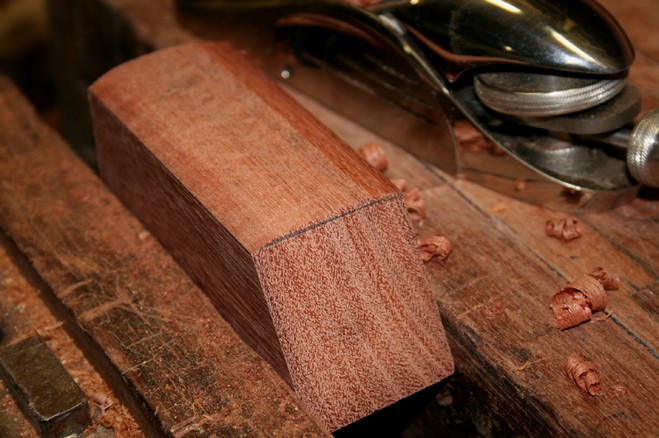
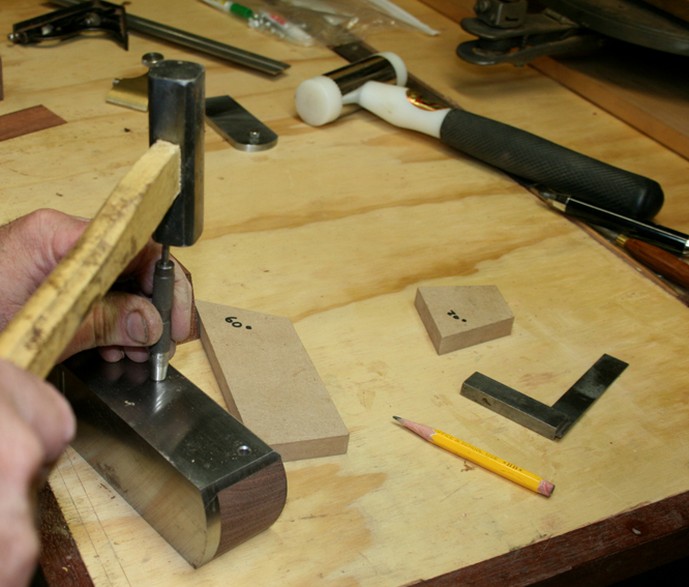
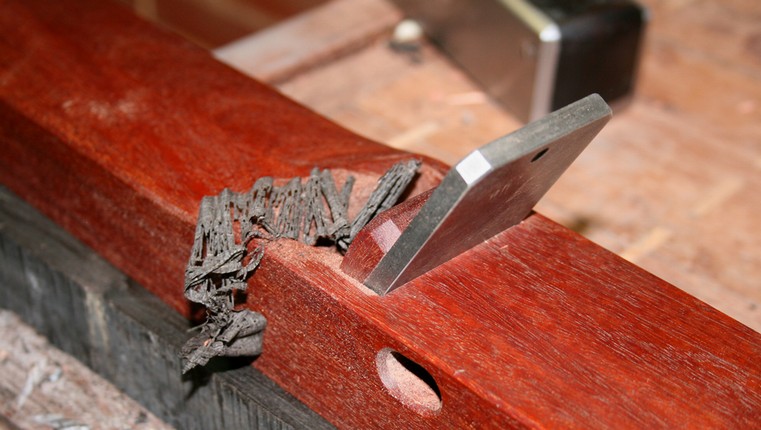
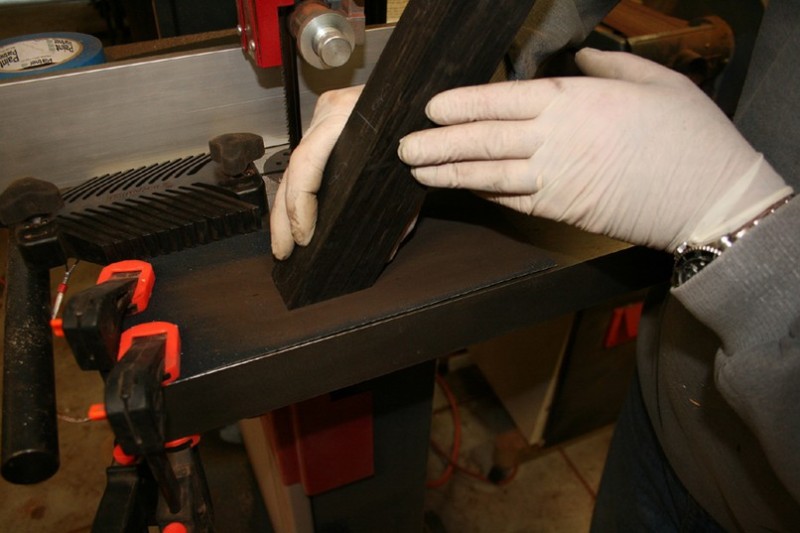
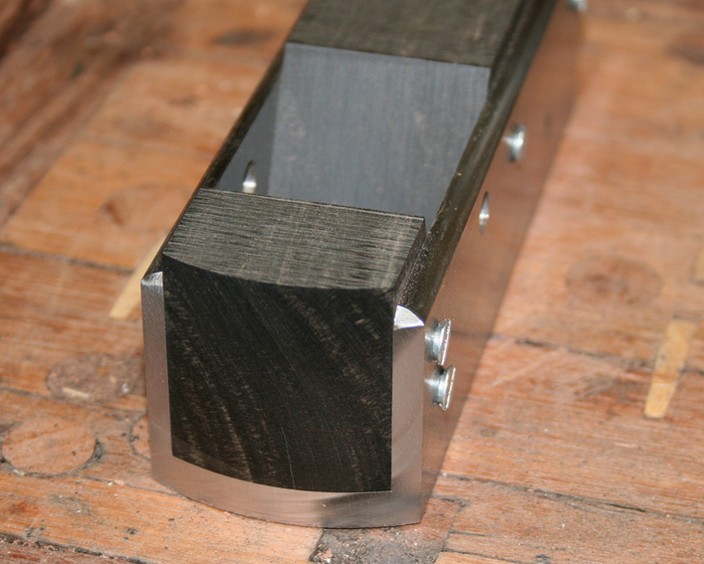
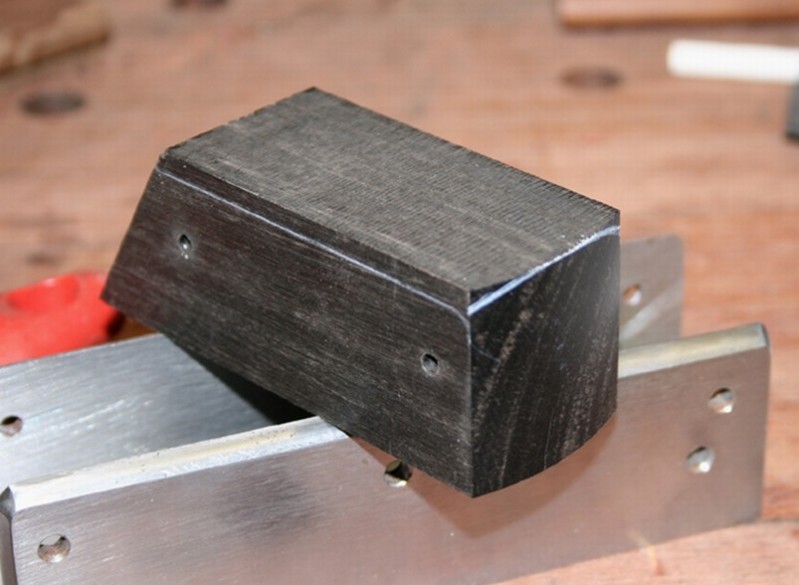
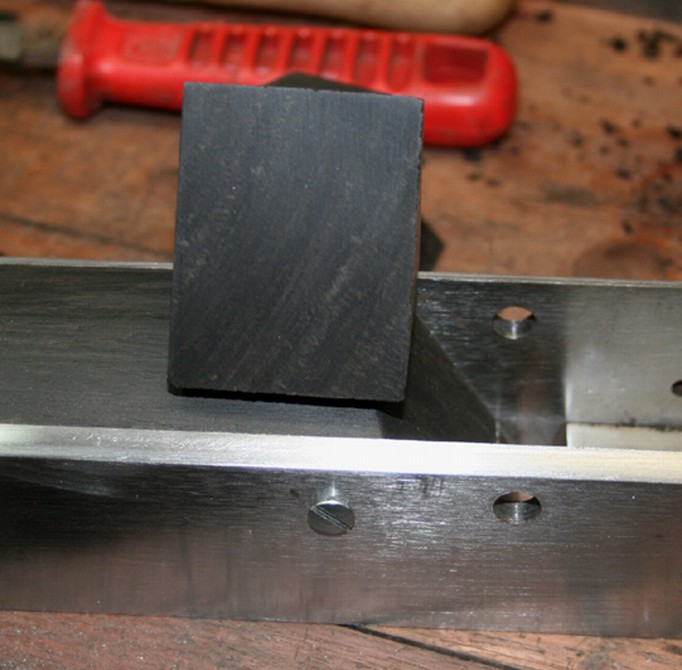
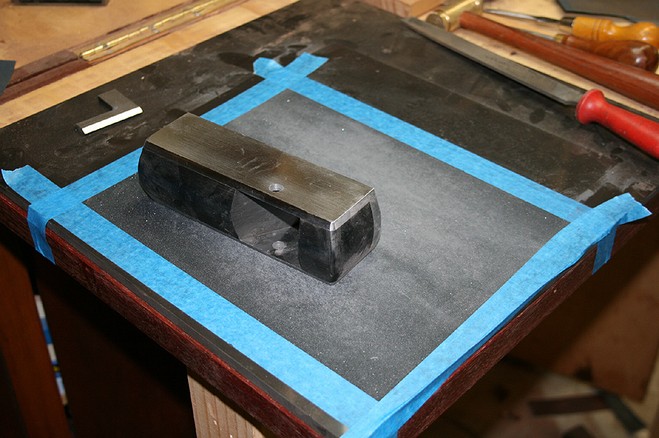
OK, so the first thing to do is cut the
infill to size on a tablesaw and plane it to fit. Then cut one side
at 60° and the other at 20°. I won’t bore you with
that. The result is here …

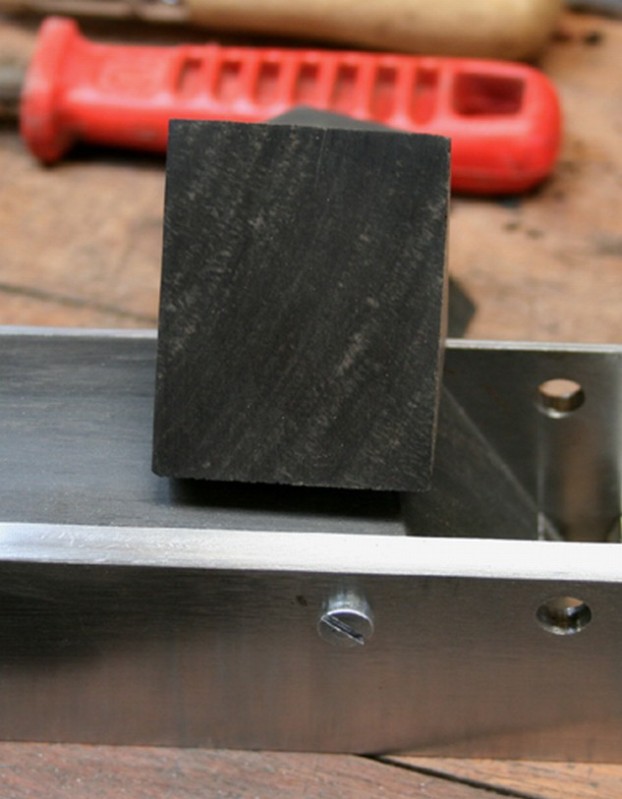
Make
sure that the angles are spot-on .. square to the mouth ..
Now
mark off the dimensions of the infill …
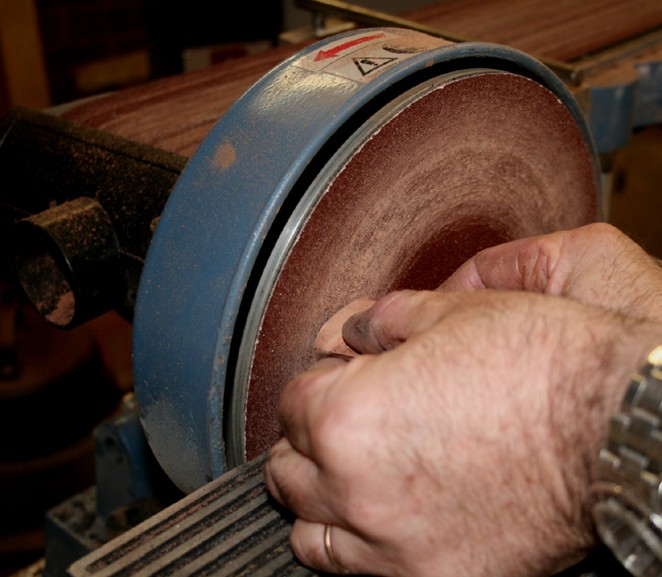
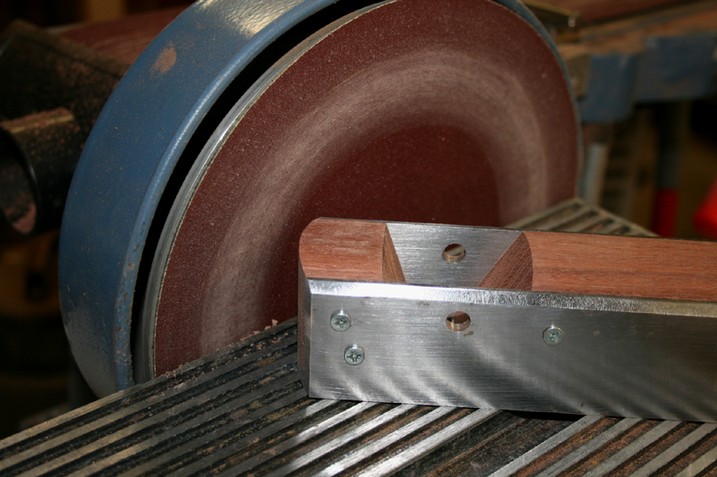
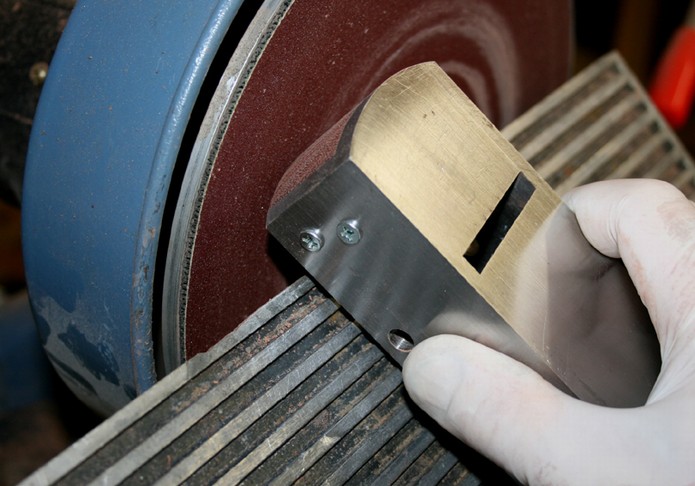
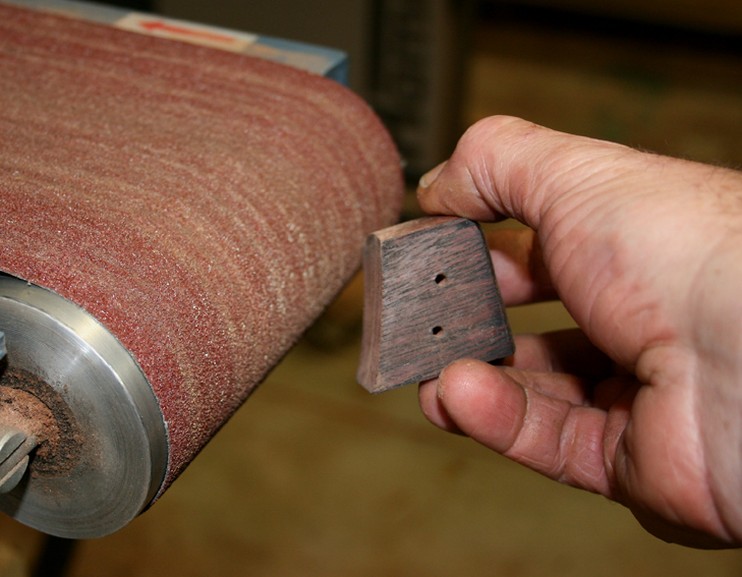
The
next bit is only for the experienced or the nutters. I am comfortable
using a disk sander for grinding, and used it here for shaping the
curves at the ends. First bandsawed, then sanded. Gets it done
quickly.
Leave
it slightly oversize ..
Holtey
shapes the top surface of his infills flat. I think that Ron does as
well. I had in mind something a little different. I just could not
imagine flat being comfortable, so I decided to shape in a little
round to the top. Quite subltle – you might miss it unless
looking ..
Shaping
was easier with a block plane.
Once this was done I could
position the infills for screws. I needed to hold the infills in the
correct position to finish the shaping.
So
back to the disk sander to finish the ends ..
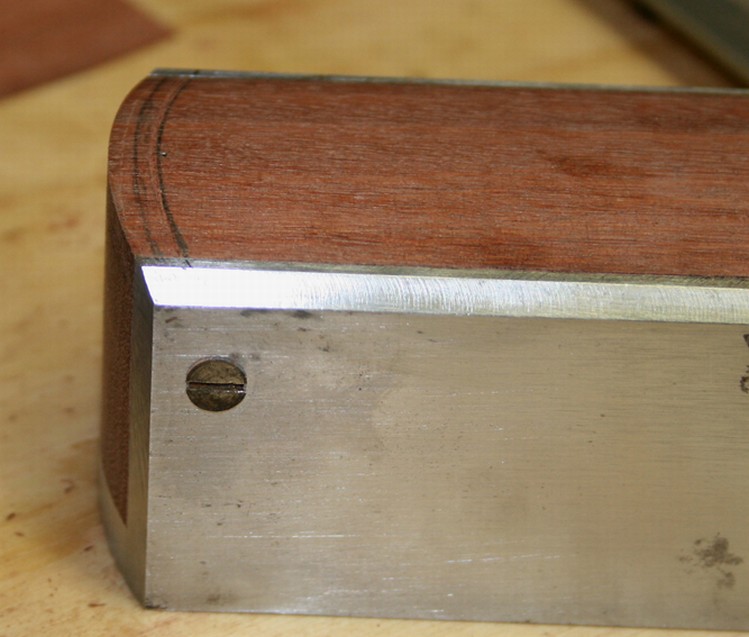
Here
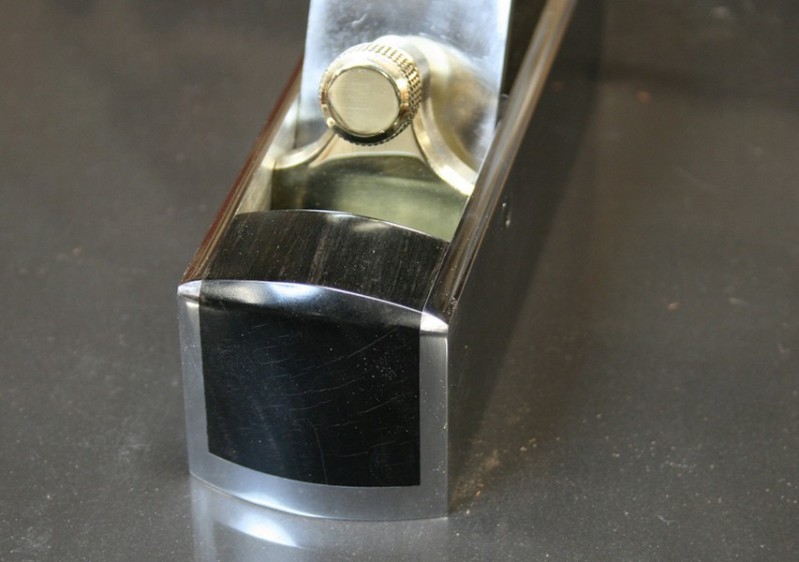
is the infill marked for chamfering. The ends of the plane need to be
rounded for handling.
And
back to the disk sander .. (y’all need one of these boys and
girls) ..
The
result ..
Now
soften the lower edge with sandpaper - not the top edge. This is
needed to maintain the profile.
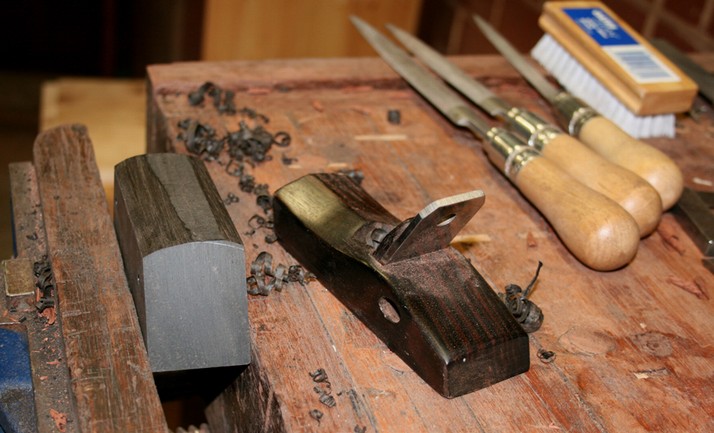
Now
it is time to round the sides. What I did was to chamfer the top of
the plane with a file, making it flow into the infill.
OK,
once this is done a little sanding to 240 grit completed the work,
and we were ready for staining the Jarrah. I removed the infills and
gave them several coats of black stain. The Jarrah is very hard and
the stain does not soak in that deeply or completely. The effect is
to darken the Jarrah, removing the red tinge. I like the result. Mmm…
if the Ebony does not work out I can always use these.
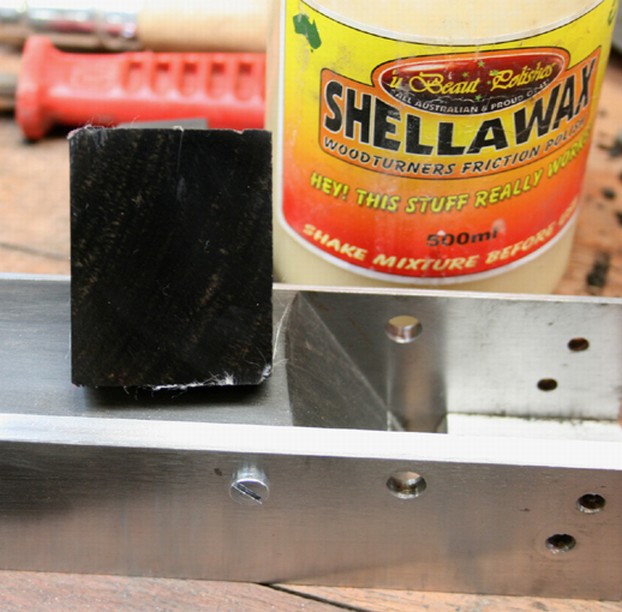
After
the stain dried I added a couple of coats of buffing oil. This helped
darken the wood slightly. Lastly I buffed on a little Shellawax,
which is a hard shellac and wax mixture.
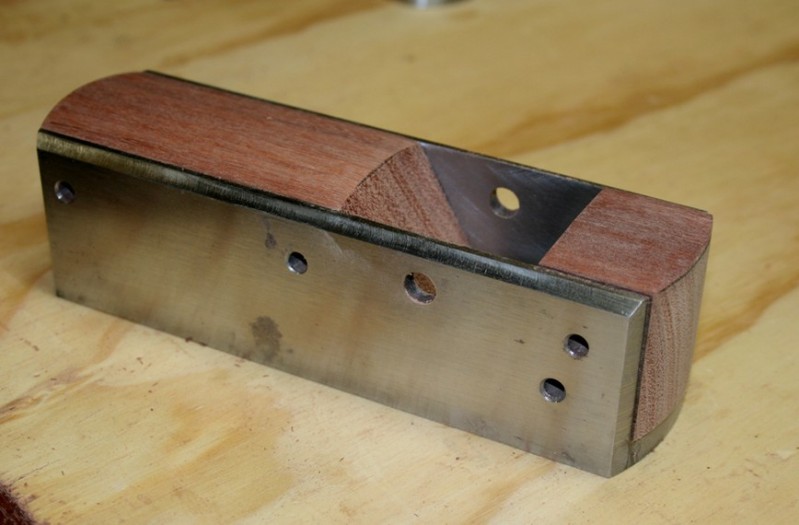
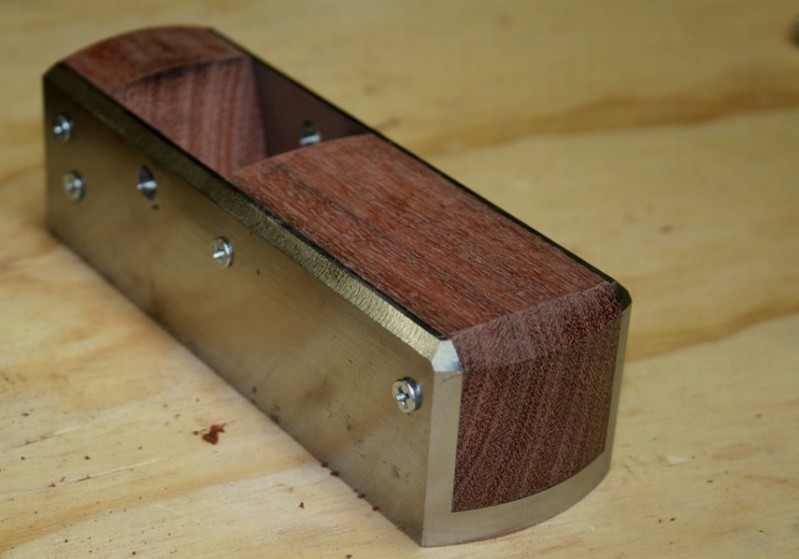
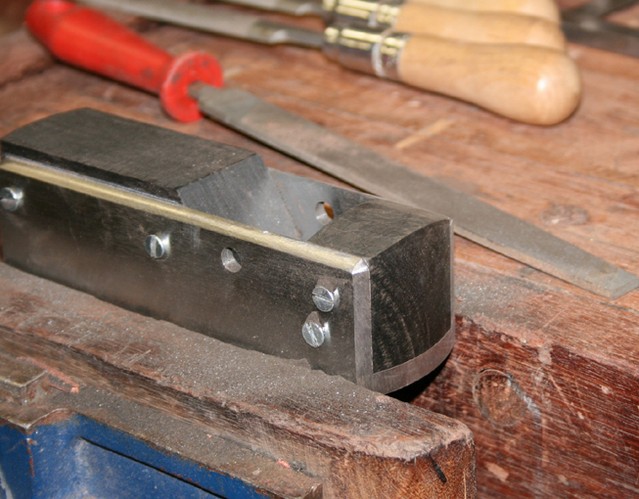
So here it the
assembled plane .. of course, the metal work has yet to be finished,
but it is now easier to see how it might look .
And
of course I honed the blade and took a few shavings. Well, it is not
perfect – lots of tuning (mouth is too tight). Also, Ron I am
not sure if the front infill if correct at 20°. There is not much
room for clearing shavings and they bunch up.
Session
Two
Follow
me through the second session of building Ron Brese’s Small
Smoother kit.
We left off Session 1 where I had infilled the
plane with a practice Jarrah infill. This was to work out the design
and see if the plane would work appropriately with a 60° bed. Ron
usually makes only 50° and 55° kits, and this kit, which was
a custom bed, proved to need a few tweaks.
As it stood, the
mouth choked when planning, shaving collecting in the mouth, and
compressing until the lever cap had to be removed to eject them. Ron
was aware that this was a possibility and sent me a few suggestions.
I had similar thoughts, so set up a sequence to complete these mods.
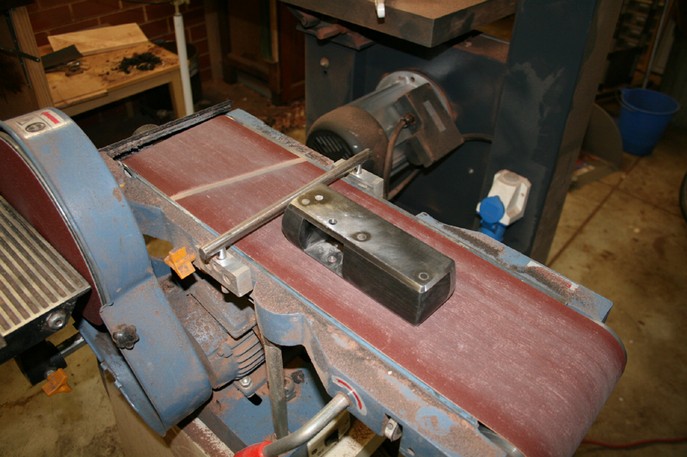
The
first was to increase the clearance inside the mouth by forming a
slight radius in the front infill. The original was angled at 20°.
A radius could increase this to 25° without shortening the
handhold. This was done on the belt sander…
This
made a significant difference. Shaving began to flow out of the mouth
…

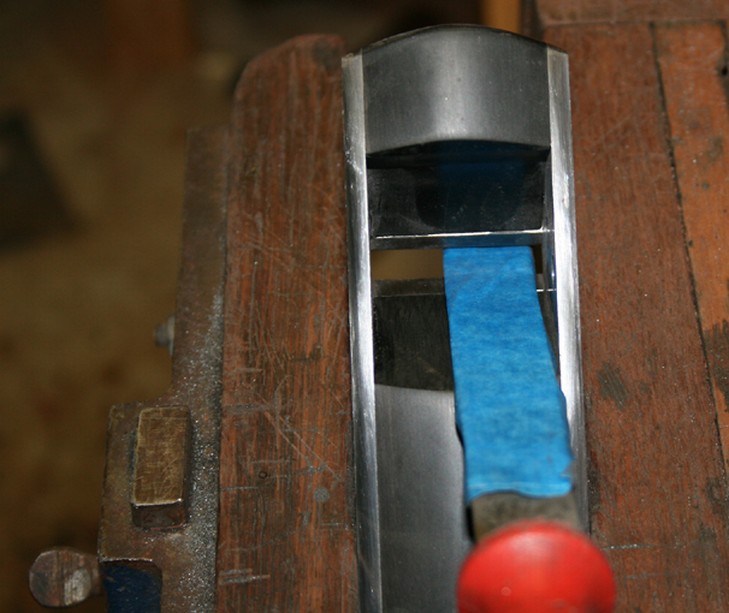
However
this was still not satisfactory as the mouth continued to choke.
So
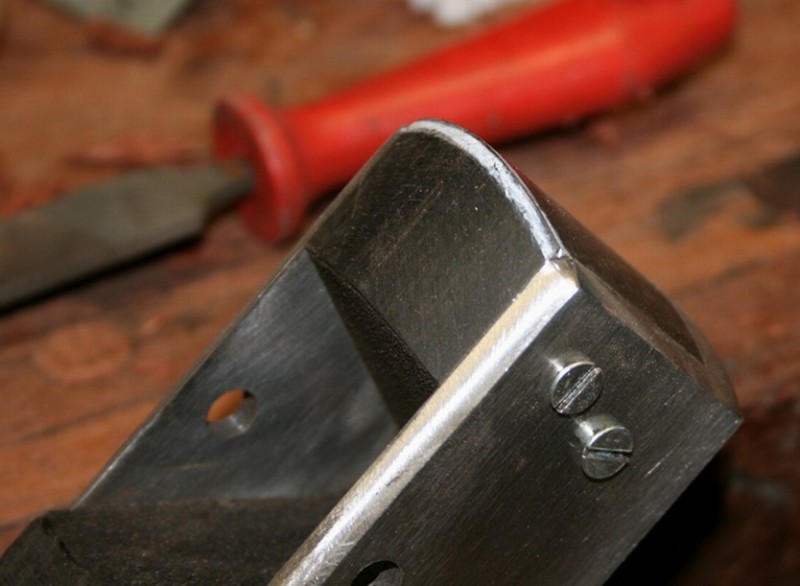
the next mod was to alter the angle of the lever cap. I could see
that it was too thick here and impeding shavings. Here is the
original lever cap..
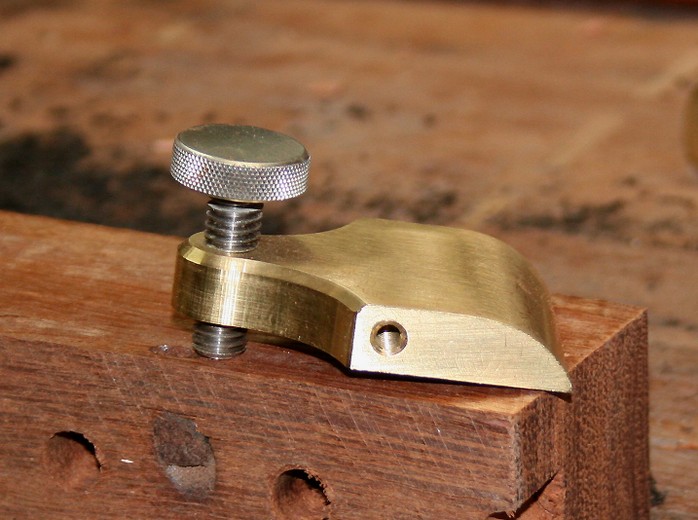
I
was not sure how much to remove and just decided to “make it
look right”, hoping that this would also be right.
For
this, the quickest and easiest method was to create a quick jig for
the belt sander – just screwed the lever cap to the end of a
stretcher and used the mitre gauge for stability.
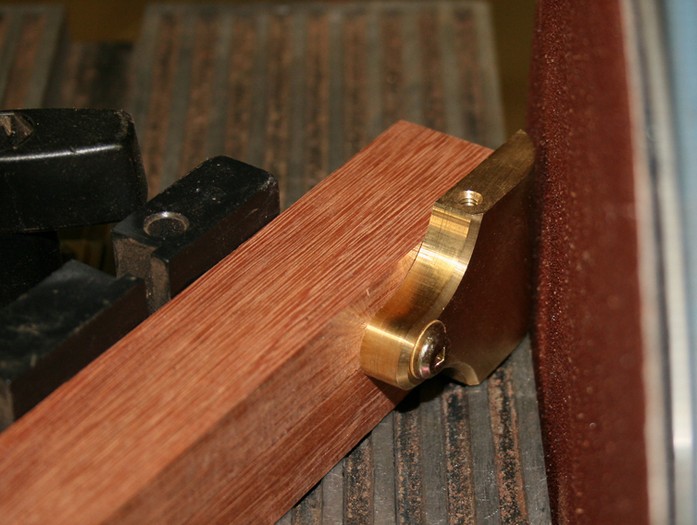
This
was repeated at two angles, before hand sanding to shape.
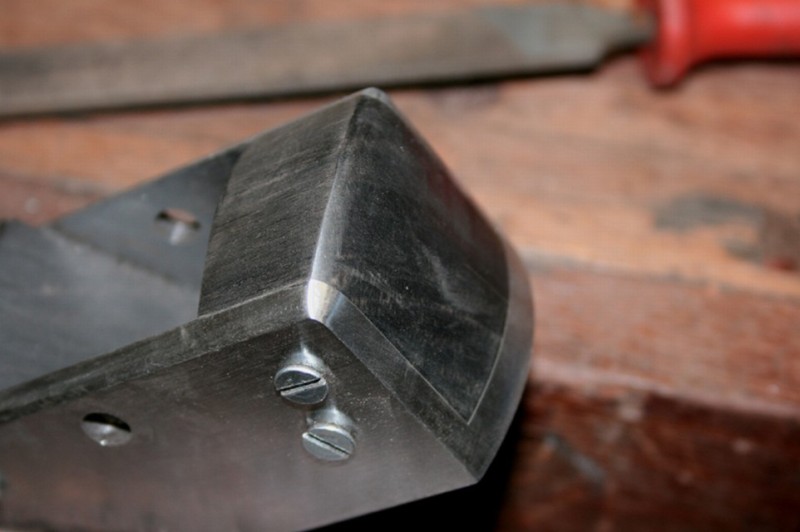
Yes
I know, it is not quite finished. This was to test out the new shape.
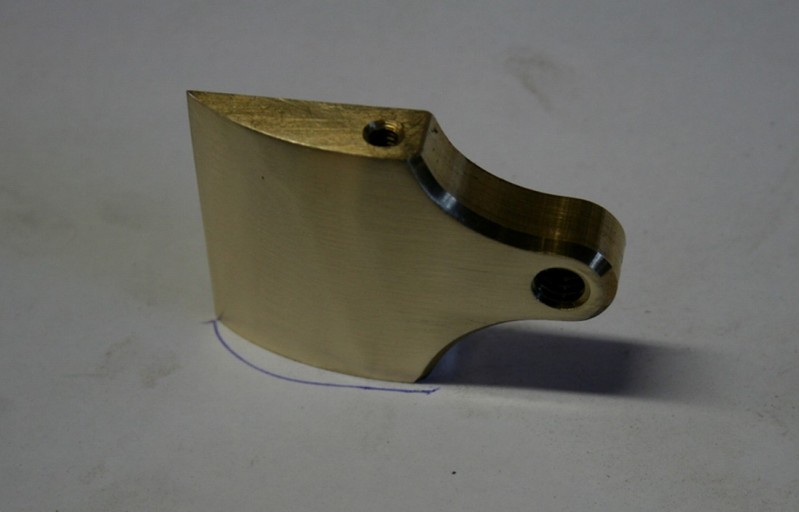
You can see how much brass was removed (original outline in blue)
…
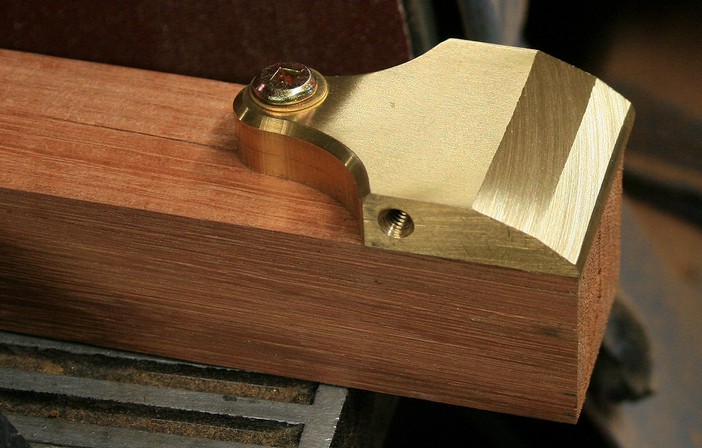
So,
how did this fare? Once again there was an improvement. The shavings
were flowing more easily … but I felt that this could be a
little better still.
So the third mod was to return to the
first mod and increase the radius to 30°.
Now
we are cooking!
…and
ready for the Ebony infill!
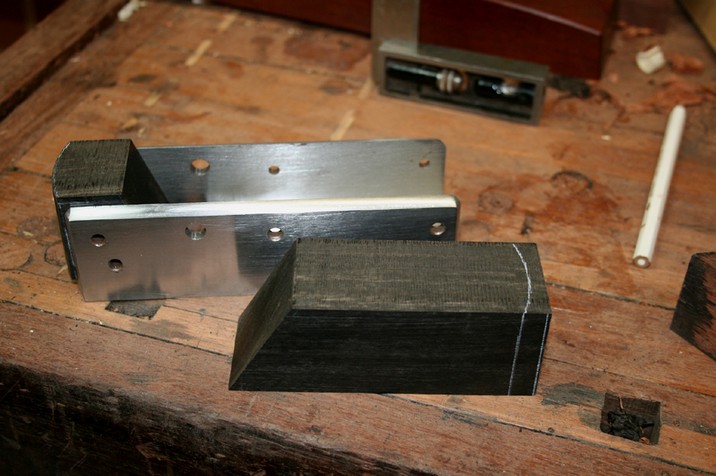
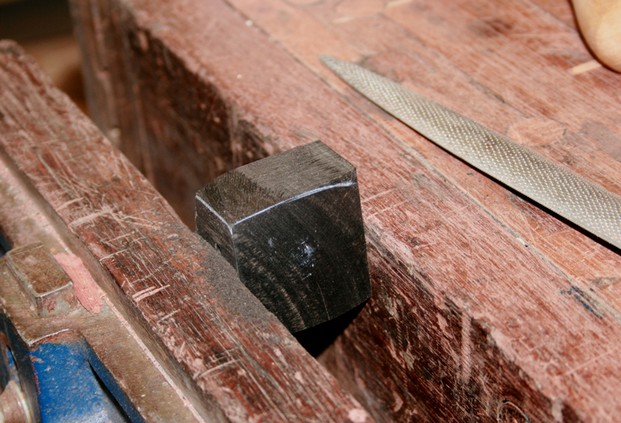
At this point I need to go back
two Christmases time to a Galootaclause gift of this length of rough
sawn Ebony (seen here alongside Ron’s kit). The two were a
match made in Heaven.
First
stage was to plane it square with my trusty HNT Gordon Trying Plane
…
I
planed three sides square, then removed the fourth side on the
bandsaw (saving as much of the Ebony as I could). This process
included checking the grain direction and arranging it as I wanted
(as much quarter sawn as possible). Finally, with careful
handplaning, the infill slid in evenly and with just enough space for
an ultrathin layer of epoxy (to be added on the final fit).
This
was now cut to shape on the tablesaw. 20° slope on front infill
and 60° bed on rear infill.
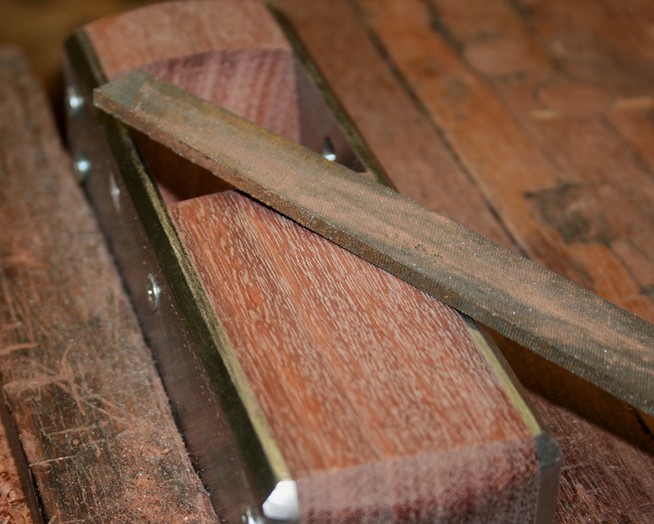
Tuning
of the bed was done on 240 grit W&D sandpaper. This was simply
clamped to the bed of my bandsaw, and the wood pulled over it (one
direction only to avoid rounding over the face). Frequent checks were
made for square in both the vertical and horizontal, with pressure
place on the area that required more removed.
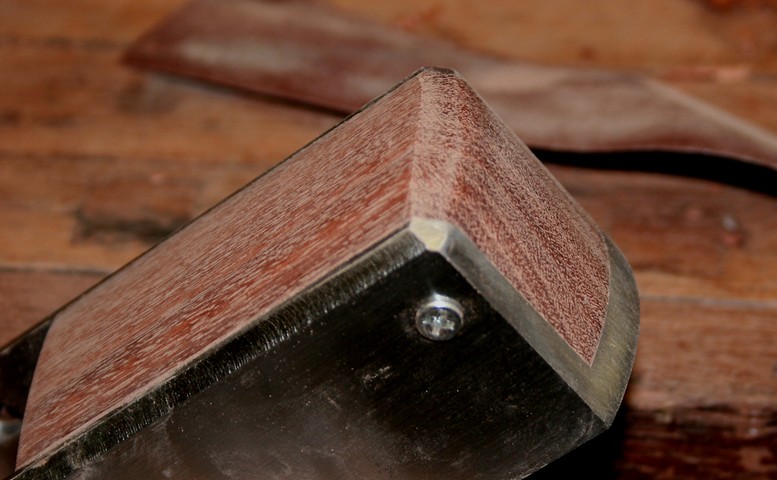
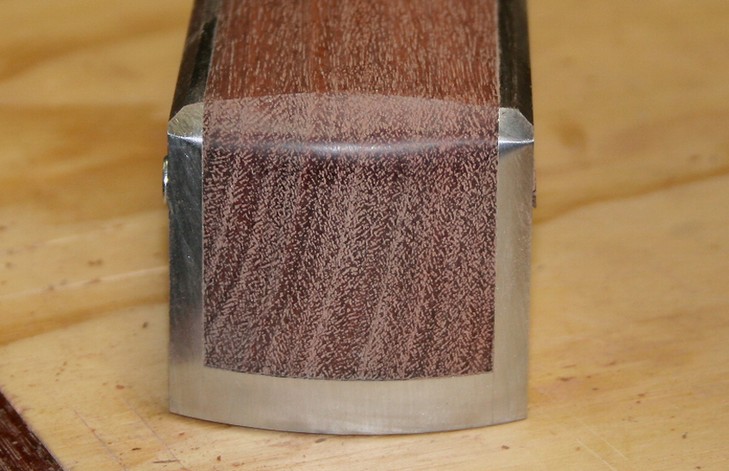
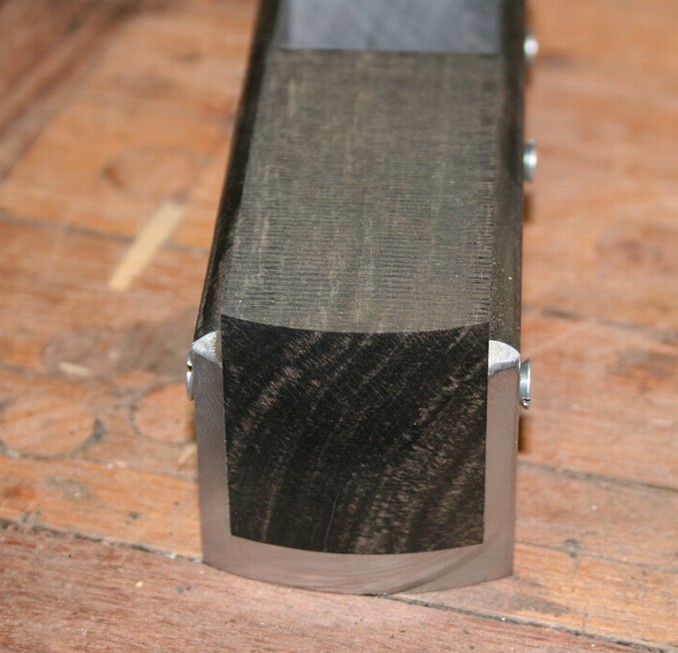
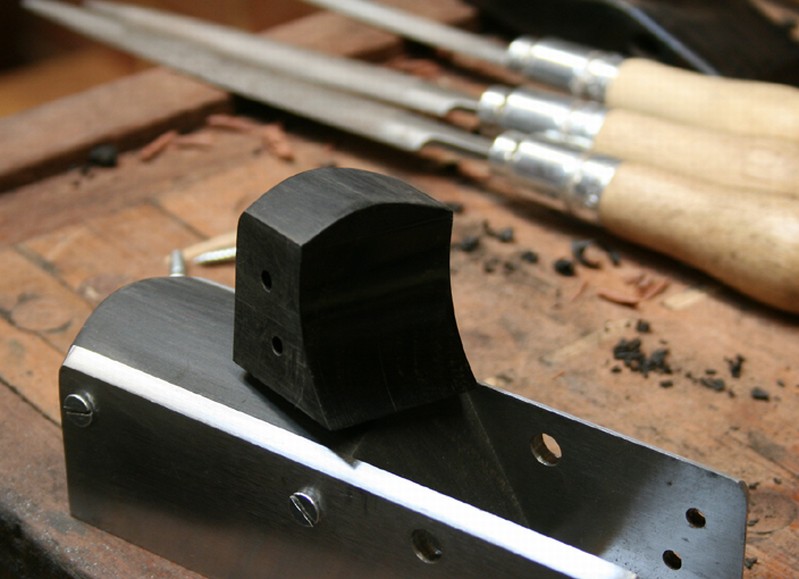
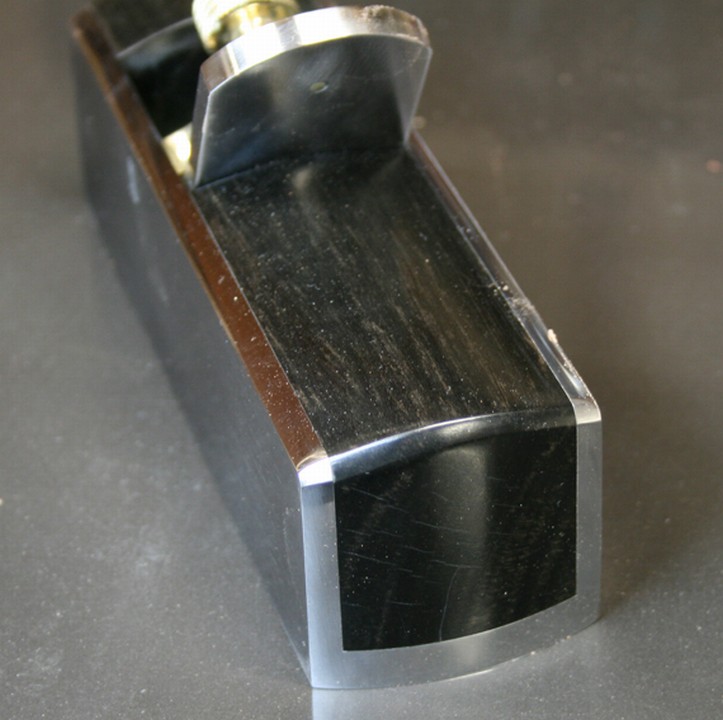
Here
is the final result ..
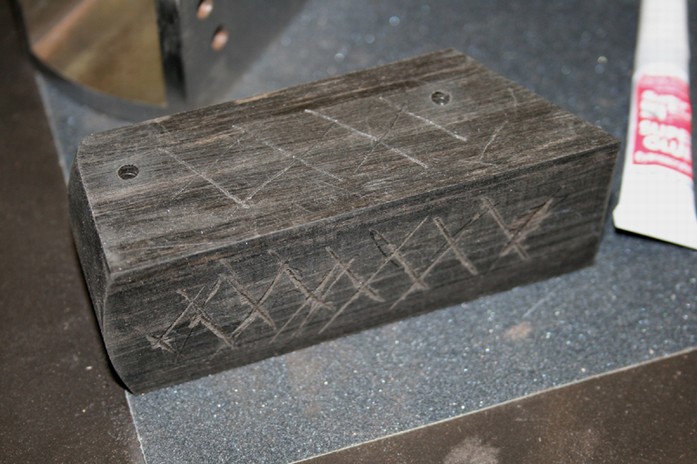
Here
are the infills marked out for shaping ..
After
the documentation of the First Session (in which I infilled the
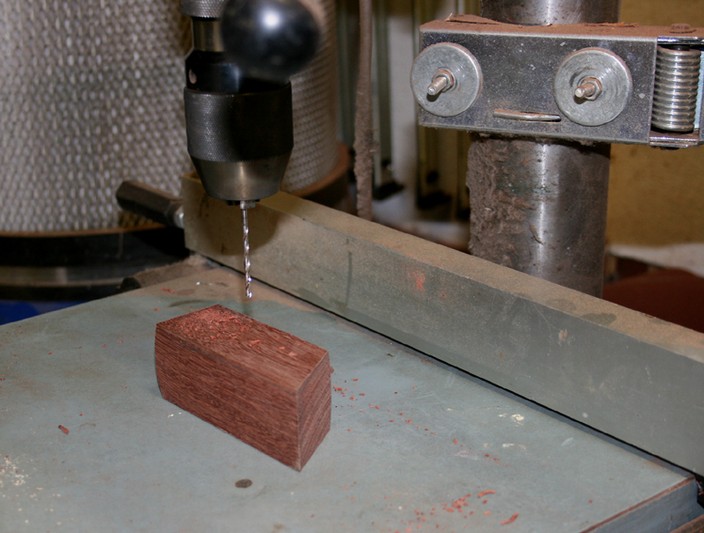
Jarrah), BB asked me how the screw holes were created so accurately.
Actually, BB, I did demonstrate this in the posting: the holes were
marked with a spring-loaded awl ..
Since
this time round the infills were a slip-fit (that is, the Jarrah were
a tighter fit as they were not intended to be epoxied), I needed
clamps to ensure that nothing moved out of alignment.
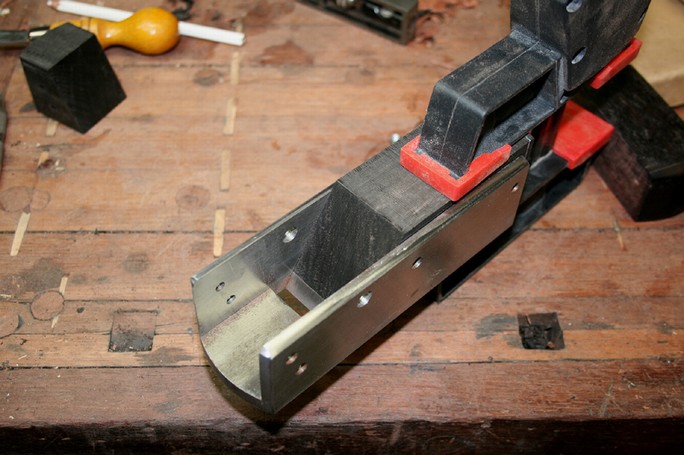
With
the infills now safely held with screws, the ends could be shaped to
the metal – this is necessary so that I can work to layout
lines when shaping the tops of the infill.
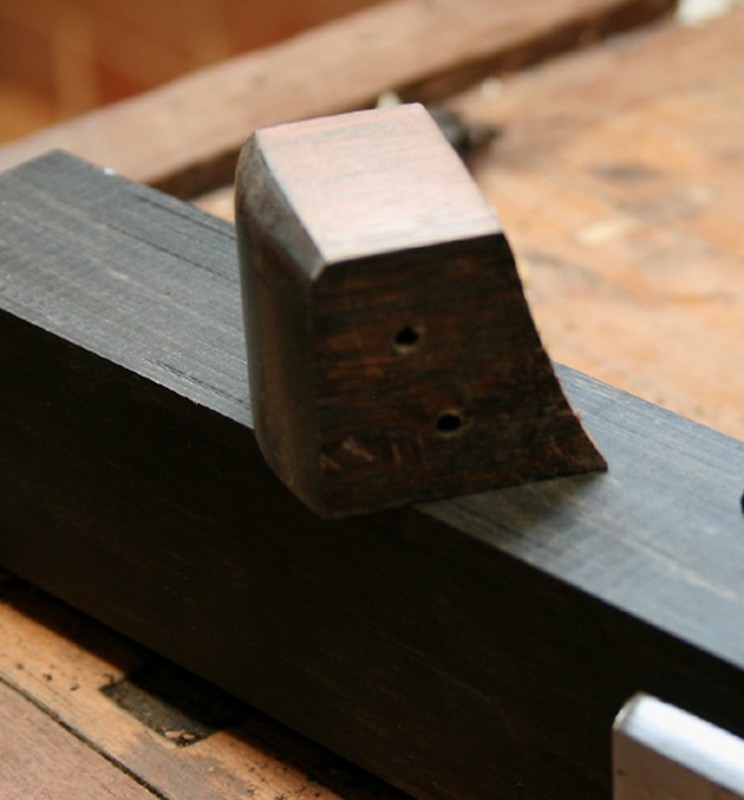
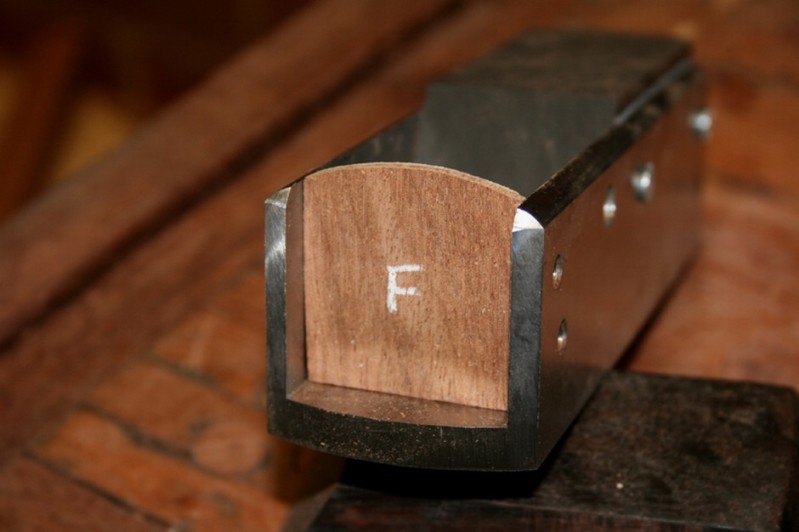
Here
is the front infill to date ..
..
and the rear infill ..
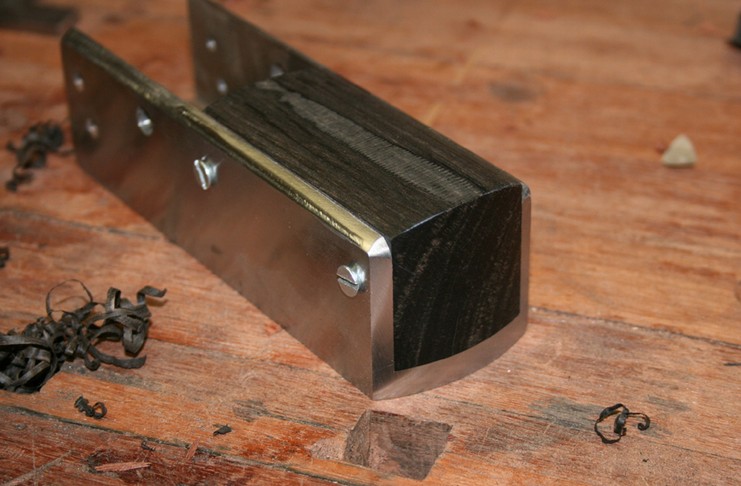
And
finally, the current state of the project ..

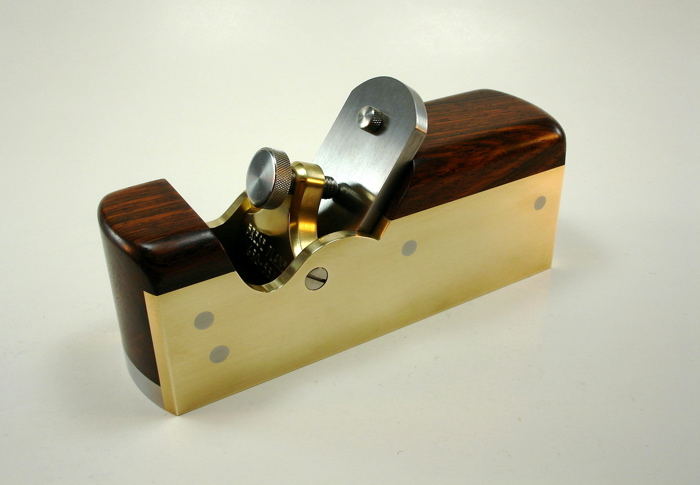
I
have asked Ron if he has a brass lever cap screw to replace the steel
one here. This is on its way! Also, the eagle-eyed will note that I
have discarded the steel insert in the blade and infilled the screw
hole with brass. Sorry Ron, I think that the tiny “knob”
look out of place on this small plane.
Join
me in Session Three when hopefully I shall complete this small
smoother.
The
Final Build Session
Shaping
the front infill
Time
to shape the upper side of the infills.
This began by
creating a template out of 3mm ply.
This
was transferred to the front infill, which was then shaped with
rasps.
The
reason for shaping the infill outside the plane shell, rather than
both at the same time, was that I needed to remove a fair amount of
waste from the wood, and it was not efficient to use a file.
Both
could be shaped together once the infill was close to the edge of the
side wall. This became important at that point since I wanted to
reshape the bevel (at the top of the wall) …

…
into a curve that flowed into the infill. This was not only for
aesthetic reasons, but also for comfort when pushing the plane.
The
other reason for shaping the front infill separately was that it
needed to be removed to add the internal camber (which was important
to aid shaving flow with a 60 degree bed).
One more item to
finish the front infill. Mark out the bevel ..
..
and shape with a file. This will be fine tuned later on.
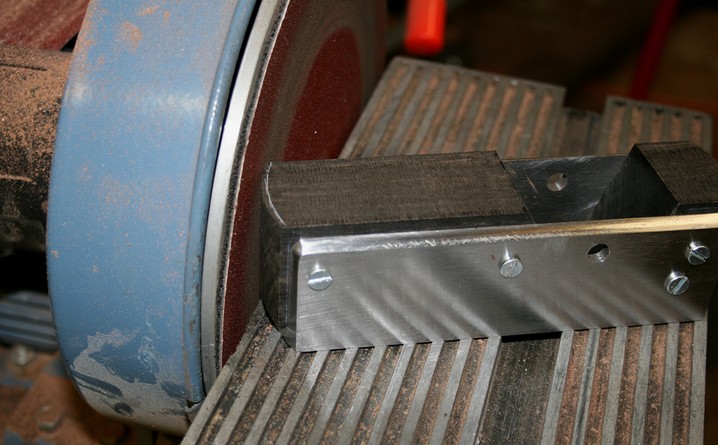
Remove
and camber the front infill on the end of the belt sander. This was
taken to about 30 degrees (probably a little less).

Shaping
the rear infill
The strategy altered slightly for the rear infill ..
This
was easier to shape with a small high angle Mujingfang smoother.
So
we get to the point where the infills are shaped and ready for
finishing ..
Finishing
I have not worked with ebony before and was not sure how to
finish it. I was not sure whether to use an oil or wax, although I
was sure that a wax would obscure any figure since this has been my
experience when using it with dark woods. With dark woods I prefer to
use shellac and/or wax. I did ask the advice of the forum –
they were mixed in their recommendations.
Wayne Anderson
wrote to me to say he used Minwax Antique Oil.
I had a look
on a luthiers forum to see what they were using for fret boards, and
discovered many were not using any finish at all since ebony has a
tight grain and polishes up well with high grits.
So I
decided to do a little research (again).
Here is a piece of
ebony sanded to 240 grit, which is the current level of the infill:
This
was now sanded through 400-800-1200 grits:
Now
this surface was buffed with Shellawax (a mixture of blond shellac
and hard wax):
The
wood was sanded through the grits back to 1200, and this time was
buffed with wax:

Mmmm
… my vote goes to sanding. Nevertheless, I like the hard,
smooth finish of Shellawax and used this on the inside of the front
infill. That should aid in ejecting shavings.
Fixing
the infills
Ron supplied two-pack gel Cyanoacrylate (superglue).
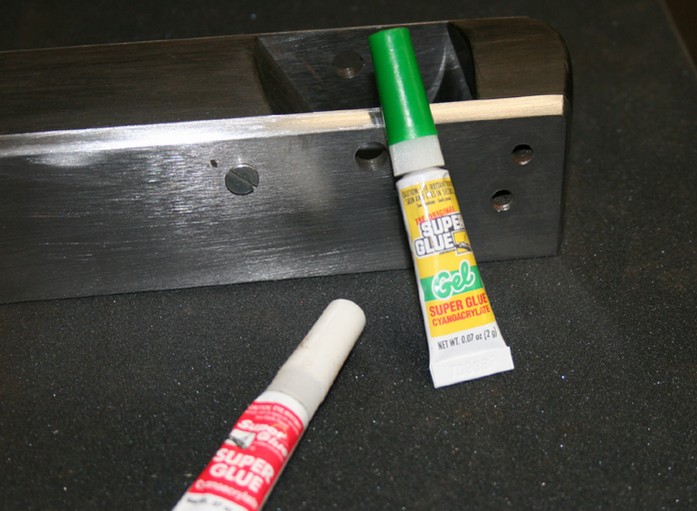
From
what I can ascertain, epoxy is not the glue of choice for ebony –
cyanoacrylate is the recommended way to go. No special preparation is
required, such as wiping down with acetone, since ebony is very dry,
but I did score the surfaces of both infill and steel shell to create
a key.
The
infills were glued in and the screws were inserted tightly. The gel
has a little open time, so this was a comfortable process. I added a
little gel into the screw holes as well.
Once dry the screws
were files down ..
Well
they started out this way. Then I began to get impatient as this was
slow work .. and unnecessary – I decided that the beltsander
would do the basic work much more quickly.
This
was finished by hand on 240- then 400 grit. I would have preferred
360 grit as the finish since I did not want too much shine –
not only would shiny sides show fingerprints, but I wanted a matt
contrast to the upper edge, which I planned to finish to a mirror
shine.
In
sanding the sides I discovered one more feature that spoke to the
precise machining that Ron did on this plane. The screws that hold
the lever cap were sanded flush with the sides. When I later removed
them they had been sanded evenly, that is, they were the same height
along their sides. This pointed to the screw holes being drilled in a
perfect vertical.
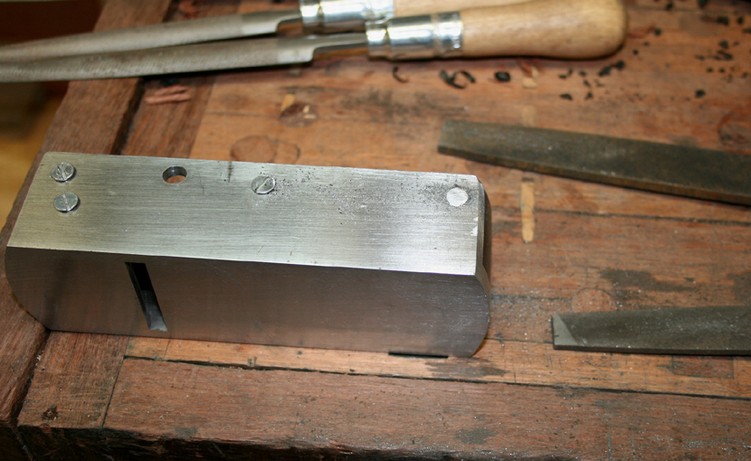
Tuning
the bed
The
bed needed to be tuned. Although careful shaping of the rear infill
had achieved a near perfect fit at the junction of the bed and steel
mouth support, this needed to be absolutely perfect to optimum
performance. To achieve this I first used a flat file to scrape the
bed flat to the support (stopping when I began to raise a wire edge)
…
..
and then smoothed it with a medium diamond file (325 grit) ..
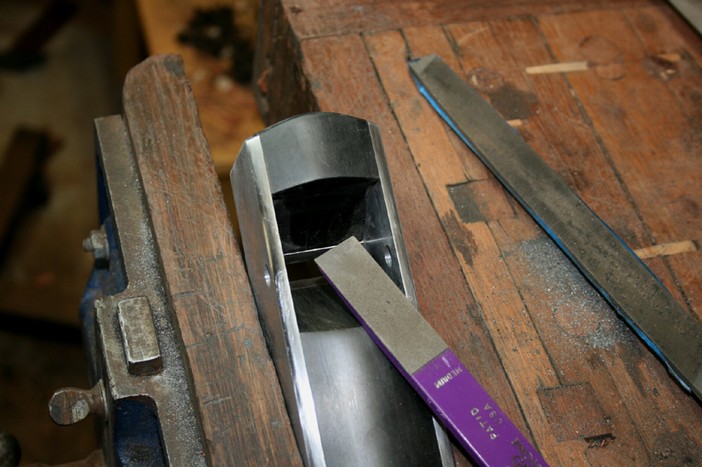
The
final lap
OK,
we are almost done. Time now to finish the wood.
First I used
sandpaper to smooth the upper radius of the sidewalls and the infill,
running through 400 … 800 … and 1200 grit.
Then
I brought out the Secret Weapon! I had this idea … Tormek
honing paste.

And
you know what .. it worked! It not only created a mirror edge for the
steel, but it took the ebony to a whole new level. The wood looked
like it had been burnished. It was just the way I wanted –
natural wood with a shine.

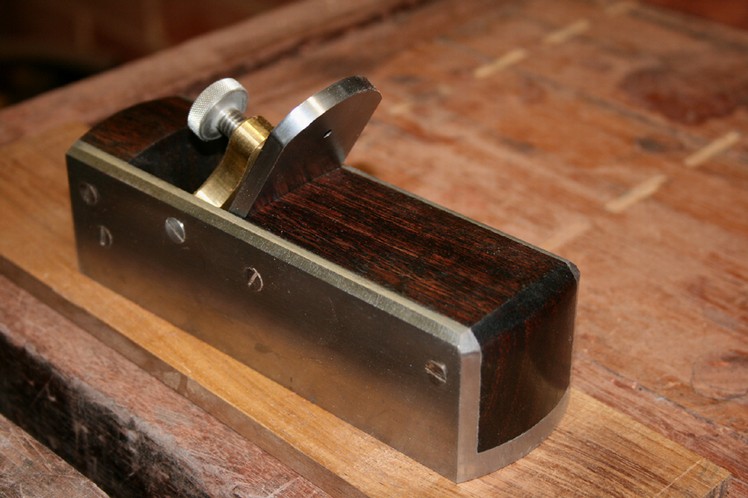
Fitting
it all together
After the second build session I asked Ron if he could supply
a brass lever cap screw. I thought that this would be a better look
than the steel one that came with the kit. Ron knew exactly what was
wanted, a smaller version of the ones that Johnny Kleso (aka
Rarebear) custom builds for the large smoothers. It arrived last
night.
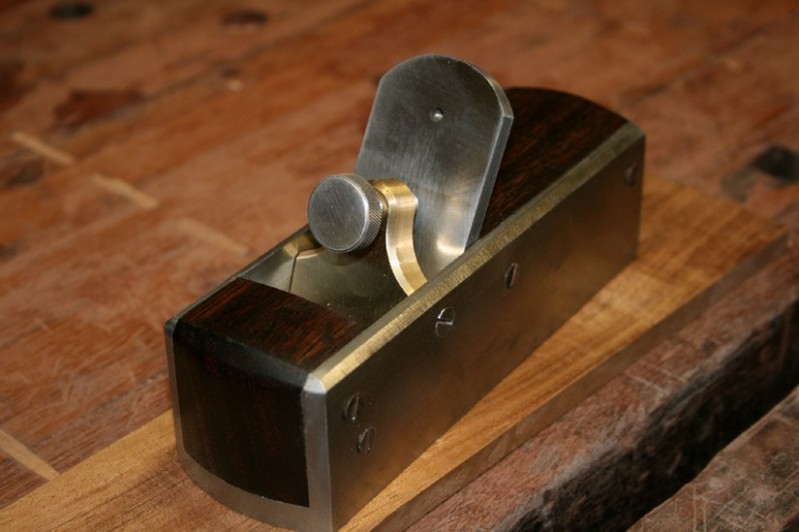
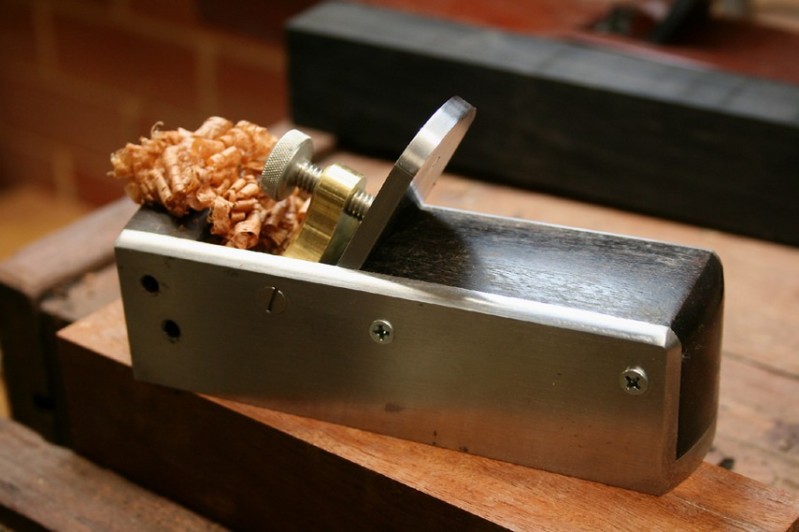
So here are all the pieces ..
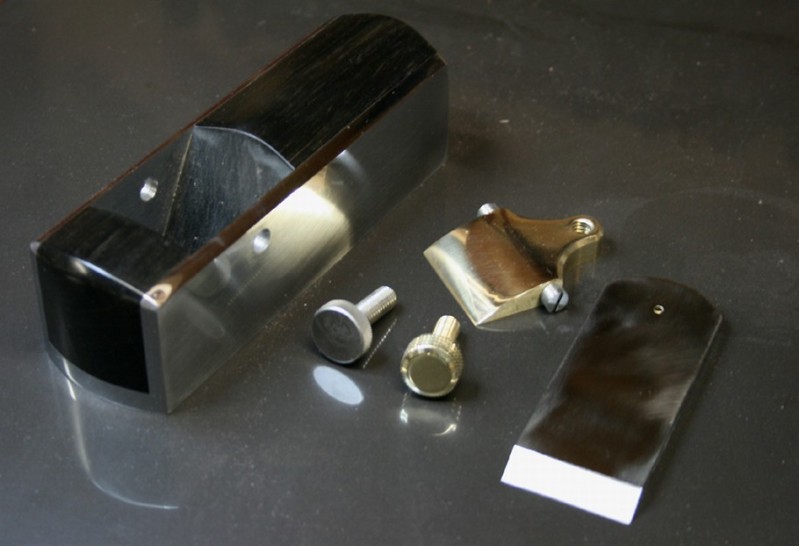
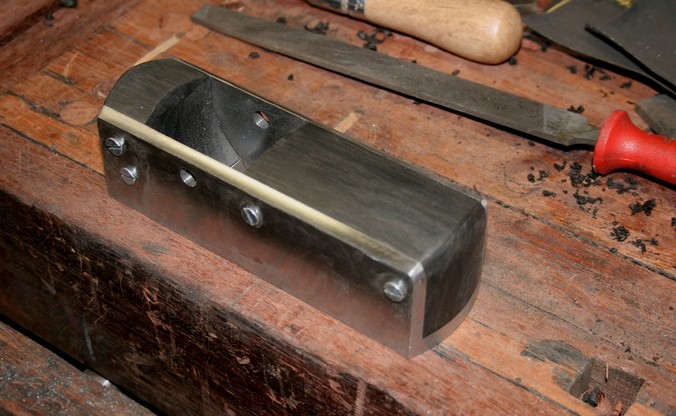
And
finally …

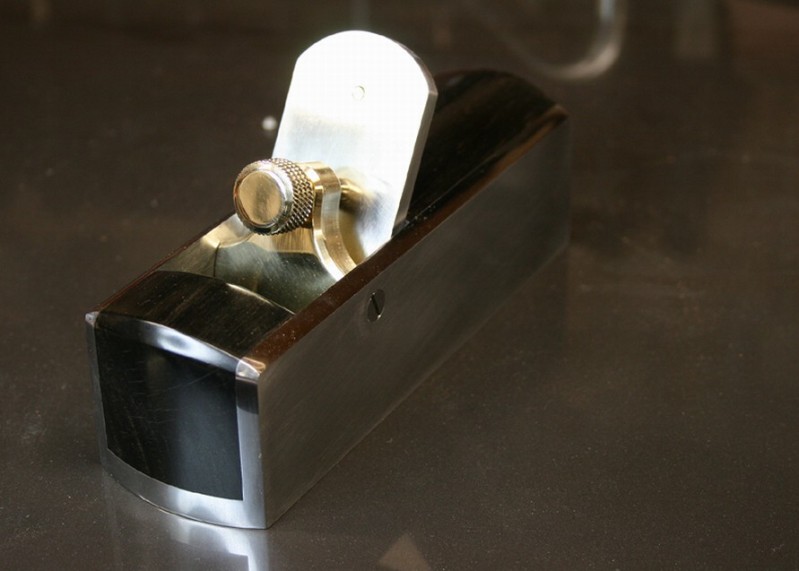
A
comment on the "figure" shown here. This is more a function
of the light when taking photos. In actual use, the wood is black
with the faintest visible amount of grain coming through. There is
also apparent (in the images) some checking (or what looks like
checking). I don't recall this from before. I suspect that it may be
the consequence of the heat generated while grinding the screws flat.
In any even it cannot be seen under normal inspection. The finish on
the plane is just wonderful and I am very pleased with it.
Putting
the plane to work
In the hand the plane has great heft and great authority. It
is remarkably heavy for its small size (all 6 1/2" or about
16.5mm).
The infill is also comfortable. All corners have
either been softened or rounded. I am pleased I went to the effort to
round the top - inspite of this creating a great deal more work - and
I wonder how comfortable it can be to have a flat top (like the
Holtey).
The plane makes fine shavings .. a little too fine
perhaps.
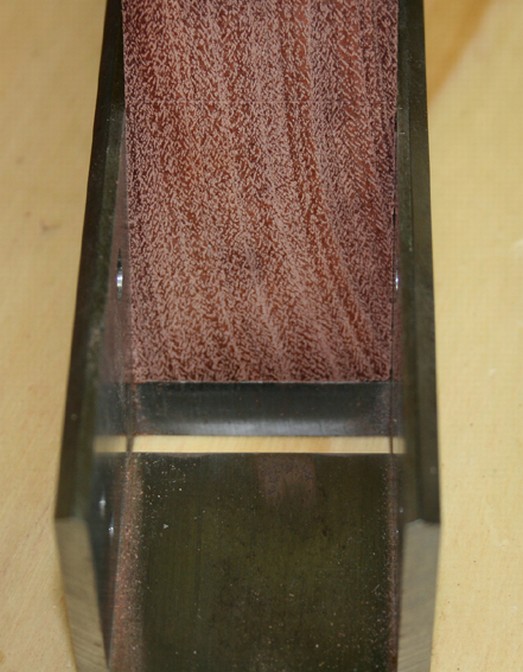
The mouth is still very tight. I measured it at .05mm
(or .019”). A 60 degree smoother does not really need a fine
mouth, but there are some benefits for really cranky grain and so I
decided to keep it at this stage - it is easier to open later. Keep
in mind that this smoother is aimed at small areas of work on woods
with difficult grain.
I get good shavings, but they are a
little striated at this stage. Or should I say that they are more
striated than expected – Jarrah tend to plane this way anyway
as the grain is short. The blade is sharp and smooth. I had hollow
ground it on my Tormek and then honed it through 1000, 5000 and 12000
Shaptons front and back. I usually associate striated shavings as a
result of a blade that is not truly sharp. This is unlikely to be the
case here. What I think is occurring at this point is that the front
of the mouth needs to be smoother – it was only finished with a
coarse file. The mouth is small and the shavings are being cut on the
rough mouth.
It
is too late to do this today. I will use diamond files to smooth it
off tomorrow.
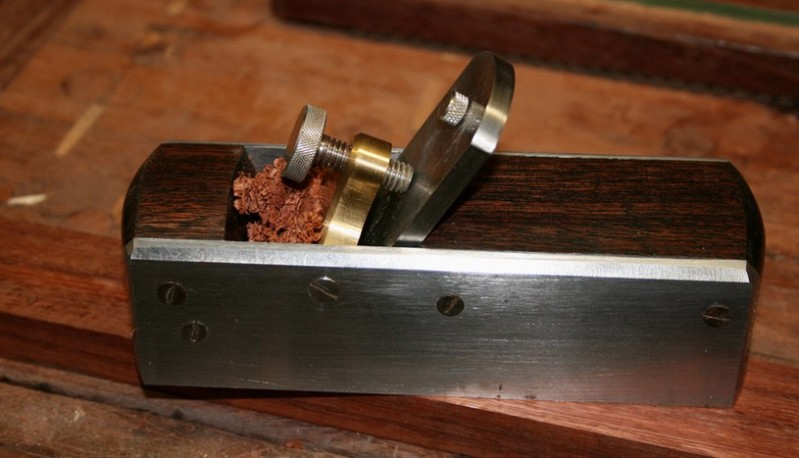
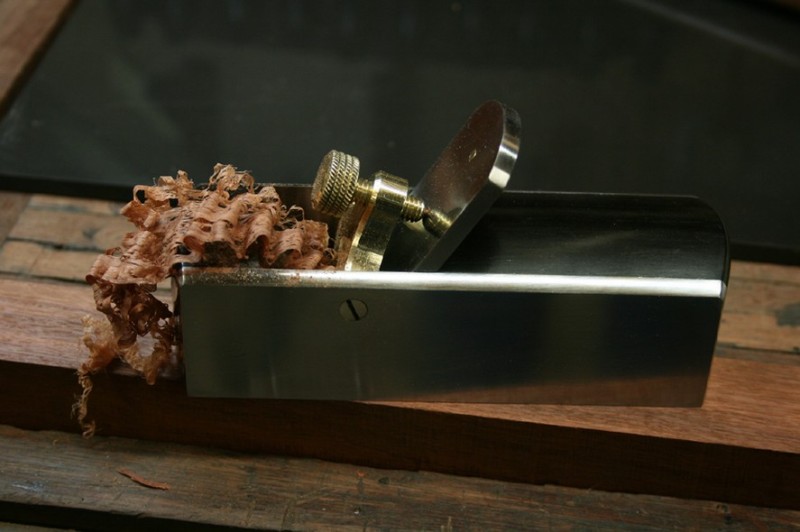
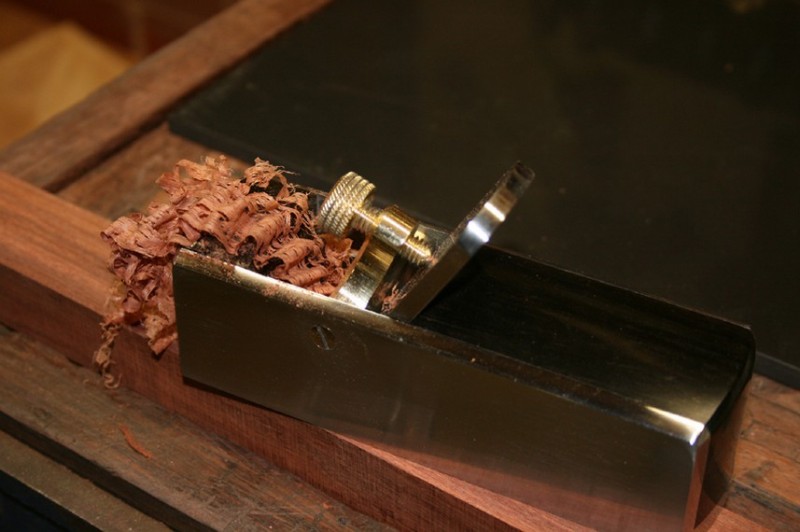
Anyway, here are shavings. The plane left a
wonderful finish in both jarrah (which I was able to plane both with
and against the grain without tearout, and also cherry.
It
is the next morning.
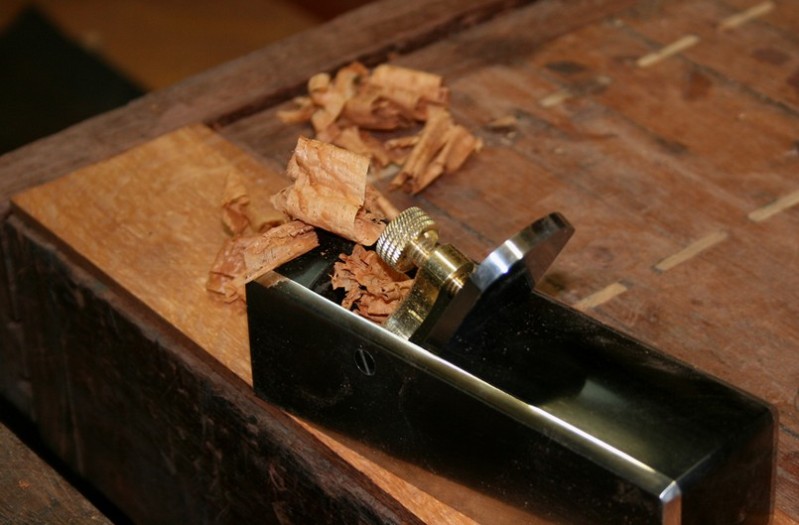
I
have managed to complete a little tuning of the plane. This consisted
of opening the mouth fractionally. It is still a very small .10mm
wide (about .025"). I also made sure that there were no burrs
left on the mouth from doing so.
The result was a significant
improvement in the quality and flow of the shavings. I was able to
obtain full width shavings in she-oak ...
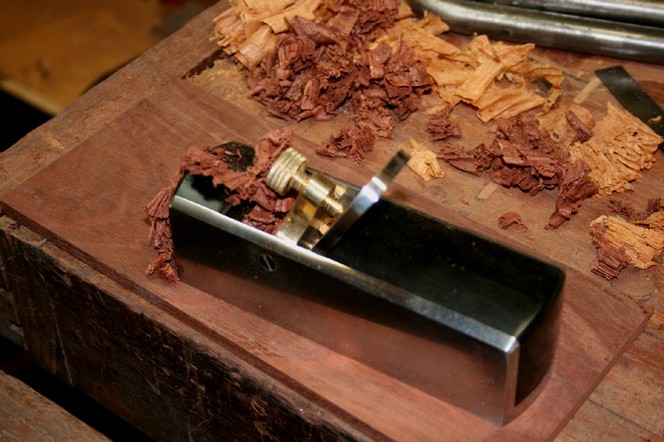
Planing
some interlinked jarrah was completed without any tearout, so I
turned the board around and planed into the grain. This was also
managed without tearout ...
Now
doubt I shall continue to fine tune this plane as it gets used, and I
feel that there is better performance still to come.
Thank
you Ron for a great plane.
Regards from Perth
Derek