
The Veritas 20 tpi Dovetail Saw
Veritas is well known for their innovation in tool design, and this certainly applies when it comes to their dovetail saws. While the design is recognisable as a backsaw – a saw with a blade stiffened by a spine - Veritas have broken with tradition when it comes to construction in order to produce a design that can perform as well as expensive custom and production saws … and sell for less than half as much.
Gone is the metal spine, and no longer is the blade morticed into the handle and secured with nuts-and-bolts.
“Each saw has a spine molded from an advanced material incorporating stainless-steel powder for weight, glass fiber for stiffness, and a polymer resin binder. An over-molded blade and stainless-steel handle-mounting bolt creates a solid one-piece blade/spine/mount assembly. A single brass fastener secures the bubinga handle. Made of high-carbon steel, the blade of each is 9-1/4" long and 0.020" thick, with a cut depth of about 1-9/16". (It is) 14-1/4" long overall.” (Lee Valley website)
There are now two dovetail saws in the range. The 14 tpi version was released a year ago, and just recently Veritas have added a 20 tpi. It is the latter saw that is the focus of this review.

About the tooth profile
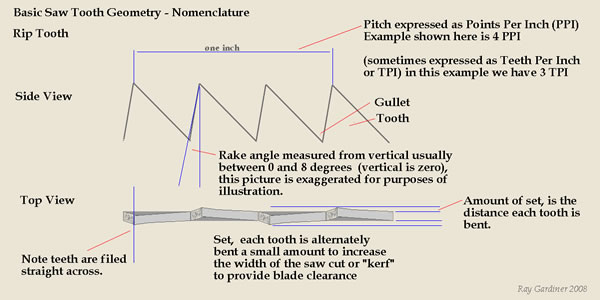
 Dovetail saw teeth are typically sharpened to a rip profile (filed
straight across like little chisels, see illustration below) as the
cut they make is with the grain.
Dovetail saw teeth are typically sharpened to a rip profile (filed
straight across like little chisels, see illustration below) as the
cut they make is with the grain.
The Veritas saw blades are high carbon steel manufactured and sharpened in Japan. Unlike the typical Japanese saw (which has impulse hardened teeth), the Veritas is capable of being re-sharpened with files.
“Tpi”? What is that?
Tooth size is generally measured by the number of teeth per inch. This is referred to as “teeth per inch”, or “tpi”. To calculate this, over the space of one inch, count the number of gullets (the V between the pointy bits – see illustration below). Now you have probably also read of tooth size being referred to a “ppi”. This stands for “points per inch” and is just another way of measuring the same thing. Here you count the number of points (the sharp bits) in one inch. What makes all this more confusing is that there will be one more point than a gullet in the first inch, so a 15 tpi saw blade is the same thing as a 16 ppi saw blade! The Veritas 14 tpi is, therefore, the same as 15 ppi.
 Courtesy Ray
Gardiner
Courtesy Ray
Gardiner
Veritas measure their saws in tpi. Side-by-side the 14 tpi and the 20 tpi saws are identical to one another (other than the notation on the blade). Here is a closer look at the differences in teeth size.
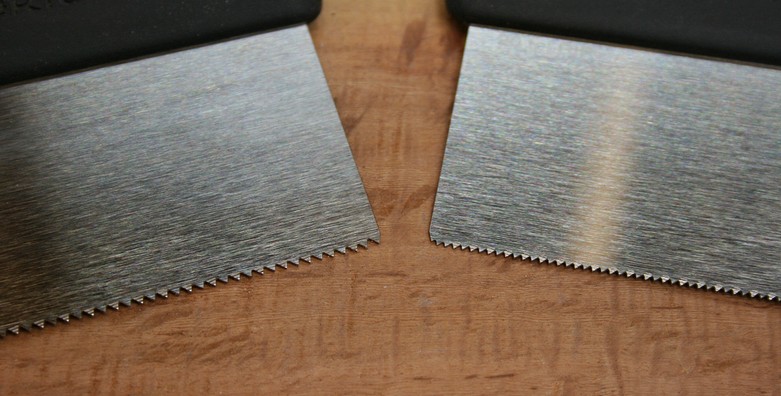
14 tpi to the left and 20 tpi to the right
Saw blade thickness
The Veritas saw blades compare with most modern sawmakers, such as Lie-Nielsen (and the original Independence Tools saw), Wenzloff & Sons, and Adria, in having a thickness of 0.020”. Very recently some sawmakers have begun introducing thinner blades into their dovetail saws, such as 0.015” (Eccentric Tools) and 0.018” (Gramercy and Wenzloff & Sons). It is not so much that a thin kerf is considered to be important for either sawing accuracy or smooth walls, but that these reduce effort in sawing (less wood to remove) and may aid in speeding the saw cut.
Saw Set
Surface smoothness is more likely to reflect the amount of set added to the teeth. Dovetail saws are generally required to cut to a maximum depth of ¾”, typically more shallowly that that, and very rarely beyond 1”. For such a shallow cut there is far less chance of a blade binding in the kerf and, consequently, most decent dovetail saws have very little set. This is often referred to a “minimal set”. Typically, this is around .003” on each side of the blade and, in this regard, the Veritas saws have the same design as others mentioned here. The amount and the consistency of set is an important factor in how a saw will work, especially with regard to the straightness of the kerf it cuts. Too much set (as often found in cheap, mass produced saws) leaves the teeth rolling around in the kerf and free to go off in undesired directions. When we use the Veritas saw we shall discover how straight it cuts.
The Handle
The traditional backsaw handle is wood and attached to the saw blade with nuts (see the IT, below). The Veritas handle attaches to the body in a manner more common to a handplane.
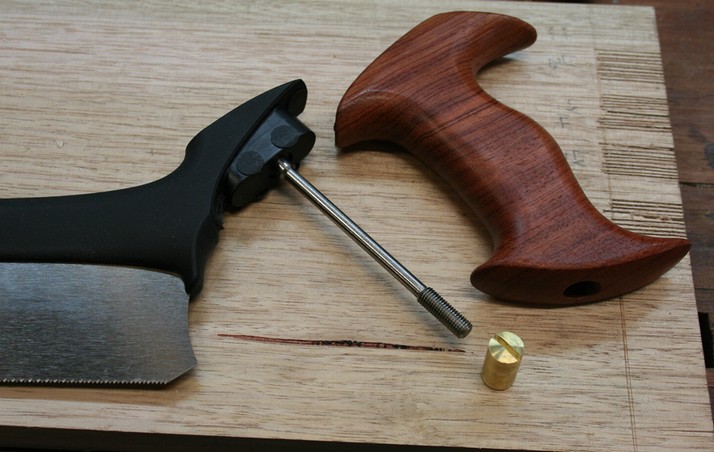
Where did the shape come from? Essentially, the shape of the handle was chosen for its comfort, and modelled from a few vintage saws in the Lee Valley archive. Those who have seen pictures of the Lee Valley’s vast collection of woodworking tools will appreciate that they had many models of vintage saw handles from which to experiment.
For a fascinating insight into the design history of this saw, read Rob Lee’s article.
For my part, there is little to separate the handle profiles of the Lie-Nielsen, Veritas and Independence Tools, with the exception that the latter is slimmer.

Left-to-right: Lie-Nielsen, Veritas, Independence Tools
Why a saw blade with 20 tpi?
The thickness of drawer and panel sides is generally dependent on the overall width and the weight the structure must carry. Drawer thickness for cabinets may range from ¼” to ¾”. In the USA cabinet drawer sides appear to be slightly thicker than their UK and Australian counterparts, where sides 5/16” thick are often considered the traditional choice.
There is a Rule of Thumb that suggests 5 to 6 teeth should always be within the saw kerf at all times. In line with this, a 14 tpi saw is going to be better suited for ½” to ¾” thick boards, while boards ½” and below will be better suited to a saw with around 20 tpi.
The question I am curious to answer here is whether this rule can be substantiated in practice?
Hang, Rake and their relationship to ease of sawing
“Hang” refers to the angle at which the handle is orientated to the blade. The hang of the Veritas saws is identical to that of an Independence Tools (IT), my reference dovetail saw, one long considered the model for dovetail saws in the modern period. It is also identical to the Lie-Nielsen dovetail saw, for those looking for another example.
There is, however, a difference in the rake of their teeth. The Veritas saws have a rake angle of 14°, the IT a rake of about 4° and the LN a rake of 0°.
A few observations:
All things equal, the more vertical the teeth (0° being vertical), the more aggressively (faster) the saw will cut. Conversely, the greater the amount of rake, the less aggressively (slower) the saw will cut. The advantage to fast cutting is that there is less opportunity for errors to creep into the saw cut.
The disadvantage of teeth with little rake is that the saw will have more difficulty starting a saw cut. And conversely, the greater the amount of rake, the greater the ease in starting a saw cut.
Hardwoods also benefit from more rake. Those with the least rake will be experienced as “notchy”.
Less teeth per inch equal larger teeth. More teeth per inch equal smaller teeth. 14 tpi will cut faster than 20 tpi.
The upshot is that the 20 tpi Veritas saw, with its 14° of rake, is expected to start easily, cut smoothly, but also more slowly.
When starting the saw cut one has a choice of three methods from which to choose. The “Rob Cosman” method is to start at the far edge of the board, saw a slight bevel, and then saw horizontal. The advantage here is that the blade gains a purchase in the wood for sawing. The downside is that a saw with zero rake will get stuck in the kerf.
The “Joel Moskowitz” method is to start on the horizontal and cut the wood evenly. The saw here is easier to start than with Rob’s method.
Finally, the “Adam Cherubini” method is to start the cut on the near edge so that one can follow the two adjoining marked lines, and then level the saw. This also effectively reduced the rake of the teeth and makes for an easy start. The downside is that a low bench can make the stance uncomfortable.
 The “Rob Cosman”
 The “Joel Moskowitz”
 The “Adam Cherubini”
One significant issue in evaluating the “feel” of a dovetail saw is that the saw may be used differently by users. The hang, the rake of the teeth, the angle at which it is held to the wood … all these factors affect the relationship of the saw to the wood. One saw may be experienced differently by a variety of users because they do not use these aspects in the identical manner.
Performance
The Veritas 20 tpi saw was the principal focus in this review. I included the Veritas 14 tpi and the 15 ppi Independence Tools (IT) dovetail saws for comparison.
The IT was the forerunner to the Lie-Nielsen (who later went on to manufacture the IT under their own name). Information about the IT may be found in an article here.

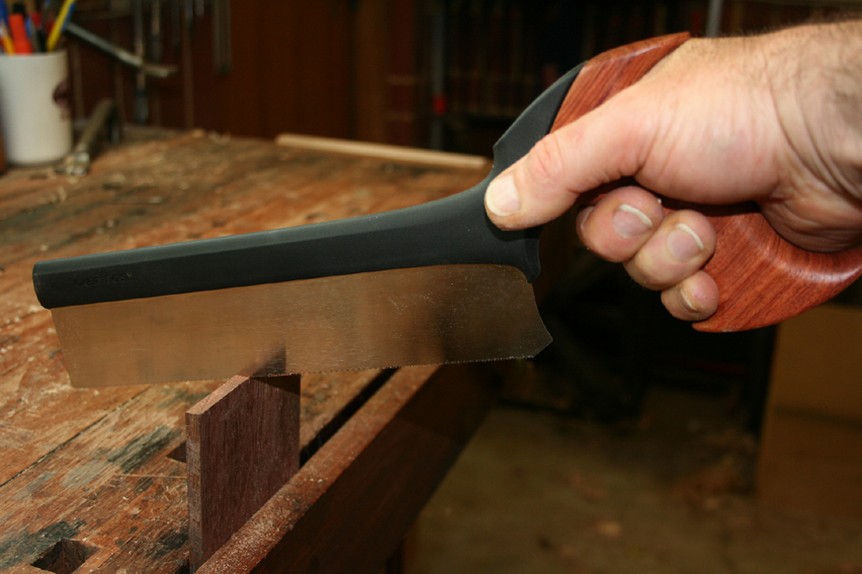
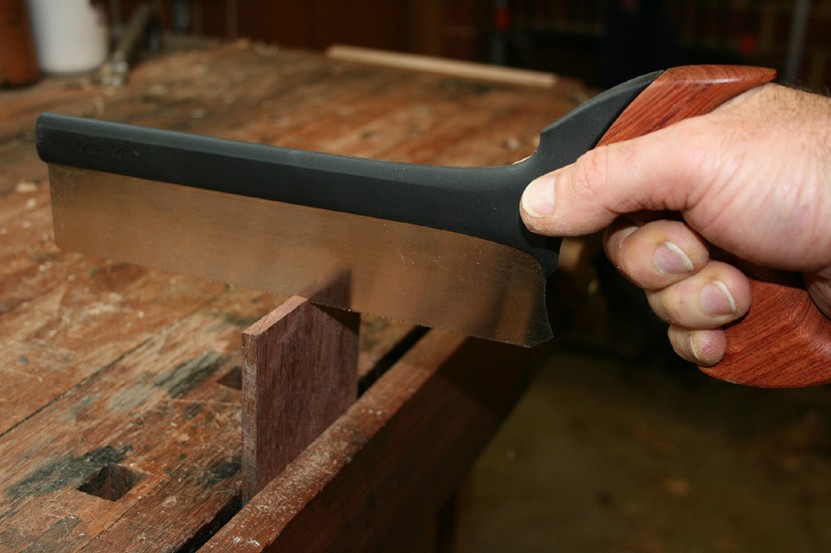
The Independence Tools (IT) saw above, and the Veritas saw below
How the saws felt in use
In the hand and unweighted, the handle of the Veritas feels nearly indistinguishable from my Lie-Nielsen dovetail saw. They have near-identical dimensions, especially in the girth. The IT has a slightly thinner handle. My palm measures 4” across, which I have been told is on the broader side (I don’t really believe that!). The Veritas (and the LN) is my preferred fit. The IT feels just a little too small. The only reason that the IT has remained my go-to dovetail saw has been that it cuts so sweetly.
Anyway, this is a long way round to say that I very much like the Veritas handle.

When the saws are weighted, it is evident that the brass-spined IT is heavier in the toe. The lighter Veritas’ (both the 14 and 20 tpi) have a neutral balance. In practice this translates into the IT requiring less downforce as you saw. The differences are not great, however, and both saws respond positively to a light touch when sawing.
I found that that 15 ppi IT started fairly smoothly in all woods, hard and soft. I’d score it 7/10. There was never a hint of any binding once sawing.
The 14 tpi Veritas also started smoothly, more smoothly than the IT. I’d score this 9/10. It would cut cleanly and easily until it reached a depth of about ½”, when it would begin to bind very slightly. This was never enough to impede the saw cut, and really only apparent when used alongside the IT. This 14 tpi Veritas also cut faster than the 15 ppi IT, which came as a surprise (bearing in mind that the Veritas has significantly more rake than the IT).
The 20 tpi Veritas started like a dream – extremely smoothly - the easiest of the three saws. Easily a score of 10/10. It also cut the slowest of the saws. This was noticeable in the presence of the other saws - generally requiring an extra stroke – but otherwise may not have been evident. As with the 14 tpi version, slight binding was present. This was less than on the 14 tpi and again minimally intrusive.
Dealing with the slight binding was easy enough – a wipe of candle wax across the teeth was sufficient to cause this to be a non-issue.
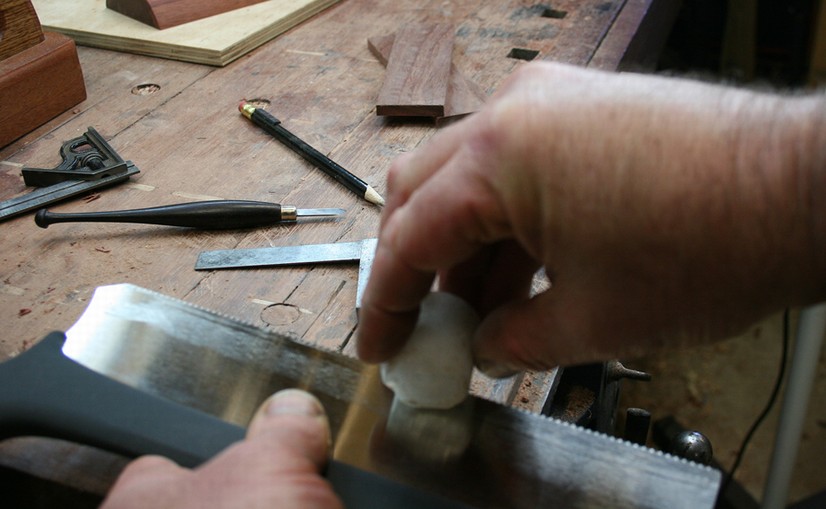 Waxing the teeth.
How the saws cut
I was interested in the straightness of cuts and the smoothness of the kerf left behind. The latter should be self-evident: it is more common to join woods of different densities, one hard and one soft. If the join is a tight fit, the softer wood will compress and fill any gaps in the completed dovetail joint. However, if one is using two hardwoods, neither of which will compress, then the accuracy of sawing is more important, as is the smoothness of the kerf. Further, thinner boards will create smaller dovetails, and in turn this maximises the impact of the kerf quality. Note that the width of the kerf is actually unimportant, other than a wider kerf requiring more effort to saw.
Below are the results are of sawing different thickness boards – from ¾” down to 1/8” – of both hardwood and a medium hard wood. The hardwoods were West Australian Jarrah and USA Mesquite, both recognised as brittle. The medium hardwood was Tasmanian Oak (a eucalypt).
In each of these segments is a front and rear elevation. As seen in all the series of pictures, the kerf straightness was similar for all the saws. None experienced any difficulty in holding a line.
 ¾” Tasmanian Oak.
 ½” Jarrah
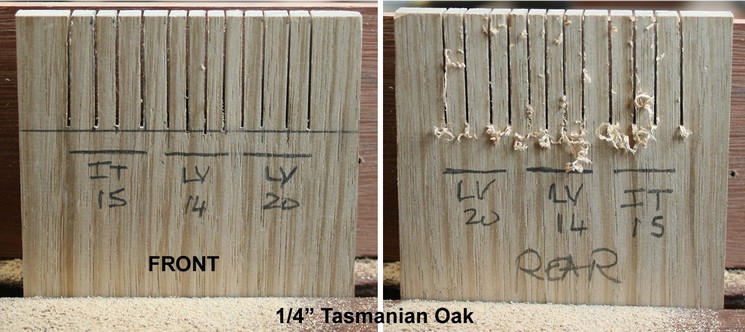 ¼” Tasmanian Oak
 1/8” Mesquite
I measured the width of the kerfs using a set of feelers. Mine are metric, however I converted this to imperial.
Both Veritas saws created a kerf .45mm (.0177”) wide In Tasmanian Oak. The IT created a kerf .50mm (.0197”) wide.
At first these measurements did not make sense as the kerf should be .020” for both saw blades plus .006” for the combined set, producing a total kerf of .026” (.66mm). It occurred to me that there must be some springback within each kerf. This hypothesis was supported by the .05mm wider kerfs on Jarrah, a stiffer wood, although there appears to still be some springback in Jarrah. I could squeeze .55mm (0.0216”) through the IT kerf and .45mm (.0177”) through the Veritas kerfs.
Importantly, the figures indicate that there was more set on the IT than on the Veritas saws.
Below is a sample of the kerf faces by the three dovetail saws. As may be seen, the 14 tpi and 20 tpi Veritas saws were essentially identical and produced a smoother surface than the 15 ppi IT saw. It must be noted, however, that the surface of the IT was not considered to be unnecessarily coarse – just that the Veritas kerfs were noticeably smoother.
 Tasmanian Oak
The final test for the 20 tpi Veritas was to saw kerfs in a ¼” thick Jarrah board approximately 1/16” apart. I did a great many of them. The saw cuts as straight as a die. It is a “point-and-shoot”. Here is a sample …

Conclusions
All three saws are capable of being used in all wood thicknesses.
I liked the 20tpi Veritas best for thin boards. It was easiest to start and smoothest in practice. This is important with thin boards as they tend to flex slightly and, especially with hardwoods, as larger teeth tend to catch.
I was impressed with the 14 tpi insofar as I recognised that the smooth start linked to the 14° rake makes this saw a dream for a novice dovetailer. For the more advanced user on a budget, this saw will surprise with the speed it cuts. It was faster than the IT, which I put down to the 14 tpi having less set, which then required less waste to be removed.
For boards greater than ½” I will, however, continue to stick with the 15 ppi IT. It may not be as fast or as smooth to start as the 14 tpi Veritas, but it cuts more freely in the kerf, and it does so without the need for lubrication. The reason appears to be that it has a touch more set. This does make enough of a difference.
Using a dovetail saw
Since dovetail saws are about cutting dovetails, I have included below a pictorial of some of the steps involved. This project used boards that were ¼” thick, and therefore provided another vehicle to assess the 20 tpi Veritas saw.
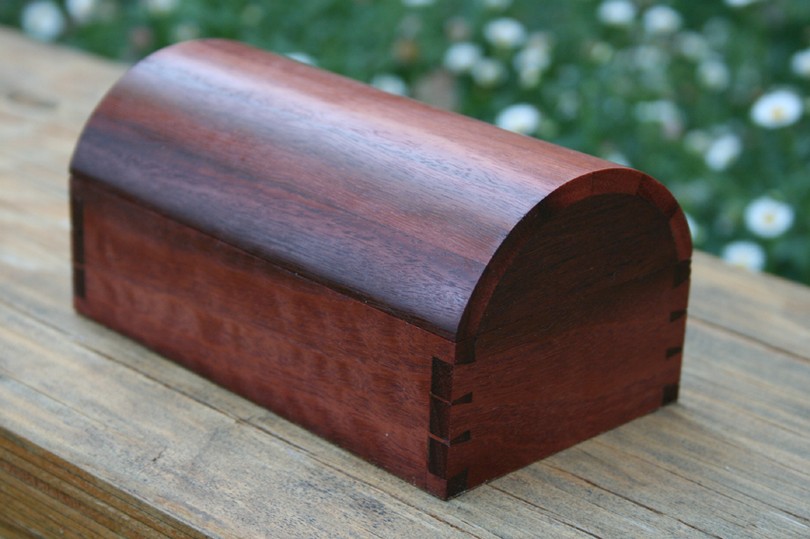
The plan was to build a box with a coopered lid for my wife.
The wood is Jarrah. Final dimensions: 6" long x 3 1/2" wide x 3" high (at the centre).
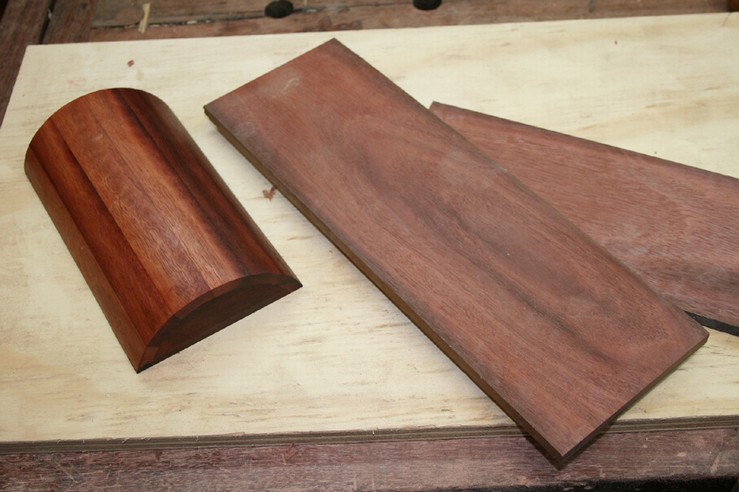
Here we have the coopered lid along with the undimensioned boards that will make up the sides. In the second picture the board ends are marked for the depth of pins/tails.


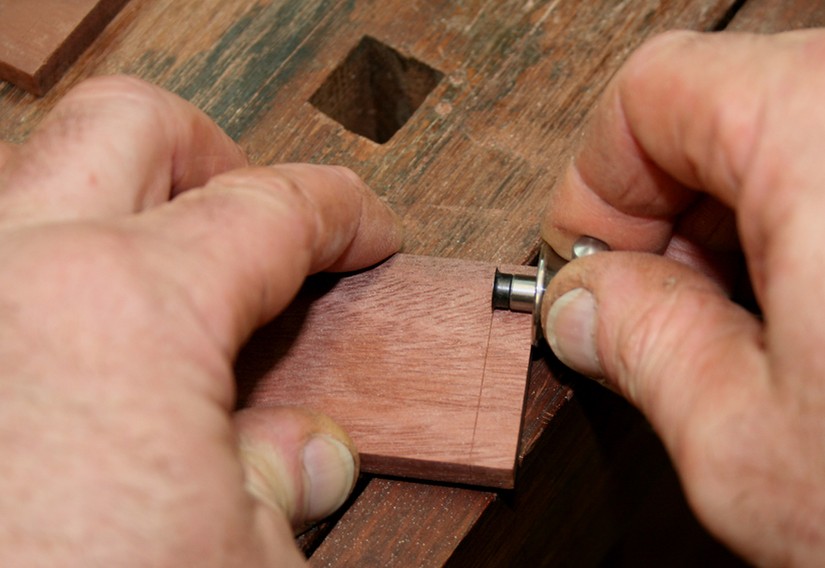
The tails are marked (and cut first), and then the boards are ganged together and cut. The second picture demonstrates the finger support for the blade as the saw cut is started.


The tails are sawn, and then the waste is chopped out with a 1/16” dovetail chisel (all that would fit). These are going to be tiny and skinny dovetails!

The shoulder waste is removed ….
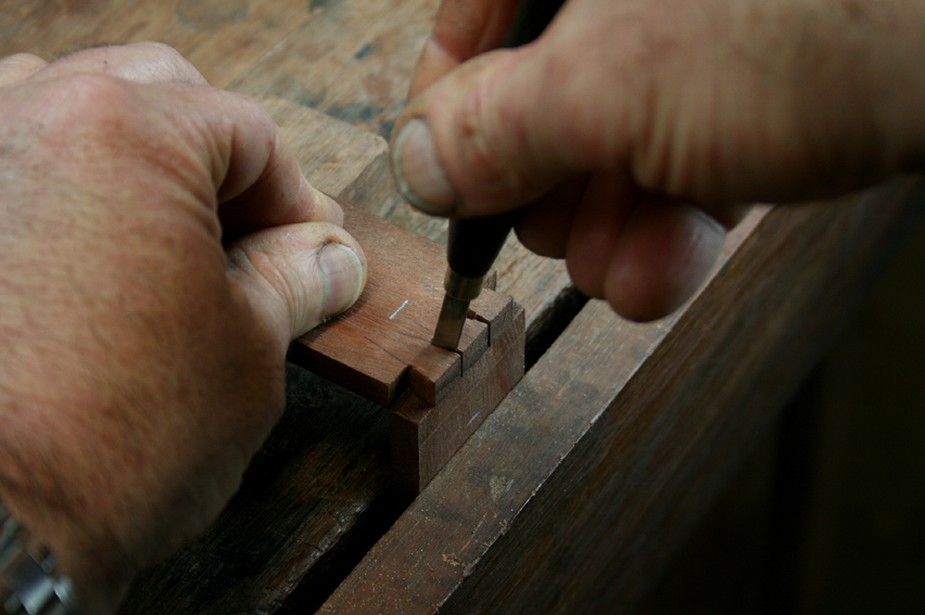

The pins are traced from the outline of the tails with a thin-bladed marking knife.

This time I first remove the waste from the pins with a fretsaw ….
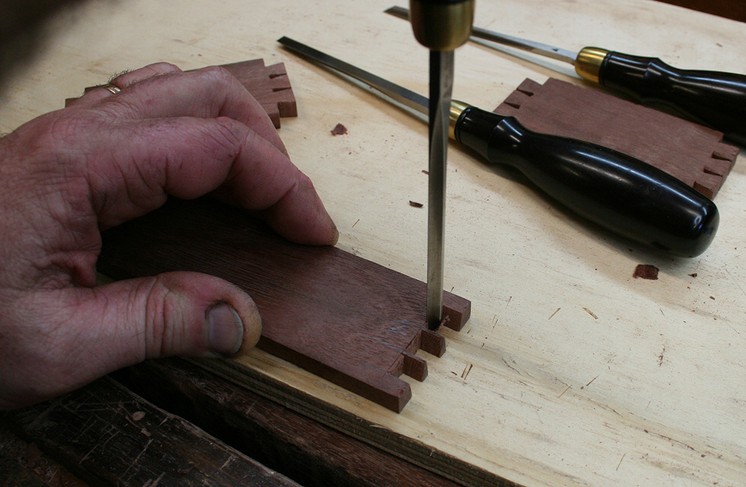

… and clean up the baselines with a chisel. I test fit only the ends of the mating boards.

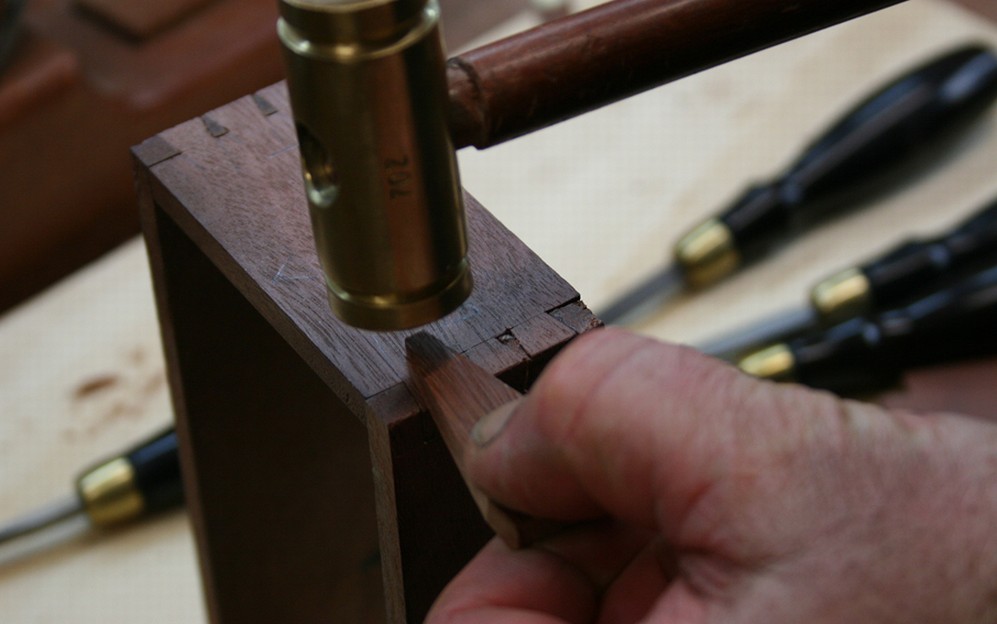
Here’s a tip. Brittle wood into brittle wood is a recipe for splitting corners. I support the sides with a clamp to prevent blow out when I hammer the ends together. Once together I use a wedge of wood to tap between the pins.
And the finish...
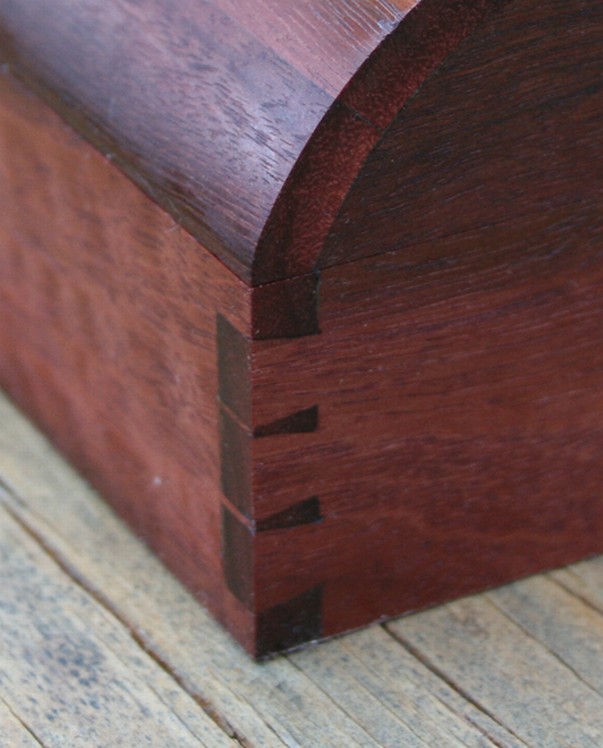
First a close up of the dovetails:
… and the completed box …
Final Words
The Veritas saws offer a reliable low price entry into the world of hand sawing at a level of performance that rivals saws double its price.
What impressed me most about the 20 tpi Veritas saw was the ease of starting - especially in very thin boards, the comfort of the handle, the control of the saw, and the straightness of the cuts. I was a less happy with the very slight binding.
Overall, I would conclude that the 20 tpi version fulfils its brief as a dovetail saw for thinner boards, specifically those under ½” thick.
Derek Cohen
Perth, Australia
November 2009