
The Veritas Small Shoulder Plane
Veritas recently released their third shoulder plane, the ½” wide Small. This joins the ¾” wide Medium and the 1 ¼” wide Large to complete the set of shoulder planes.
 courtesy of Lee Valley website
Answers before Questions, Commentary before Discussion
I’ve always considered a shoulder plane to be an important piece of kit in the cabinetmaker’s tool bag. It is used for detail work, such as tuning tenon shoulders - for which it is named – as well as the shoulders on moldings, raised panels, and breadboard ends.
The shoulder plane is the plane I turn to when I need to make delicate precision cuts, ones that require the very finest of shavings, where one may consider using a paring chisel but recognise this would not provide sufficient control. Shaping the curve of a bead comes to mind.
And then there are the times it follows a coarse plane, such as a rebate plane, to fine-tune and square rebates, or to smooth the bottom of a dado that may have been roughed out with a chisel.
Since I consider the shoulder plane so useful, it never ceases to surprise me when I hear other woodworkers arguing that it is unnecessary addition to the workshop. I recognise that they are thinking only of tenon shoulders, as it is possible (and indeed some do prefer) to tune these with a chisel. This article is a review of the Veritas Small Shoulder Plane, and for this reason I shall focus on evaluating and demonstrating this plane’s design, build quality and user friendliness. As with all the reviews I write, there is also an emphasis on seeing the plane in use, and for the reason outlined above I shall concentrate on the tuning of tenon shoulders.
The other question that does seem to me to warrant an answer is why one might need a small shoulder plane? In other words, what is the difference or advantage in having shoulder planes of different sizes?
The Anatomy of the Veritas Small Shoulder Plane
 Courtesy of Lee Valley
Notable features include:
The blade is 1/8” thick and made of A2 steel (O1 is available as an alternative).
Low bed angle of 15°. The blade is positioned bevel up. Its 25° bevel creates a 40° effective cutting angle.
An adjustable toe allows the mouth size to be opened or closed.
There is a Norris-type adjuster for blade projection.
The body is ductile cast iron and the sides and sole are machined and ground to be perfectly square.
Side set screws aid in positioning the blade for ease of set up and stabilizing it in use.
The standard and quality of this Veritas tool is out of the top drawer. Over the years we have come to expect faultless execution from the Lee Valley factory. My example of the Veritas Small Shoulder Plane does not disappoint in any way.
Although this should not matter as much, I find the design of the Small to be very attractive. It has a smooth, flowing line that simply begs to be held. This really is a case of form and function coming together. I have long coveted the LN ½” Bronze, which is a copy of a Norris design. It is beautiful. The LN and Veritas are different in their designs but each has star quality.
Dimensions
How “small” is the Veritas Small Shoulder Plane?
Before its release I was aware of only two other ½” wide shoulder planes on the market, those from Lie-Nielsen and HNT Gordon. These planes differ from the Veritas in that both are infill construction (versus the all-metal of the Veritas) and are simple wedge-and-hammer designs (that is, without mechanical adjusters). I have the LN in my workshop (on loan from a friend) but have not used the ½” Gordon. I am very familiar with the ¾” version of the latter having owned one for several years. Neither of these planes is included for review, however I have provided below some comparisons of their physical attributes for perspective.
 1/2” shoulder planes
My first shoulder plane was a Stanley #93, which is 1” wide. I still have it. I still use it (.. well .. when the blades in the others are dull). It does the job … just not as comfortably as others that have come to share shelf space. Until the arrival of the Veritas Small, I have relied on a Veritas Medium (3/4”) and a large Norris-design infill (1 ¼”).
Below are several of these shoulder planes for a visual comparison of size.

From the rear: Norris-design infill, Veritas Medium. In front: LN ½” Bronze and Veritas Small.
Facts and figures
|
|
Length |
Width |
Mass |
Blade thickness |
|
Large infill |
8” |
1 ¼” |
1100 g |
3/16” |
|
Veritas Medium |
7” |
¾” |
900 g |
1/8” |
|
Veritas Small |
6 ¼” |
½” |
530 g |
1/8” |
|
HNT Gordon |
5 5/16" |
½” |
250 g |
3/16” |
|
LN ½” Bronze |
5” |
½” |
230 g |
1/8” |
Setting up the Small shoulder plane
The blade: Out of the box the blade has a flat back and is honed sufficiently to work reasonably well. Nevertheless, no self-respecting woodworker expects to leave it this way, and I honed it to a mirror polish very rapidly up to a 12000 Shaptons.
As is my preference, I ground the bevel face to a hollow at 25 degrees and freehanded a microbevel. The A2 steel honed quickly and created a very keen edge (On this point I must add that I have not experienced problems with honing A2 at 25 degrees. I have used A2 blades on shooting board planes for many years extremely successfully. There is no difference in “sharpness” between A2 and O1. For end grain, I prefer the durability/edge retention of A2 over O1).
It is vital that the blade is ground and honed square as there is minimal leeway for lateral adjustment – the bevel must be square to the mouth and the side of the blade must be parallel with the body.
The sole: Now the question arises whether one should lap the sole. Lap the sole?! Well, as Lee Valley note, and as I tested, the sole is flat in “rested” state, that is, when there is no downforce from the lever cap wheel.
Lee Valley writes, “A very light clamp force will deflect the blade bed 0.0005". A hard clamp force will deflect the blade bed by as much as 0.003".
There appears to be two schools of thought here. Lee Valley essentially suggests that the lever cap wheel may be used as a fine adjuster – increasing the tension deflects the plane bed and increases the thickness of the cut. This adjustment is not to be confused with the blade’s projection being increased by the blade adjuster, per se.
David Charlesworth (in his DVD, Furniture Making Techniques) believes that “a new shoulder plane will need a little bit of tuning”. He states that the manufacturer (in his case, he was reporting on the LN #073), will machine the sole flat without the blade and the lever cap being set to working tension. In his DVD he demonstrates this change in the sole’s shape when tension is applied to the blade by the lever cap wheel, and he argues that the plane will not be capable of a fine shaving if the “bump” remains. His response to this is to lap the sole flat with the blade retracted but in “working tension”.
The choice is yours: increase the blade projection via the lever cap wheel as a means of fine tuning a cut, or remove the source of the blade projection prior and use only the blade adjuster. Each option is a valid method. My preference here has been to retain the original construction of the plane, and utilise the lever cap tension as a means of fine tuning the cut.
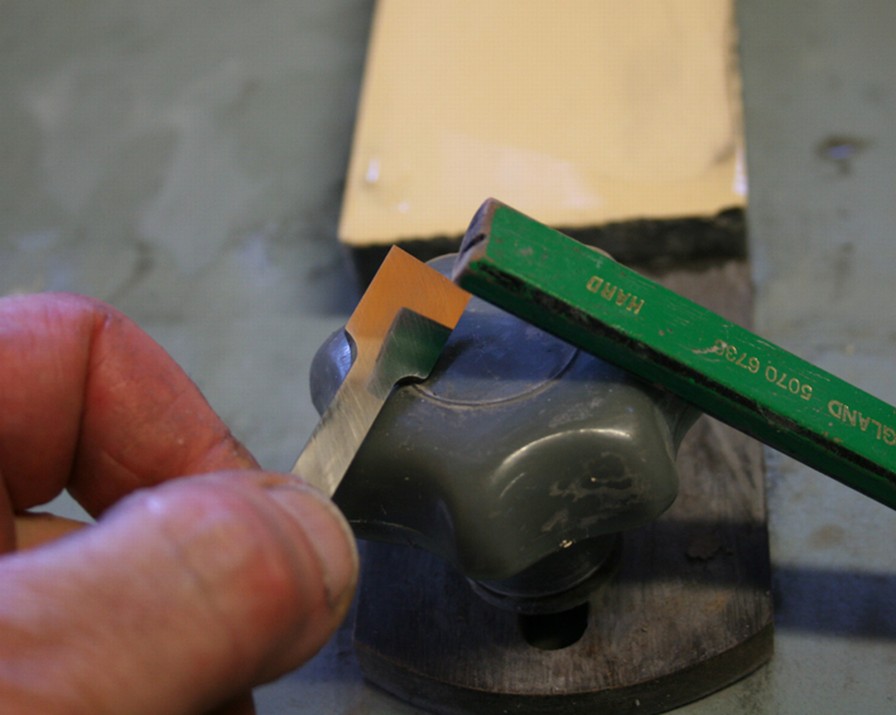
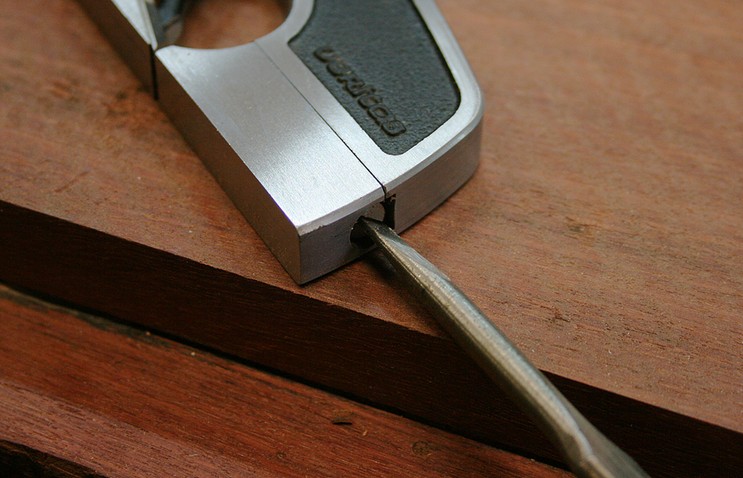
Positioning the blade: The aim is to set up the blade a hair beyond the side of the plane’s body. This enables the blade to reach into the corner of a square cut. Setting the blade flush with the side of the body will eventually cause the plane to be pushed away from the sidewall, and leave behind a sloping waste.
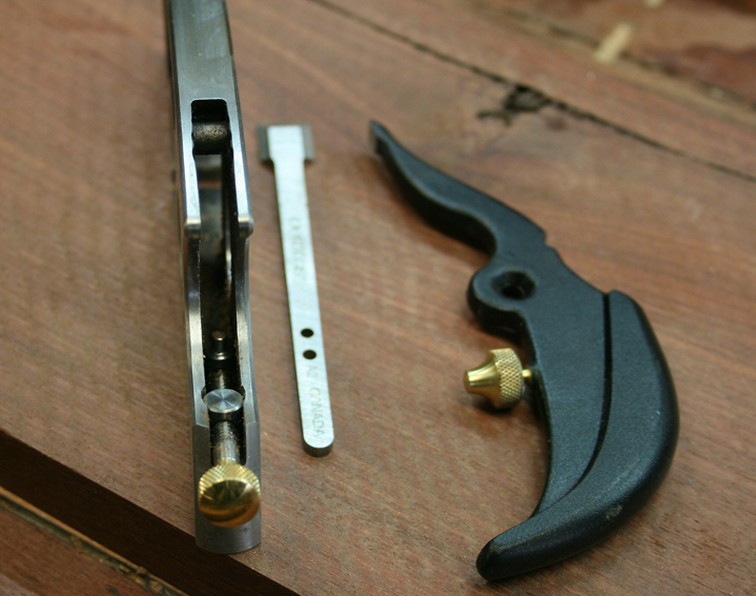
In the picture above you can see the plane minus the blade and lever cap.
Withdraw the set screws, insert the blade so that it ends up seated bevel up, and replace the lever cap.
Tighten the lever cap wheel sufficiently to hold the blade but still permit movement.
Move the blade into position on one side, that is, with the blade face extending past the body by a hair, tighten the lever cap to hold it firmly in place, and then adjust the set screws on that side until they make contact with the side of the blade.
Loosen the lever cap, and adjust the blade in a similar way on the other side of the body.
Do not adjust the blade without first reducing the tension from the lever cap wheel. Without first doing so you may damage (bend) the adjuster shaft.
There is backlash on all adjusters. In my experience with Veritas planes, backlash has tended to be small (e.g. 1/8th turn for a Veritas Premium Block Plane, and ¼ a turn on the Veritas Medium Shoulder Plane). On this sample I found more than expected, ¾ turn (this was repeated on a second sample). For reference, the Stanley #93, another bevel up design, had backlash of 1/8th turn. On bevel down bench planes, a Stanley #4 ½ required 1 ½ turns while a LN #4 ½ was a tight ¼ turn. More backlash does not decrease the performance of a plane, but it does increase the frustration of the user.
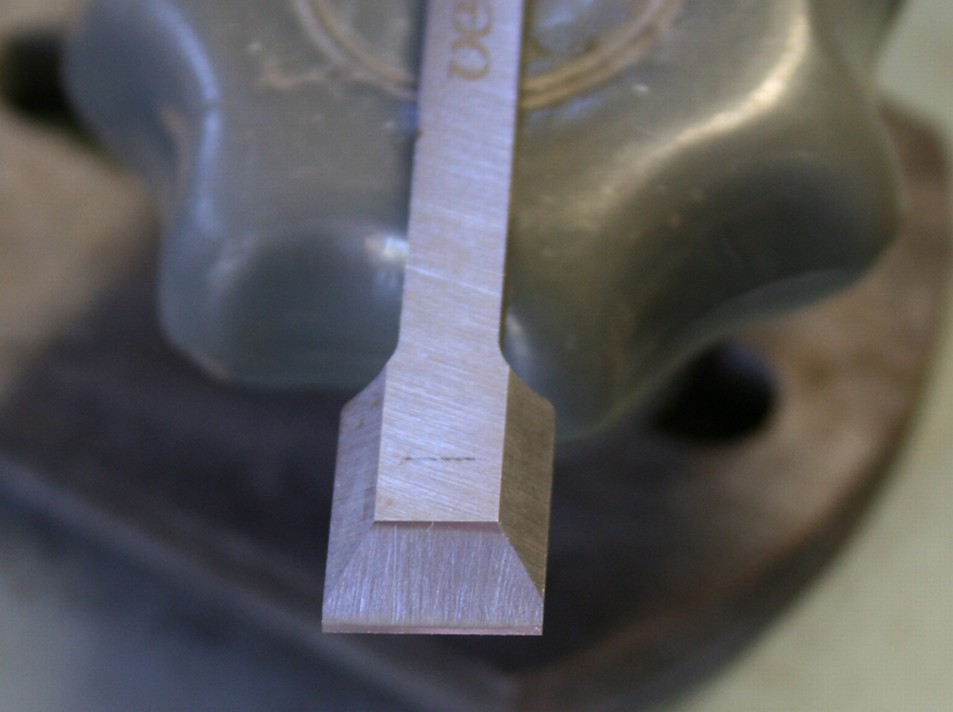
Adjusting the mouth: There is a good reason for setting the mouth as small as possible. However a small mouth, per se, is unnecessary when planing the end grain of a tenon shoulder since end grain does not tear out.
A small mouth makes it easier to set the blade for a very fine (.0001”) shaving, plus a tight mouth limits tear out when the plane is used on face grain.
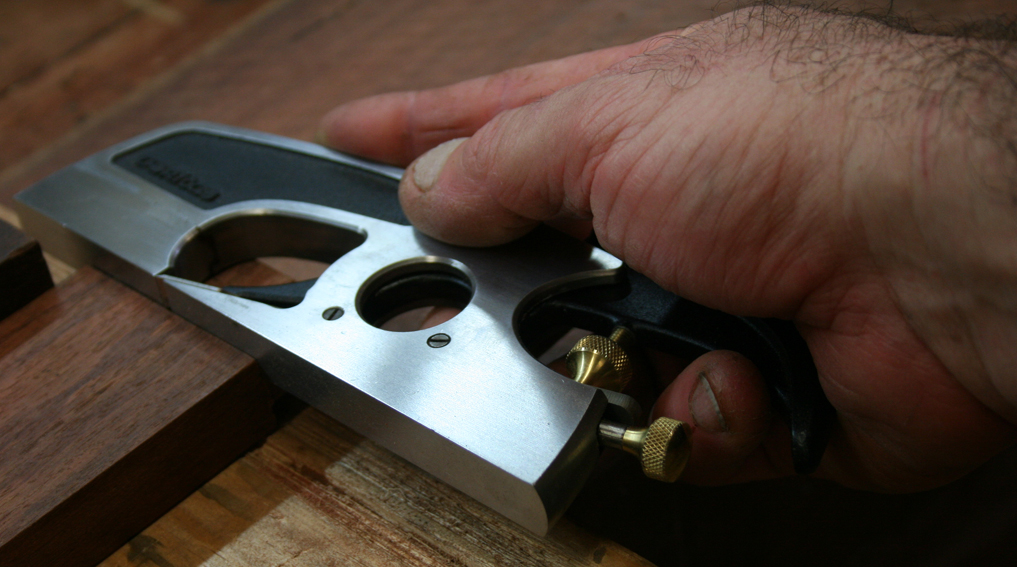
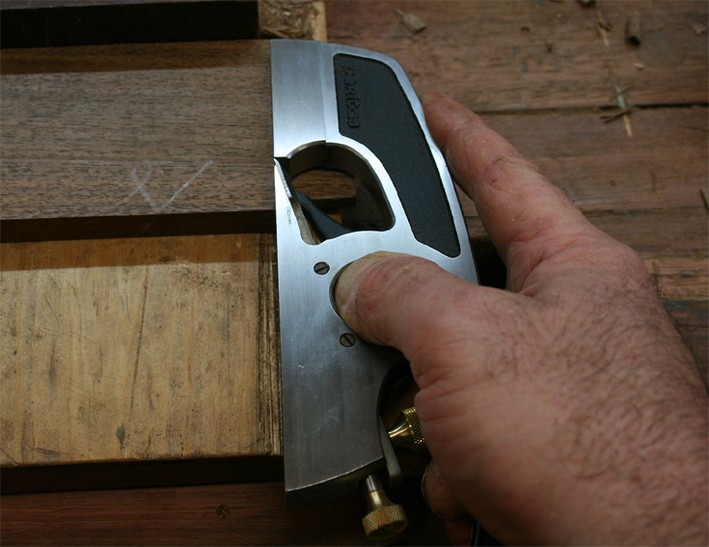
Step one, loosen the Toe Locking Screw …
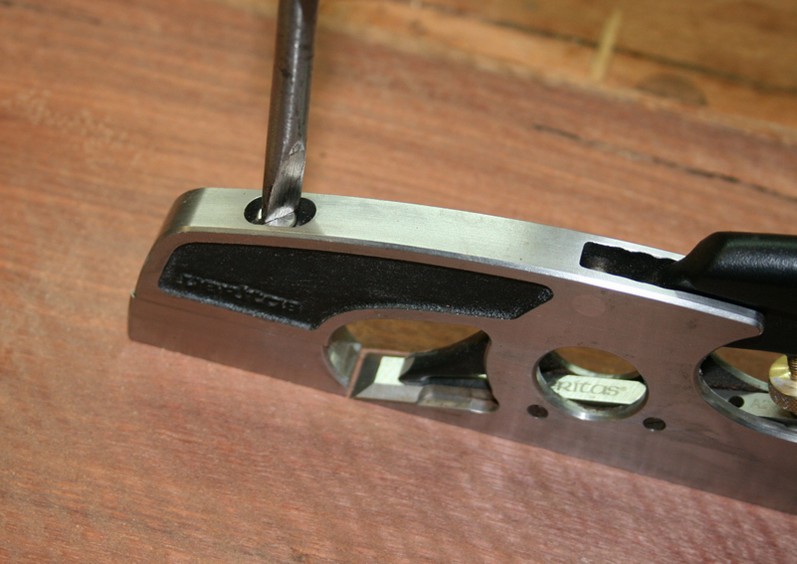
Next, adjust the Toe Adjustment Screw in-or-out …
Close the mouth as much as possible, leaving just sufficient room for a shaving to pass.
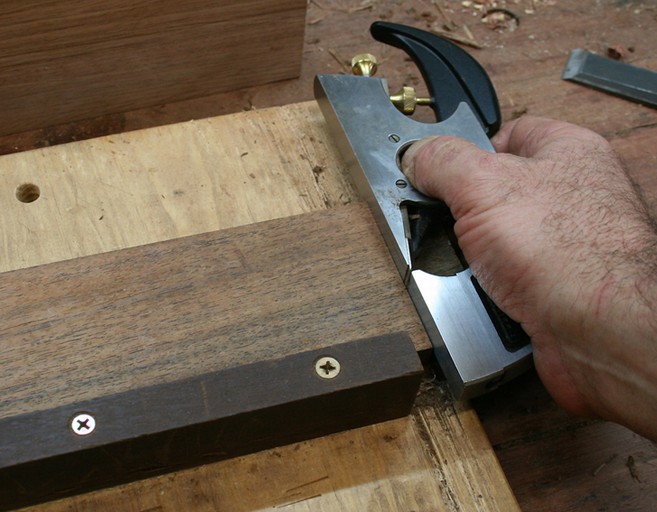
Handling the Veritas Small Shoulder Plane
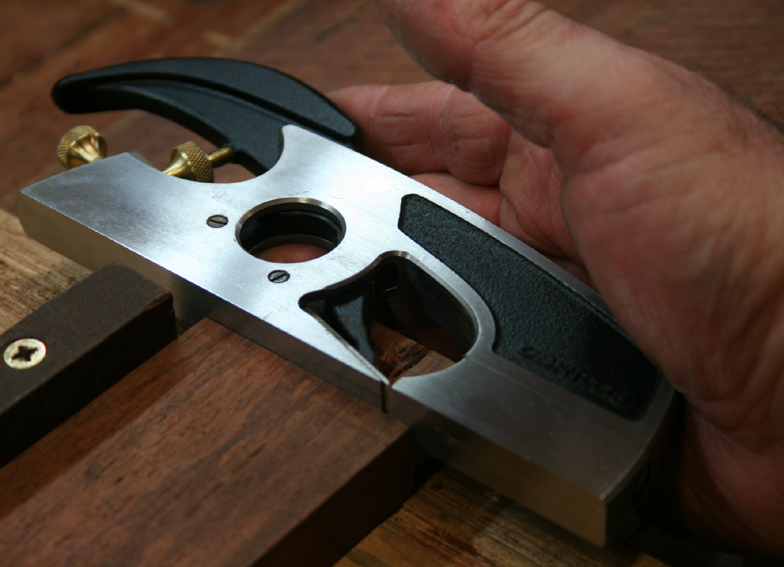
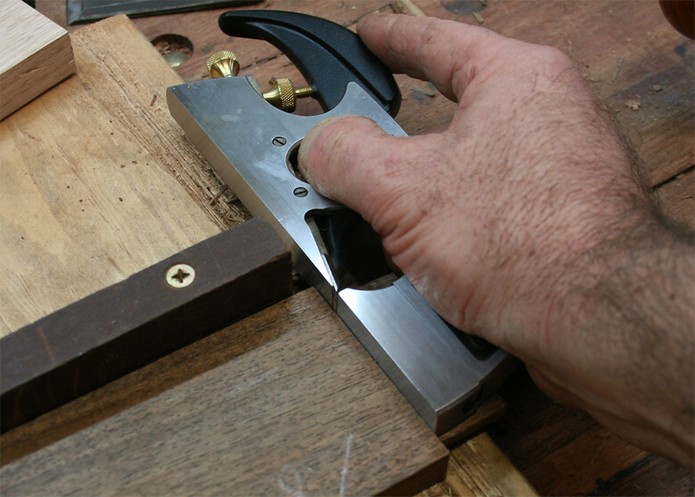
Comfort: The Small differs from the Medium and Large shoulder planes in that it is intended for one-handed use. The lever cap is shaped to meld into the palm of the hand.
How well does it work one-handed? It does so very well indeed. This is an extremely comfortable and balanced plane to hold.
Below is a view of the plane held to push forward. The lever cap tucks into my palm, my little finger tucks under the lever cap, and my thumb gains leverage from the round cut out.
When the plane is pulled, the rounded nose fits into the palm and the thumb drops into the round cut out.
For a small plane, there is sufficient mass to lend the plane momentum and to feel that the mass was working for you, rather than needing to be man-handled through the wood.
Compared to the Veritas Medium, the Small has less mass and this does translate into less momentum. Similarly, alongside the Veritas Small, the LN ½” Bronze, with its lower mass, required more muscle to work.
Does size count? A famous question! If the Medium is easier to push/pull, and a large shoulder plane easier still, then why does one need the Small?
Why use a #4 smoother when a #4 ½ smoother may just perform better owing to its greater mass, or because it can take a wider shaving? Think of the Small as a #4, and the Medium as a #4 ½, and the Large as a #5 ½. I am the type of guy that, given the choice of smoother size, tends to plump for a smaller model as these tend to offer more feedback, although I do prefer one with greater-than-average mass.
Here are some reasons to choose a smaller shoulder plane:
Firstly, a smaller plane may better suit a smaller hand. Heft and balance are often a personal choice, in the same way that one chooses a bench plane, above.
Secondly, a smaller plane may better fit the work piece. Consider the most common width of a shoulder. I would estimate that there are more stretchers that are ¾” and under used than those ¾” and greater. Applying the “1/3 Rule”, the tenon shoulder of a ¾” wide piece would be ¼” for the tenon cheek and ¼” for each tenon shoulder. Below are images of the same ¼” tenon shoulder with different sized shoulder planes …

Clockwise: ½” Small, ¾” Medium, 1 ¼” Large.
A third reason is visibility - the larger the shoulder plane, the less easy it is to see what one is doing.
Remember that the Veritas Small is a one-handed plane, where the other, larger shoulder planes are best used with two hands.
In my opinion, a determining factor in choosing a smaller shoulder plane is the ease with which it cuts end grain, especially hardwood end grain. A small shoulder plane may cut softwood end grain or face grain well if the blade is sharp enough, but then lack the authority of a heavier shoulder plane on harder wood.
My experience with the Small was that it manages well with hardwood end grain. I did not find that it was necessary to apply a higher level of muscle power to take a shaving. For contrast, the Small certainly has more authority than the smaller LN ½” Bronze. It lies midway between the lighter LN and the heavier Veritas Medium, the latter of which carries itself even better through hardwood end grain.
Where I prefer the Small over the Medium is that I found it more comfortable to hold for small work. The Small provides more feedback. It feels more precise in what it does. At the other end of the spectrum I find that the large infill has rarely been used over the past few years. It has the highest mass and carries the most momentum of the shoulder planes, but it just feels awkward to hold on narrow shoulders.
The Big Question – if I could only buy either the Small or the Medium, which would I choose? That is tough. The Medium is the better allrounder. The Small is the nicer to use on ¼” shoulders.
Using the Small Shoulder Plane
Here is an example of the creation and fitting of a mortice and tenon joint. The emphasis below is on the part played – or not played - by the shoulder plane.
As will all joinery, start with pieces that are perfectly square (sides and ends). For reference, the mortice board is Tasmanian Oak (which has similar qualities to White Oak), and the tenon board is Jarrah, another hardwood.
While I often chop out mortices with a chisel, on this occasion it was formed with a power router and the ends squared with a mortice chisel. The use of a power router was to ensure square sidewalls and reduce any unwanted variables.

I aim to get away without using a shoulder plane when making a M&T joint. It comes down to how straight one can saw the tenon shoulders. Sometimes I am, and sometimes I am not good enough.
I thought today would be one of those days the shoulder plane would be unnecessary. I prepared my usual way for a clean and straight saw cut. First I knifed the shoulder cuts as deeply as I could all the way around the board. Then I undercut these lines to create a fence against which to saw …
One of the most useful tools in a workshop is the Bench Hook. It has a central role in sawing and tuning tenons.
The first role it plays is in providing support for a carcase saw when making the shoulder cuts …

Now I turned to my bandsaw for the cheek cuts. More typically I use a tenon saw, but I was feeling a little lazy – after all, it was the shoulders that were of importance, not the cheeks. I must point out that I have a great bandsaw, a large and powerful bandsaw, but today it let me down. The blade appeared to follow the grain and the cheeks were cut out-of-square …
OK, so here is an opportunity to say what the ½” Veritas Small Shoulder Plane is not suited for. A Veritas Large or my Norris may have sufficient registration to plane a cheek, but a narrow Small lacks the registration for control and is likely to plane any angle it (rather than you) chooses.

I would rather use a chisel to square up the cheeks …

The rabbet block plane (such as the LN #60½R) or a skew block plane are both suited to the fast removal of waste, but I find that these planes are less easy to control where the waste is removed, and are capable of removing more than one intended.
A joinery float is another excellent tool for tuning cheeks, but is best suited to the removal of small amounts of waste, such as when making a final fitting. It was unsuited to this situation.

These tools were useful in straightening the cheeks … but a test fit revealed that the base of the tenon was too thick …
It is so easy to plane or chisel the cheeks out-of-parallel during this correction phase. For this reason, the best tool for this task is the router plane. This will quickly and easily create cheeks parallel to the stretcher faces.

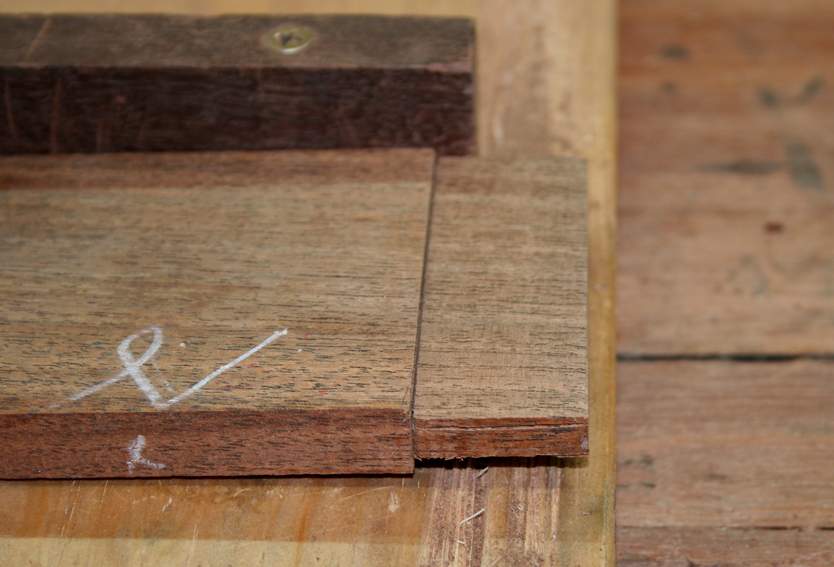
So finally the tenon slides into the mortice.
It looks a perfect fit from the reference side. Damn, too good – no work necessary for the shoulder plane!
But wait! The reverse side is sawn straight but still reveals a gap. This won’t do.
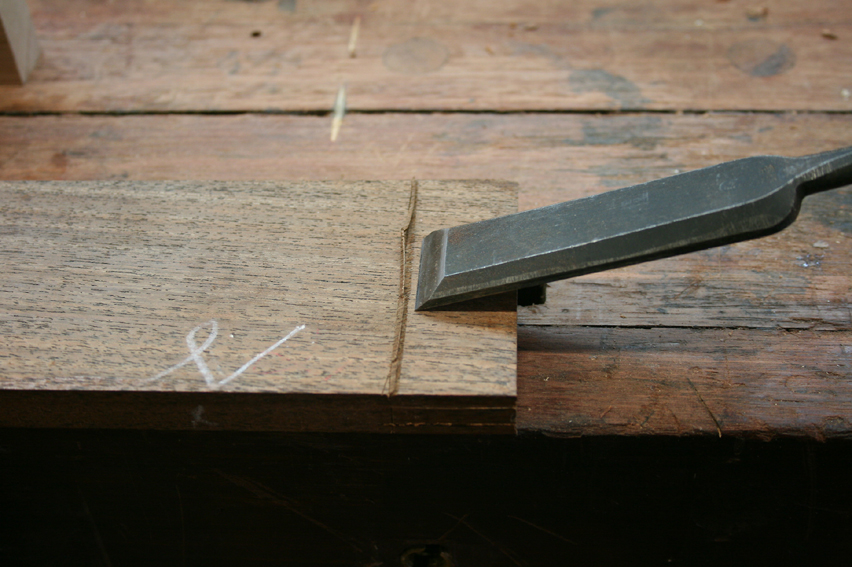
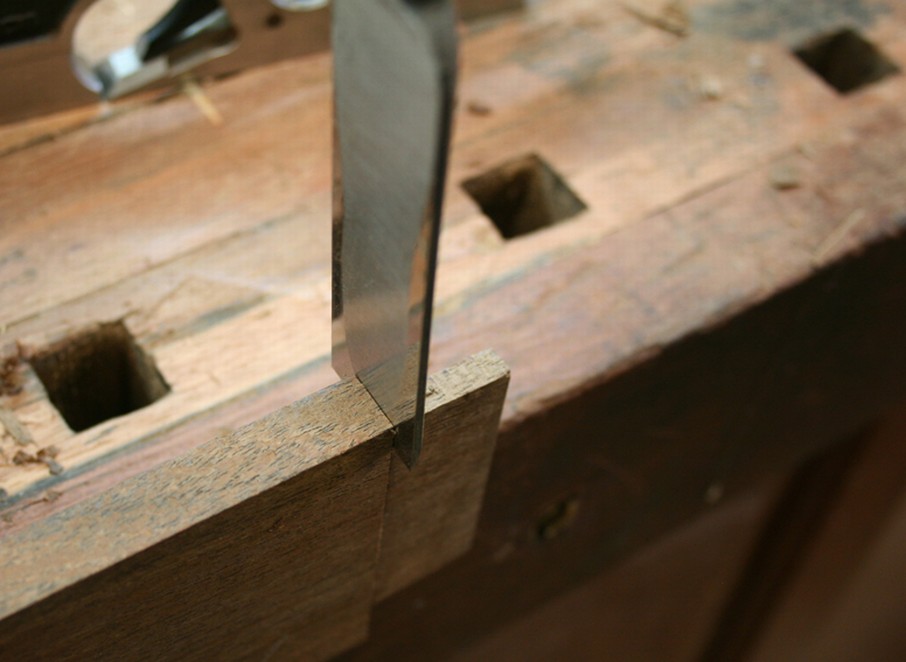
Time for the shoulder plane!
Now please do not just grab your shoulder plane and zap the shoulder(s) impulsively. All you will end up doing is creating shoulders that are even more out-of-square.
First check that the stretcher sides are indeed as square and parallel as you thought. They are? Good, onto the next step then.
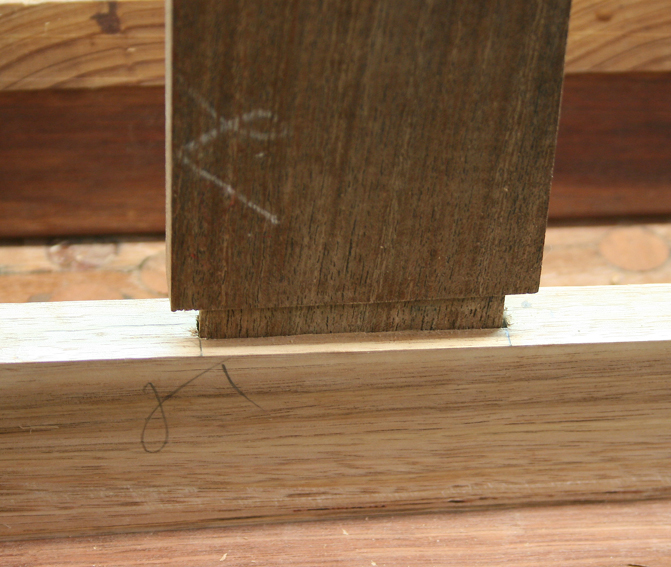
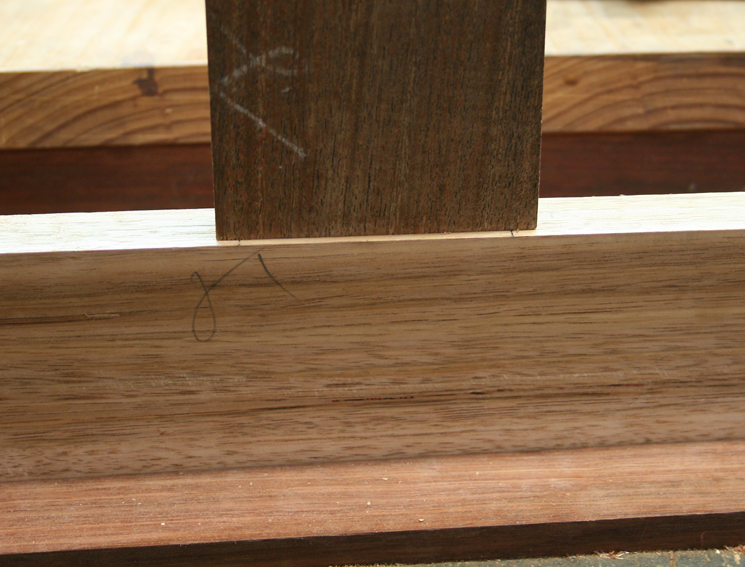
Now, using a square, scribe a line around the shoulder starting at the low mark. The plan is to plane to these lines.
Now back to the bench hook.
My bench hook has the fence situated in the centre of the base. This allows for a board to be sawn with either a Western backsaw (where it is pushed against the fence) or a Japanese saw (where it is pulled against the fence).
This design is also useful when using a shoulder plane on tenon shoulders. One always enters the shoulder from the outside, and never planes across the shoulder as this will cause spelching (breakout) at the far end. For this reason, one pushes the shoulder plane from the one end and pulls it from the other end. Below is an example of pulling the plane into the shoulder, with the stretcher supported on the far side of the bench hook fence.
Think of the bench hook as a shooting board, the shoulder plane as the shooter, and that you are going to shoot to a line.
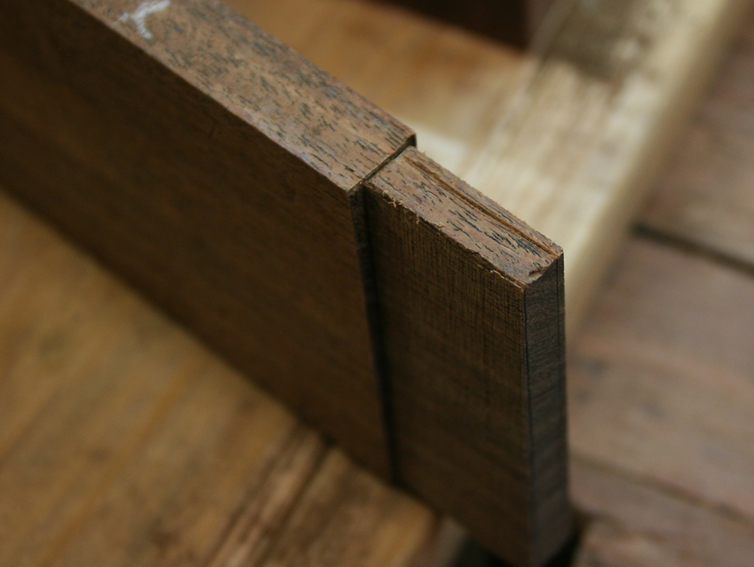
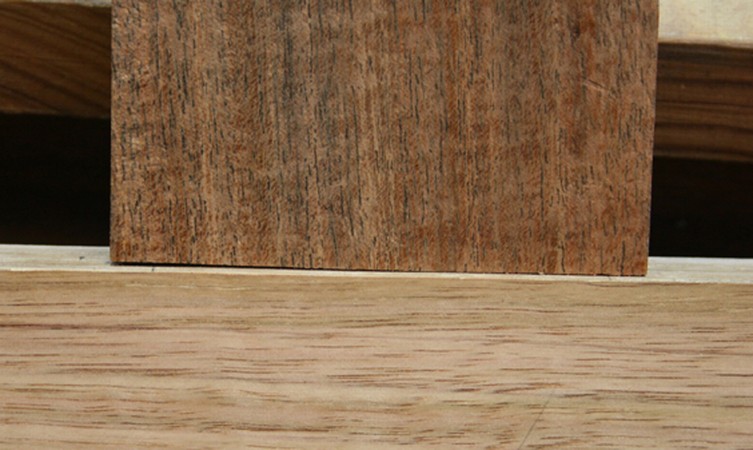
Clean up the ends with a chisel.
And here is the result. On the left is the reference face (which is as good as before). And on the right is the back side (which is now perfect).

Summing Up
The Veritas Small Shoulder Plane is a beautifully made tool. In fact it is one of the most physically attractive shoulder planes I have seen. It works as well as it looks. For small shoulders and fine detail, it is the plane size I find easiest to use. Overall, the Veritas Small Shoulder Plane is very hard to fault in any department.
Regards from Perth
Derek Cohen
April 2010