Back
to Building Furniture
Glueing Up
I
thought at first when I posted this on the forums that it may be a
little simplistic for some. However it created a large amount of
discussion, with differing opinions as to better methods and the
dos-and-don’ts of glueing up. This is one of those topics that
most avoid, or pretend does not exist, and certainly feel insecure
avoid .. often fearing that they are doing something wrong. I decided
to address this.
There
were many really useful pieces of advice that followed from various
forum members, which I shall include later. What I do want to stress
is that the method here worked well for me in the context of glueing
up a dovetailed carcase.
The results of this glue up have been good. However this does not
constitute a blanket defence for the method. Far from it. I have
incorporated the advice offered and shall be using this in the
future.
It
occurred to me to keep a record of glueing up the two Military
cabinets. In part, I always look for feedback to improve methods. And
in part, it may help someone what to do - or what not to do!
 -
as glueing together dovetailed cabinets can be a little unnerving.
-
as glueing together dovetailed cabinets can be a little unnerving.
I left off last weekend at this stage - a dry fit of the two
cabinets ...

Here
I present the right hand cabinet, which will have three drawers and
three shelves ...

Glue?
I am using Titebond III. It has about 15 minutes of open time, and is
required to be clamped for 30 minutes for the initial bond.
The
internal "seen" surfaces (around the shelves) have been
scraped. All other internal surfaces are planes flat and smoothed but
scratches and scrapes are left be. They will never be seen.
The
clamps are ready, the glue bottle is clean. I have made up a fresh
bunch of spatulas.
I make glue spatulas from an old, broken,
cheap tape measure ...

I
start with the sides:

I
only add glue to one side, not both. I find it easier to place the
glue on the pin board as there is a wide area, and it can be
plastered on evenly and completely.
First one side
...

Then
the other ...

And
lastly the centre (even if it is end grain) ...

The
clamps do double duty. As the boards warp a little and are no longer
as straight as they were when first built, the clamps pull the join
into alignment. Secondly, by angling the clamps you are able to alter
the pressure on the sides and square up the angle.

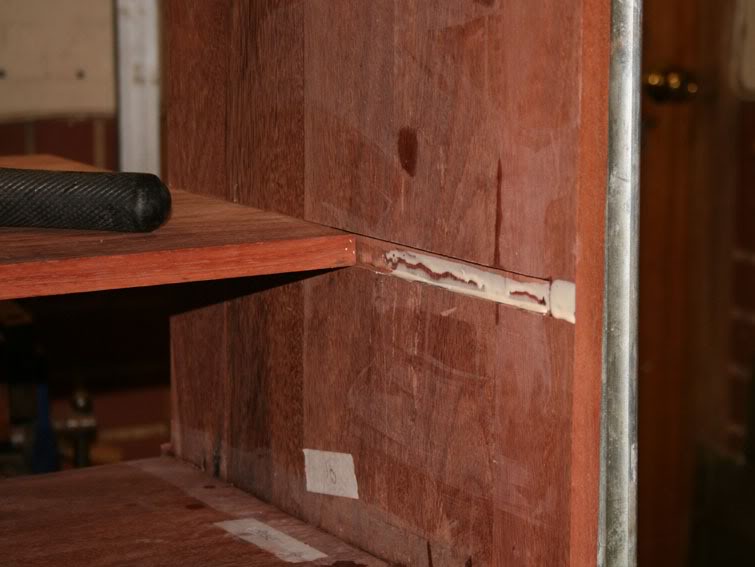
Next
the centre divider is glued in. Glue runs the full length of the
stopped dado, and I add a little more for the undercut edge. I am
never sure whether one should leave an unglued section for expansion
here?

I
clean up with tepid water as I go.
Now the top can be added
...


I
had worked hard on the dados and the runners of the drawer supports
and the shelves to fit well. I did not want to be surprised at this
stage with sticking parts, drying glue, and panic. Happily the
shelves slid in smoothly, the lower one first ...
I
only glued the first quarter of the dado. This would allow the solid
shelves to expand and contract with changes in the weather.
And
– yes, I know – glue on end grain is not recommended.
However I just do it. It makes me feel better.

I
did the same with the drawer supports althogh these will expand
differently, probably hardly at all (as they are all
mortice-and-tenon joints).

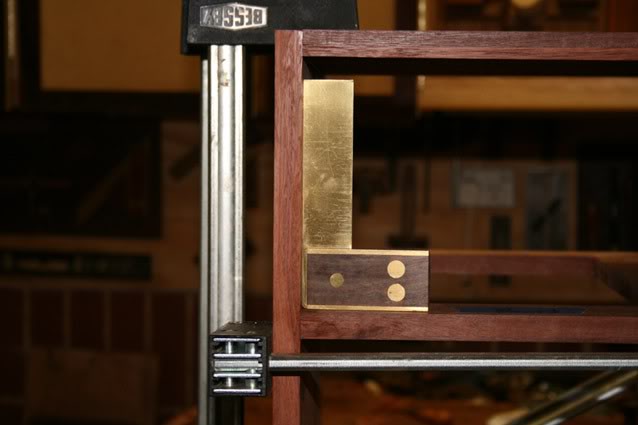
Clamps
ensure that there are no gaps at the front ...

And
then diagonal braces are used to fine tune the squareness
...

That
came out just fine:
Forum Feedback
There were some that agrees with the methods above …
I agree that putting glue to one side of a piece is
good enough; I never have had a glue joint failure as a result of not
putting glue to two mating sides or faces, provided enough glue is
put on the first side. Dovetail joints are inherently strong and
usually lack of glue is not the reason for a joint failure if it does
fail.
… and there were those that had a different view.
I prefer to focus on the latter to gain an alternate perspective …
Hi Bill
Many thanks for your thoughtful reply. You raise many of
the issues that are often in one's mind, and the choices that we have
to consider. I will respond from my experience here, mainly to
clarify what went on in my head and what was unseen in the pictures
(not that cool under pressure as suggested by having time to take all
the photos!).
You are using way to much glue. It takes a film of
glue only two molecules thick to form the bond. Try brushing it on
with a small brush. Before assembly scrap all that extra glue off
with the spreader, or don't put it on to begin with.
Although it looks a lot of glue in the pictures, the
fact is that there was very little squeeze out - the tiniest bead
only. Squeeze out was immediately cleaned up with clean paper towel
soaked in tepid water. I'd rather that there was a little squeeze out
- the merest suggestion thereof - than none as then I am reassured
that I put on enough glue.
For glue to work it has to wet both surfaces. If one
puts it on both surfaces there is no doubt it has wet both surfaces.
I think it a waste of time to glue the end grain.
There are two schools of thought when it comes to one-
versus two sides. I have done both. In this situation, with as many
dovetails to glue, the open time of the glue would effectively have
been halved - that would not have been sufficient (and THEN I really
would have panicked!).
With regard end grain, I do agree with you ..
intellectually. Emotionally it is another thing
 ...
my fear of leaving some join unsupported gets the better of me.
...
my fear of leaving some join unsupported gets the better of me.
If you put glue only on one surface(not recommended)
then put it on the surface where the excess will be pushed to an
outside joint, not an inside corner. In this case glue the tails.
Yes to ensuring that the surfaces coming together do not
created a starved joint. I ensured that the glue was a little thicker
at the top of the pins. Pushing one end over another does not favour
gluing the tails - that does not make sense. I chose the pins because
it is easier to spead glue fully over the surface.
I don't risk a partial case glue up and I have never
seen a professional shop that does either. Somewhere down the road
you will get one of these joints off a bit and not know it till the
rest of the parts get added. Glue gets applied one joint at a time
and that joint assembled until the whole of the case is done.
I think that if I did this more frequently (2 or 3 large
projects a year is my quota, with a dozen small ones thrown in that
do not require this kind of pressure), then I would be more efficient
and more confident. I have better control working with smaller
sections. I wonder how others feel? In any event, your point about
having a joint move is taken - which is why I am fanatical about
measuring and monitoring the squareness as I go along (you can see
several squares being used in the pictures). As I mentioned, clamps
are used to maintain the angles, not simply to add pressure on a
join.
It is unimaginable that more than 20 min would be
necessary to do the assembly. I do often get help applying glue in a
complicated assembly. I use liquid hide glue for dovetails. It has
slow tack so assembly is aided.
I am in a double-bind with hide glue - I lack experience
in using it, and therefore I avoid it. I recognise the advantages
regarding repairs (as Warren mentioned below). Help? Rufus (the
Golden Retriever) would rather chew any Jarrah than help me. And Aura
(my son's shih tzu cross maltese) just bats her eyes at me, then lies
down to rest) ..

Diagonal clamping is risky. When the case is dry fit
I check for square in the unclamped state. If it is not square then I
fix the issue. If clamps are needed to square a case then spring back
is likely and the result is unsquare.
I will find out whether there was any springback later -
I am in your camp here. I do not rely on these braces to square the
carcase. They were just fine tuning - there was a fraction of a mm
that I wanted to correct. (Edit – there
was no springback when the clamps were removed)
There are two times important to glue. One time
involves how long the joint can be left exposed to air. This time is
typically in the range of 10 min and it of course depends on
temperature and humidity. Glue can be diluted with 5% water to
increase this time. The second time is how long after assembly can
the joint be adjusted. 10-15 min is typical and it depends on
moisture content of wood and variety of glue.
Thanks. Good info.
For reference, it is Winter here and the weather is cool
(18-21 Centigrade/about 65 degrees F).
Thanks again.
Warren wrote: I use hot hide glue
to put together a carcass like this. I don't have a camera, but
probably wouldn't have time to take a picture while gluing. I use a
brush and put a thin coat coat of glue on both pieces. Even though
hide glue doesn't stain like Titebond you really don't want a lot
squeezing out. I often put dividers, shelves and such in after the
carcass is dried; I think this is the traditional method.
I generally refuse restoration work if the piece is
put together with yellow glue. It just is not worth the aggravation
of trying to get the thing apart and cleaning off the old yellow
glue. Nobody wants to repair that class of furniture. And most other
guys with restoration experience use hide glue for new construction
as well.
Derek: Thanks for replying Warren.
See my reply above about the hide glue. I shall be
including it in future pieces. To be fair, however, I have not seen
PVC fail in 20 years. On the other hand I have not thought of my
furniture being used for more than my lifetime - never considered it
good enough that someone else would want to own it, never mind repair
it, in generations to come.
I often put dividers, shelves and such in after the
carcass is dried; I think this is the traditional method.
How do you do that, the dividers I mean?
I was doing a constant dry fit - measuring when
assembled, dissembling to create the dados (for example), assembling
to test the fit, dissembling to tweek ... Not a efficient method I
know, but I really did not want to try and do this work after
the carcase was permanently assembled.
Warren replied: With some designs
internal pieces need to be put in at the time of gluing. However,
with your design everything could be fitted and installed from the
rear after gluing. In restoration work it is nice if pieces (shelves
or runners for example) can be removed from the rear without
disturbing the carcass.
Next up - smoothing the
outside and building the bun feet.
Regards from Perth
Derek
August
2011