Making a Frame and Panel Door
By
Sean Hughto
|
I
don't know if this will be worthwhile to anyone, but as I'm making
some panel doors for a project right now, I thought I'd take some
pictures along the way and share the steps I
happen to use. I'm not by any means suggesting that my way
is the best way. Indeed, I welcome tips or posts about
alternative means to the same or better ends.
I
know these are really basic woodworking skills and that frame and
panel doors are as common as dirt. So I'm not intending to
boast or claim any of what follows is original. The reason I
thought it might be slightly interesting is that I use mostly hand
tools, and intend to show minor details that tend to be left out
(probably because they are too obvious to mention) from most
magazine articles on similar subjects.
Finally,
I will plan on posting a step every day or two as I make the
present door, as opposed to posting one single long description
from start to finish.
So,
on to today's entry:
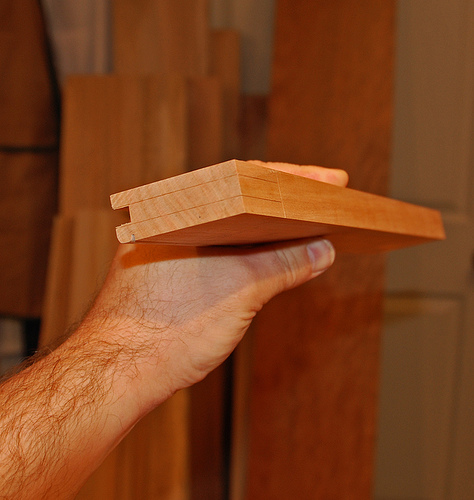
My
present project will need four frame and panel assmeblies (3 for
doors, and one that will be a drawer front). I am beveling
the panel and incorporating a bead into the interior of the
frame. Here is the first one complete (awaiting hardware) to
give you an idea where the following steps are intended to end up:

As
I begin the second door - the subject of this step-by-step - I
first do a mock up right in the carcase opening using whatever
scraps (and blue tape) are handy to arrive at the proportions:

I
find this step very worthwhile as an extra 1/8th inch in width
here or there can change the feel of a door significantly.
The next step, also shown in the above picture is to mill some
stock. Those rails and stiles are the correct width and
thickness, but I leave them over long at this point for several
reasons (horns for mortising; leeway in choosing optimal grain
patterns; the potential ability to recut a tenon if something
really goes wrong, etc.).
Next
I use my plough/grooving plane (mine happens to be a Stanley 248
A) to plough grooves in all the frame members (her the members are
about 3/4 so the groove is 1/4"). Carefully mark the
front
of all members, and reference your fence on the same side of each:

I
run beads, using my 66, full length on the rails:

After
cutting mortises (in whatever way you prefer - pigsticker,
benchtop mortiser, or drill press and chisel) I run a stopped bead
on the stiles. The reason I bother to stop it is that it
makes it easier to mark precisely for the next step (i.e., I can
saw and pare to a knife line rather than to the bottom of the less
precise quirk line):

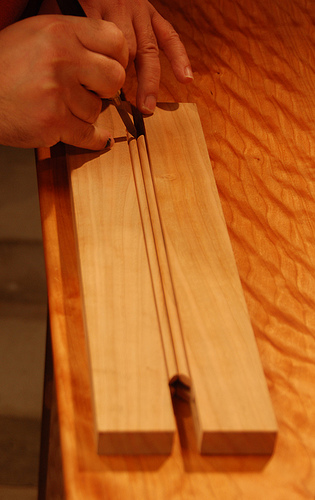
In
order to miter the bead, you need to rip out that bit of the
stile, so I start by using the wheel gauge to mark a line the
width of the bead and quirk around all three sides:

|
Part
2
Okay,
so on to the next installment. In the last episode, I had
marked the bit to be ripped from the stiles to account for the bead.
Here is the saw cut.

I
deliberately saw very slightly wide of the mark, not because I can't
saw straight or to a line, but because the cosmetic perfection of
this join is so important and paring to the line is quick and easy,
that this works out better.
Here
is the quick paring operation:

Now
it's time for that miter. I made this simple jig to register my
chisel back on. It allows for precise placement, when you clamp
the jig and frame embers in a bench or tail vise, and a very accurate
45:

Here
it is in use:

We
have now completed the mortise half:

Next,
we will cut the tenon. Stay tuned.
|
Mike,
"Ray's
comment/question...The nice thing about the mortise extending all
the way to where the mitered bead goes is for layout and
execution. It removes some niggly measuring issues”.
Quite
so, my miter jig, below, even has a sliding adjustment so that the
square end can be set on the layout line of the mortise, andthe 45
jig will allow one to pare down to end up where he wants to.
I
made my jig not to straddle, so as to be able to miter
broad things like case ends where a drawer divide enters.

Different
strokes for different folks,
Ray
|
Part
3
On
to the tenon. I find this the most challenging part of the
process. The tolerance for a well fit tenon is less than the
thickness of a sheet of paper. While masters and journeymen may
be able to hit such tolerances perfectly off the saw everytime, as
yet, I cannot. What follows therefore, is my method that allows
some forgivenes if you stock, your markings, your mortise, etc. are
not all perfect and predictable in everyway and in every case.
This is not an assemblyline/interchangeable part process, but rather
a "each mating is custom" process. I write for
hobbiests, who want the satisfaction of working by hand without
having to wait until they can saw like a journeymen to hope to
succeed. My eye is to the result - a well fit tenon, gap free
rail/stile intersections, and a flat square door.
To
begin, I mark the shoulder and cheek lines with a wheel gauge.
I intentionally mark the cheeks slightly wide (like the width of a
thick pencil line wide; nothing drastic) so I can sneak up on the
fit:
My
first cuts are the cheeks. I try to saw just to the waste side
of the line:

Here
are the completed rips. Not exactly perfect, but they work.

Next,
as you no doubt knew, are the shoulder cuts. This is a
really make or break line for a pretty joint, so I do not try to
hit it right off the saw, but instead leave the line for paring:

[This
particular cheek cut looks to have been a bit crappier than usual, as
that waste near the groove is on the thick side, but better too much
than too little]
Next I
start to work the thickness of the tenon down to size with lots of
checking the fit in the mortise along the way. Remember too,
that it's not just thickness, but centering, you need to be paying
attention to - that is, the tenon has to fit the mortise, and do so
such that the surfaces of the rails and stiles align. Various
methods and angles of attack can be brought to bear for the intial
thicknessing:


Next,
I simple hold the tenon to its mate (mortise) and mark its
haunches/width and make those simple cuts:

I
then clean up the shoulders. With an incised line, this is not
hard. Either saw close enough, or shave the extra waste until
you see the top half of the line at the edge, your chisel then easily
registers in the line and the thickness being shaved is easily
sliced. [One
note: don't use an overly wide chisel here as it will be much harder
to push and control]

I
cut the miter with the same jig as shown above in the stile
installment. In most cases you will now have to do some
tweaking here and there. What is required varies and really
just amounts to patiently figuring out were slight bits can be
removed for a better fit. Be patient. Sometimes, the
miter needs to be moved back very slightly (easy to shave with the
jig); sometimes the tenon needs to be tweaked. One thing I use
when tweaking the tenons is the old standby of marking the high
spots:

That's
just pencil scribbled on a cheek offcut.
Here's
where I end up:

And
the mates:

|
Charles
Stanford wrote:
Here's
my contribution - As part of an in-house 'training
session/challenge' I four-squared stock, smoothed the
workpieces, ripped and crossscut, laid out the joinery, ran the
grooves, shaped the thumbnail with a C&W #12 (I think) hollow,
mitered and coped the joint, chopped the mortise, and sawed out
the tenon all in 22 minutes 18 seconds (not necessarily in this
order). It's just Poplar and the workpieces are not perfect
but the 'staff', as it were were, were suitably impressed and
shocked that the old man could work up such a head of steam in
between his ranting and raving, making lunch reservations, and the
now practically infamous 'glass of wine or two' and not
completely botch the whole operation.
Sorry
for the photography, what you are seeing represents my maiden
voyage with a digital camera and as art goes is a profound insult
to the Mark Rothko hanging on the wall above where the photographs
were taken in my home.


|
Part 4
I couldn't get into the
shop tonight to get my fourth corner pictures, but here is the
progress so far with three done. I make my doors slightly
oversized so they can be planed to fit after glue up/assembly, which
meant here, I could friction fit the dry fit assembly into its
carcase opening.

|
(Replying
to a forum comment …) Mel/Cosman's suggestion about the
router plane to size the tenons is a good one, for example. For
tenons small enough to allow a large router plane to register on
the rail or stile face, I agree whole heartedly with Mel that it
is great to have the plane automatically jigging the paring of the
tenon cheek perfectly parallel with the member face.
Hi
Sean
Agree.
Although this is a time-honoured method, I suspect that few use
it, preferring instead to use a #140 (skew block plane) or a
shoulder plane. I guess it comes down to how well you saw! :)

There
is an interesting (parallel) thread on Wood Central on sawing
tenons.
Mike Wenzloff supplied an interesting link to a video of George
Huron,
in which he first split the waste away (rather than sawing it),
and then used a router plane to tweek the faces.
Regards
from Perth
Derek
|
Part
5
Let's
finish up this frame, eh?
The
fourth corner is a little less forgiving than the other corners
because there is no redo on the shoulders and miters. If those
aren't spot on the door won't be square. Fortunately, the bead
makes getting things sized fairly easy, just match stiles and rails
like this and mark:
I'll
use this instalment to add a few more tips for tenon fitting.
First, sometimes when tweaking the tenon it's hard to know which side
to shave to keep things lined up. Just put the two parts
together on a flat surface and you should be able to see better where
shaving is required:

Also,
I used this fourth corner as an opportunity to try out the router
plane again. It's actually great to use as it keeps you from
accidently putting any slope on the cheek or other uneveness:

However,
the router can be hard to adjust to take really fine cross grain
shavings, so final tweaking might still be better accomplished with a
really sharp chisel paring with the grain.
And
if you really screw up and overshoot, all is not lost by any means.
Take a little more off and get the cheek flat, then glue on a
square of an offcut like this:

You
then get a second chance. The reason to take a little more off
before gluing on the new wood is so you have some meat to work with
as opposed to getting right up to the glue line on the second
attempt.
Of
course the end result should be flat:

and
square.

This
weekend, we make a panel! Woo hooo!!
Part
5
|
Let's
make a panel. For this project I am not making any sort of
particularly fancy panel. I wanted it raised and beveled,
but without a rabbet at the field boundary. There are no
doubt hundreds of ways to remove the wood to arrive at this.
I'm going to use a router plane for the tongue work and various
bench, and maybe a block, for most of the bevel work.
But
before we get to that, I need to do some measuring and marking.
As I promised at the start of this thread, I'm going to show
details here that I suspect most of you will find obvious, but
I'll include for the sake of completeness and in case someone has
better ways to do these elementary things.
I
first choose my board and get it to thickness. Here I try to
get it the same thickness as my frame (roughly 3/4").
Panels are often figured woods, and tear out can rear it's head,
which means you may end up compelled to stop short of perfect
thickness to avoid risking tearout on the next strokes, or having
to go past perfect thickness to remove tearout from the previous
strokes. My point is that in marking, you cannot assume that
if you mark tongues from both edges as though the peanl is
precisely as thick as the frames, you will end up with good marks
(e.g., if the board is too thin, the tongue would be too thin as
well, and vice versa).
After
you've got the peanl cleaned up thickness and surface-wise,
you need to cut it to size. I like to take my measurements
right from the completed frame using a scrap as a little story
stick:

I
cut only 1/16th less the marked height as the panel will not move
in this dimension (the leeway is just to allow adjustments in
other directions if required), and, here, roughly 3/16ths off the
width as I'm building in winter, and this piece of cherry is about
9 1/2 inches wide. So now I have a raw panel:

I
need to figure out some details about the thickness and length of
the tongue. So I first assess the depth. There are
lots of ways to measure this. I favor my bras set up bar:

If
you don't have those, you might use a caliper

or
a combination square

or
97 other things in your shop including that little story stick to
gauge the depth of the groove. So with that information in
mind, I set my wheel gauge:

and
mark all four edges of the front and back faces. Next,
I need to figure out how deep to go from both sides so as to
arrive at tongue of the correct thickness and also flush with the
front of the frame. So I begin by setting my gauge right
from the front of the frame:

I
mark this on the edges with the gauge registered on the front face
of the panel. I then need to mark the othe side of the
tongue. I use the 1/4" brass bar held to the line I
just mark. I strike a small knife line that I then use to
set my wheel gauge:

I
also set the wheel gauge and mark the top of the bevels (boarders
of the field) at this point too:

So
now that the thing is marked, in tomorrow's instalment, we'll
remove some wood!
|
|
|
Part
6
Alrighty
then, time to bring this sucker in. I was about to remove some
wood from the panel, having marked it out.
I
start with the tongues. There are score of ways to make the
rabbets necessary to form the tongues with TS, 'lectric router, new
LV skew rabbets, etc., But I take the slow train and use a
router plane. I don't own the new skew rabbets, and a 78
or a 10 are not exactly ideal for cross grain work.
I
set the fence and go to workm starting with the cross grain
sides on the back:

Every
stoke and first and then every few, especially on the cross grain, I
run my wheel gauge to act as a nicker:

This
limits breakout. I work down to my gauged lines all around.

The
router is nice because you can change the fence to either side to
work with the grain on the long grain edges. I do the
same on the front, but as I approach the gauge line, I frequently
stop to test fit with an offcut (or with an actual frame member):

As
I'm not doing more to the back, I clean it up with a smoother one
last time:

and
then test fit the tongued panel in the frame:

You
want a little gap to allow for expansion. If you didn't measure
well, now is the time to adjust those rabbets (a 98 and 99
would be good for this). These here worked out.
So
time to make some bevels. This part is more an art than a
science, I think. Luckily, unlike a joint, they don't have to
meet any tight tolerance, they just have to look attractive. So
really it's just a metter of slicing and planing the wood on a line
between the base of your tongues and the line you scribed before.
I use whatever works and will change midstream if something is
tearing out or otherwise not delivering. The stable includes
most every edge in your shop from chisels and drawknives, to bench,
block and shoulder planes. The BU jack and rabbet block come in
handy on the cross grain parts:

Often
I start the hogging with a shave:

Large
shoulder planes provide a lot of control, especially near the
intersection between the base of the bevel and the togue:

Often,
the bevel tops can get just slightly muddied by the end. Crisp
them up by smoothing the field:

I
put BLO on the panel both because I like to see the grain
pop and to repel any stray glue from the tenons that might get into
the groove during glue up. This bevelled filed version of the
panel is subtle. It provides facets for the light to hit, but
isn't as obvious as when there is a rabbet at the field border:

And
there you have it. Ready for glue.
Thanks
all. It's been a blast. I yield the soap box for the next
woodworker here to take us through something he or she is doing.
Happy
solstice!
Sean Hughto
December 2008
Sean writes as
“Samson” on the Knots forum of FWW magazine.